GUEST POST: Lessons Learned by a Reluctant Owner-Builder
Reading Allison’s recent article about his experience building a green home brought back memories of my own similar experience back in 1999. Like Allison’s home, mine was designed to be high performance, although maybe not so green. (Get more details at the website for this unique home.) Quite a learning experience it was!
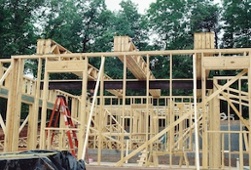
I didn’t intend to build it myself. In fact, I had been warned against such a folly by several brave souls who shared their horror stories. At the time, the building market was so hot that any subcontractor willing to work for a do-it-yourselfer was probably not worth having, or so I was told. And getting a decent rate on construction financing was next to impossible. But when I showed my 100-page spec book to prospective builders, they ran the other way. I was devastated.
Then I got lucky. One of the builders I interviewed (Doug McSpadden) was so impressed by my design specs and determination that he offered to consult on the project, even though he had a couple of million-dollar-plus homes in process at the time. By then it was painfully obvious that I had no choice but to act as general contractor. So with the support of a seasoned builder, I dived in head first.
Our first task was to develop a construction budget. I had gathered plenty of estimates when developing my specifications book, but I was surprised at what I missed. Next, the consultant gave me a Nextel two-way and introduced me to his A-list subcontractors. He asked them to respond to my needs as they would to him. Wow! He even facilitated a low-cost construction-perm loan. It was finally time to break ground!
Throughout the project, the consultant visited the site two or three times weekly. He identified problems and helped keep my eye on supporting the forward schedule instead of getting bogged down with today’s fires. I think what saved me was all the advance planning time I had invested. That, and picking my 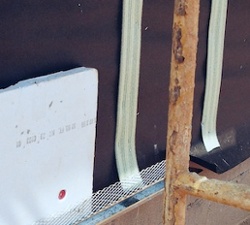 battles. During the construction phase, I tried to identify those things that had the most impact on energy efficiency — framing, air sealing, insulation quality, and HVAC — and made sure we got those right.
For example, my framer had never built a home with the studs 24″ on-center. His endless patience saved what could have been a nightmare scenario. I offered the insulation contractor a 25% premium to properly fit the R-19 batts, and I paid the drywall contractor $900 extra to seal the drywall to exterior walls and adjoining partitions. Worth every penny since this eliminated the need for building wrap, which would have cost substantially more. I did the additional infiltration detailing myself.
Joe and Betsy Lstriburek of Building Science Corporation helped with the envelope design, especially the wall system. At the time, stucco failures loomed large in my area, and I was getting conflicting information on how to steer clear of disaster. So I hired Joe based on his extensive forensics experience with stucco failures. Joe recommended 1.5″ of XPS over 2 plies of #15 felt, applied to the OSB sheathing. I rolled strips of sill-sealer (foam gasket) down the felt-clad walls before installing the XPS to create an air gap in front of the drainage plane. Since the 4-coat stucco system added another inch, I needed a perforated 2.5″ kick-out flashing at the bottom. Finding a source turned out to be quite a challenge.

I’ll never forget the day the man showed up to install the metal lath for the stucco. He looked at my blue-board covered exterior and asked “How the heck do I find the studs?!” Oops. I told him I would figure something out if he would kindly reschedule. With the help of a buddy, I spent a couple of hours each day over the next week perched on scaffolding as we chalk-lined every 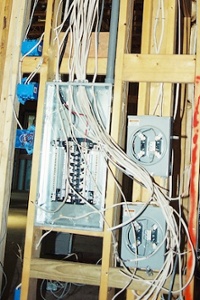 stud and plate. Whew! When the lath man returned, he was speechless — I thought he was going to kiss me! I’ve wondered how others handle this pesky detail. I regret not taking any pictures of this.
The electrical system turned out to be my Achilles’ heel. I decided to wire the house with the help of a friend, a recently laid off electrician from nearby Catawba Nuclear Plant. As it turned out, the electrical layout was the one detail plan I had not prepared in advance. With everything else happening on the job site, I ended up designing the circuits piecemeal every morning over coffee — for six weeks! I failed two electrical inspections before it was over; rather embarrassing for a graduate-degreed electrical engineer. But I got the electrical system I wanted, which was a big deal to me.
In contrast, my HVAC plans were final long before we broke ground. In fact, it wouldn’t be exaggerating to say that HVAC considerations drove the design of the house. The challenge was finding a mechanical contractor willing and able to comply with my specs. Remember, this was 13 years ago. The guy I ultimately hired had a top notch duct fabrication shop and a installation crew, but he was quite adamant that my design wouldn’t work. His initial recommendation was for 3.5 tons up and 1.5 tons down, or roughly 600 square feet per ton. Surprised?
I was adamant that my home would have a single 2-ton heat pump with a zoned duct system. The mechanical contractor retorted, “800 CFM ain’t enough air to blow out a candle in that house.” I made it clear that as long as 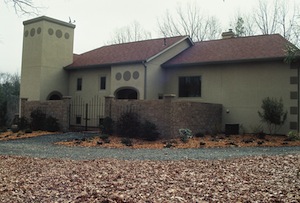 he guaranteed the equipment, I’d worry about the comfort. He made me sign a statement to that effect.
Interior trim was the last big schedule hold-up. Note to self: Next time I build a house, go with locally available trim profiles and forget about stained woodwork. (It was beautiful, though.) We moved in 11 months after breaking ground, only a month behind schedule (although the house wasn’t completely finished until several months later, something Gloria doesn’t let me forget).
The following year, I invited the mechanical contractor to drop by one hot muggy afternoon. I gleefully flaunted the comfort and economy of my little “apartment-sized heat pump” as he called it. I bragged how it could hold indoor design when the outdoor temperature was 4 to 5 degrees above design, an indication my system was oversized by at least 20%. The extra capacity came in handy since we prefer to reduce the bedroom temperature a few degrees at night for comfortable sleeping. And in winter, the additional capacity and relatively tight envelope kept supplemental heat demand to a minimum. Over the seven years we lived in the house, heating and cooling costs only averaged $31 per month!
Admittedly, there’s no way to justify the time I invested by whatever money I may have saved by acting as GC. This was simply something I had to do. But what I did gain was an enormous respect for successful builders, as well as learn many valuable lessons that helped define my professional career in the years since.
by David Butler of Optimal Building Systems in Arizona. David is a frequent commenter (and moderator) in the RESNET BPI group on LinkedIn. I’ve known David since 2009, and I can attest to his expertise in the field of HVAC. When an HVAC question stumps us, we call on David because he’ll most likely know the answer and will explain it in great detail. If you’re a home energy pro, make sure you download and read his paper, The Elephant in the Room.
Photo credits: David Butler
This Post Has 7 Comments
Comments are closed.
Nice read.
Nice read.
What are the climate design temps for that house?
Good work on the drainage plane. That probably adds a fair amount of R value with more air films as well.
David B. These are great
David B. These are great comments. I too have served as (my own) general contractor and it was well worth the effort. I learned a whole new level of respect for all the trades people and for builders that care enough to learn their trade. Builders that know the specs and why they are specified better understand what it takes to acheive them and can better synchronize the entire process.I had a very acomplished father and son framing team nearly come to blows over Ridge and Hip Vent preperation for a 9/12 & 12/12 reverse hip. The son thought they were done with the very difficult deck. That day I was more like a referee.But we got it done and done right.
EXCELLENT ARTICLE! This
EXCELLENT ARTICLE! This should be required reading for rater training. My vote goes to David as the most dedicated person to their craft. I’ll be sending copies to the builders that I work with.
A very honest and detailed
A very honest and detailed look at the very large task of building your own house.
Appreciate all the comments!
Appreciate all the comments!
Christopher: Design temps were 76/93 summer, 70/23 winter. As it turns out, with good RH control and efficient shell, we were able to set active zones to 77 & 69 without being uncomfortable. But we like to reduce bedroom to 73 (summer) and 66 (winter) at night for comfortable sleeping.
The duct system had 3 zones: upstairs, downstairs and master. However, I didn’t set up the controller until several years later (I wrote the software myself). Until then, I managed the basement temperature by partially closing diffusers in winter. I managed the master bedroom temperature with a remote thermostat sensor that I would activate at night. As you know, many pro brands support remote sensors. This is a great option for homes without zone control, especially for folks who turn down the stat at night in summer. I’ve had a remote sensor in my bedroom in every home I’ve lived in for the last 30 years.
Thanks David. <
Thanks David.
Good to see another example that makes the case that aggressive Heating and AC downsizing is the way to get dramatic energy savings.
Good point on the remote sensors. I like to do this as well. The newer stats have the wireless sensors that can be added on for about $30-$60.
Thanks.
David,
David,
Thanks for the insights that building science proves “old wineskins” wrong.