2 Bad Ways to Install Windows the Hard Way
I see a lot of interesting stuff at construction sites and in people’s homes. I also see stuff I never got to see because people send me photos. I like photos! Remember that ice chest someone had incorporated into a duct system? That was sent to me. So are the first two photos below.
The first one is from my friend Kristof Irwin in Austin. He snapped this pic at a home under construction because it so clearly illustrates a lesson that all builders have to learn: how to do things in the right order.
See anything missing there? Oops! They started installing the siding before the windows were in. Even worse, they didn’t leave enough space to install the windows there. I actually got to see this house a few weeks later, and they’d had to go in and cut the siding back around the whole opening to make it work.
They may actually have done a decent job with the flashing details to keep water out, but they sure made things hard for themselves by not installing the windows before the siding.
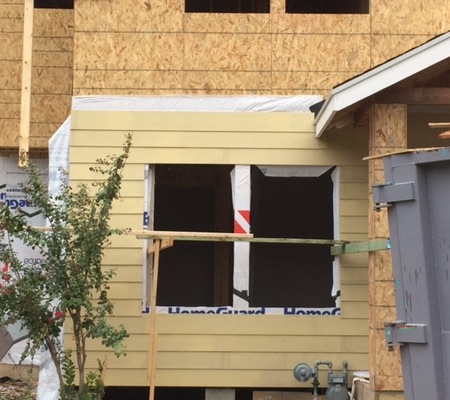
The photo below shows the opposite side of the same problem. Instead of waiting too late to install the windows, they installed them too early. Then someone realized they’d forgotten to install their main liquid water control layer, the drainage plane. (Well, we can hope they didn’t think of the house wrap as a vapor barrier, can’t we?)
So they just ran the house wrap over the windows as if they were doing it normally. I imagine they came back and cut the house wrap around the windows and then taped it all up from the outside.

The problem with just taping it from the outside is that you’re relying on two things: (i) The tape will be installed properly and last a long time, and (ii) no water will get behind the house wrap.
Tape can and does last, when you use the correct type and install it properly. But water has a tendency to get into all kinds of places it shouldn’t oughta go. If you don’t shingle the materials so that they shed water away from materials that are susceptible to moisture damage, you make it more likely that water will get in. Installing the house wrap after the windows means that it’s impossible to shingle it properly.
Here’s what you want your house wrap to do around windows.

Notice that the house wrap comes over the flashing tape at the top of the window. The tape is good, but with the house wrap coming over the top like that, the chances of water getting in are greatly reduced. The Hammer & Hand Best Practices Manual I wrote about recently has great details on how to do this.
One of the biggest lessons I learned when I was building a house was how important it is to do things in the right order. At best, you get lucky and it doesn’t matter. Sometimes, it means extra work but you can still end up where you want to be. Other times, it can spell trouble for the future because of the compromises made.
The builder of the home in that second photo certainly didn’t want to pull all those windows out and then install the house wrap to be able to get the flashing details right. But that’s really the only option there if they want to prevent the future homeowners from having to deal with the moisture problems caused by the mistake.
As painters in the 1930s found out, insulated buildings don’t dry out so well. When water gets in, it stays in and wreaks more mischief. Doing things in the right order and understanding moisture management is not optional anymore.
Allison Bailes of Atlanta, Georgia, is a speaker, writer, building science consultant, and the founder of Energy Vanguard. He has a PhD in physics and writes the Energy Vanguard Blog. He is also writing a book on building science. You can follow him on Twitter at @EnergyVanguard.
Related Articles
The Pen Test — A Control Layers Tool for Architects and Contractors
A Building Enclosure Double Disaster – Control Freaks Missing Again
A Good Window Is Still a Poor Wall
NOTE: Comments are closed.
This Post Has 6 Comments
Comments are closed.
It is amazing the mistakes in
It is amazing the mistakes in home building. I am glad for the 3 party certifications. Thanks for being willing to be a teacher. I noticed that the International Home Builders Convention had some very good hands-on demonstrations at the EXPO. I hope that the demonstrations will continue at the expo this year. We need people like you in the demonstration booths! Thanks for your wonderful e-mails. We were fortunate to find you on the web.
Those 3rd party
Those 3rd party certifications will save you every time. I also like asking friends and family, or requesting referrals from contractors we know and trust. Window installation can be a tricky thing (as is evident by the article), and it’s important to get a contractor who knows what they’re doing!
We’ve been hired many times
We’ve been hired many times to solve the problems these bad installs create. Last time, there were no nails in the window flanges, no flashing tape, and house wrap lapped backwards. OY VEY! Time before that the installers never peeled the flashing tape backer off- they just stapled it in place! And that was under STUCCO!
We have found that a heat gun and roller used on flashing tape makes for EXCELLANT adhesion and is actually necessary during colder weather. We also create a sloped sub-sill with flashing tape and cedar shingles. Lastly, on replacements, we try to use new construction windows instead of replacement style because they can be effectively integrated into the drainage plane.
You should rename this three
You should rename this three bad ways to install a window. The quote “Here’s what you want your house wrap to do around windows” with the following picture is riddled with issues. 1. Using SAM instead of WRB tape to tape the WRB to the post flash on the windows. And doing a poor job of it. And not completely taping the WRB.2. Installing a cap nail right through the most vulnerable corner of the WRB and post flash. Basically poking a hole in your waterproofing right where the water will collect. 3. Not installing head flashing incorporated into the WRB. Or maybe that comes later. And then there is the comment: “Have they not heard about low-pressure foam-in-a-can?” Foam in a can is single component (typically). Which means it cures with moisture in the sir and really should only be installed as a thin bead. It should be installed in the rough opening because the back of the foam exposed to air will cure and skin over. But the foam in the rest of the rough opening won’t cure- because it isn’t exposed to the moisture in the air.
Richard S.
Richard S. I knew someone would nail me over that nail through the tape above the window, but I was in too much of a hurry to search through my photos to find a better one. I just did, though, and I’ve changed the photo.
Martin H.: All good points. As I just said, I knew someone would point out the nail and figured I might also hear something about the less-than-perfect tape job. I’ve changed the photo to a better — but still not perfect — one.
Very nice work Allison I see
Very nice work Allison I see crap like that all the time and who are anthem I try to explain the drainage plane and so forth.
Great article and pictures