How to Install Flex Duct Properly
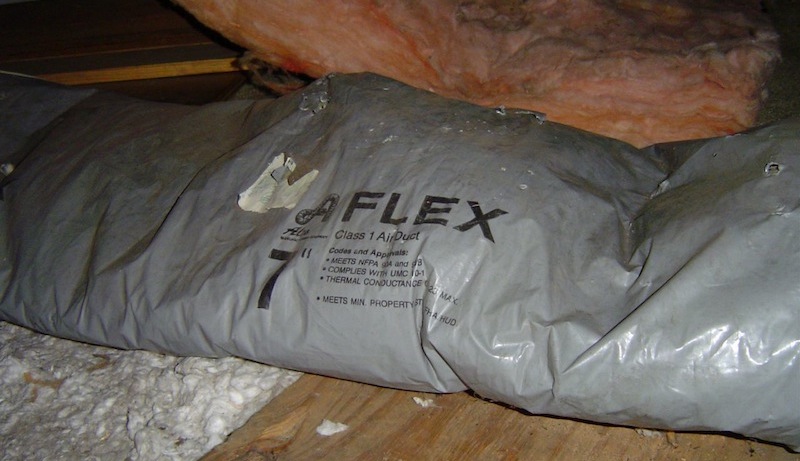
I’ve written a lot about duct problems, especially those in flex duct because they’re so abundant. A couple of years ago, I even wrote an article about whether or not flex duct should be banned. My answer was no but that we need better quality control. When I updated and reposted the article recently at Green Building Advisor, Jack Lagershausen, the executive director of the Air Diffusion Council, sent me a letter.
Unlike a certain, very large company that threatened me a while back, the Air Diffusion Council was smart about it. He admitted that the problems I wrote about are “far too common” and sent me a complimentary copy of their installation guide, Flexible Duct Performance & Installation Standards. Today, with the hope that some readers will act on this information, I’ll give you a bit of an overview of this guide and encourage every HVAC company installing flex duct to invest the $15 and get a copy. Then use it to train your installers.
A few tidbits from the ADC standards
The 25 page guide begins with a description of the classifications and characteristics of flex duct, then discusses how they’re tested, listed, reported, and certified. Chapter 4 is where the meat of the manual is, the installation details, and that’s the part I’ll talk about here.
Basically, what they tell you is not to do all those things I’ve shown here in this blog and how to install flex ducts properly. They also refer to standards from other organizations (ACCA, ASHRAE, ASTM…) because this is an installation guide, not a complete reference work. For duct sizing, they refer you to ACCA’s Manual D, for example.
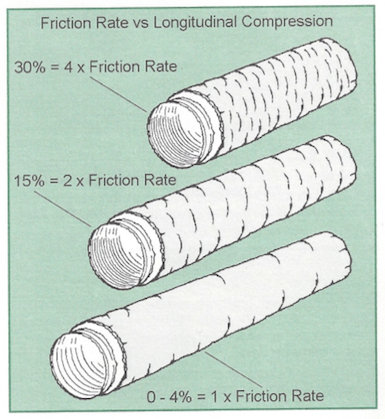
One interesting bit of info that many installers need to understand is that flex ducts need to have the inner liner pulled tight. If it’s not tight, the friction rate jumps significantly, and that means the air flow takes a hit. The diagram below shows that if a flex duct has even 15% longitudinal compression, the friction rate doubles. With 30% longitudinal compression, the friction rate quadruples.
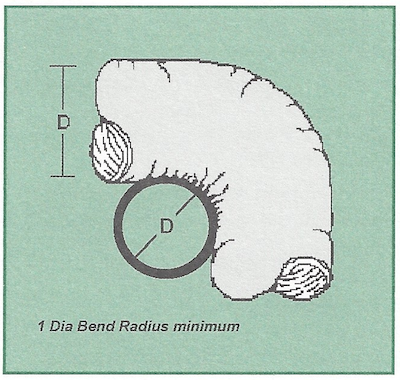
Another problem that I see frequently is bends that are too sharp. The ADC standards say, “Keep bends greater than or equal to one (1) duct diameter bend radius.” The language is a bit clunky, but the diagram below shows what they mean. If you can put an equal size duct inside the turn as shown below, they say you’re OK.
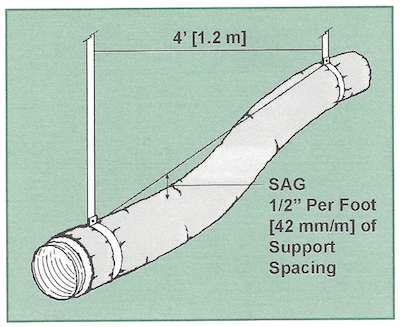
Another biggie that I see all the time is sagging ducts. The official recommendation from the ADC is that flex ducts should sag no more than 1/2″ per foot of length between supports. The supports need to be at the manufacturer’s recommended spacing, but no longer than 4′ maximum. The straps that hold up the flex duct need to be no less than 1.5″ wide.
The ADC standards give a lot of other details about installation, including one of the most important aspects, the connections. The skinny on that is to make sure you get a good, solid connection between the inner liner and the connector, seal it with mastic or tape, and then bring the insulation and outer jacket over the connection and seal it, too.
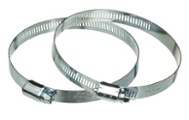 One more little note about those connections: The first method they show is to connect the inner liner mechanically with a metal clamp, the kind shown at right. I’ve never seen one of these in the field, except on a couple of my own installations. They also show how to attach the inner liner with sheet metal screws.
The fastener that’s used most often, plastic zip ties, is only mentioned in the footnotes: “Nonmetallic clamps shall be listed and labeled in accordance with standard UL 181B and marked ‘181B-C’.”
How to get even better performance with flex duct
The ADC standards provide good guidance for duct installers. If someone follows them perfectly and the system is commissioned properly, it should work just fine. The problem, though, is quality control, and one way to help with that is to make it a little harder to do sloppy work. Mike MacFarland, a home performance contractor in California, wrote what may be the best advice ever given in a comment here in the Energy Vanguard Blog:
The trick to getting these installations right is to use rigid ductwork for all “deviations from straight,” then pull the ductwork taut between the two ends which now point towards each other. The big advantage over a full rigid installation is sound control- the installations are quieter than fully rigid ones.
There you have it. Use flex duct for the straight runs and hardpipe everywhere else. If you really can’t bring yourself to buy those sheet metal elbows, at least follow the Air Diffusion Council standards.
A word about cost
The main reason we see so many bad installations is expense. It costs more use the right methods. It costs more to train employees to do it right. It costs more to use materials that are harder to mess up. It costs more to do proper design and commissioning.
The truth is that there are costs associated with doing it wrong, too. It’s just that the homeowner usually bears those costs. My friend Robert Bean just posted an article about the cost of HVAC systems, which he prefers to call indoor climate systems. The chart below is from that article and gives you a feel for how much bang you’re getting for your buck. Of course, Robert’s Canadian, so you’ll have to convert using the current exchange rate if you’re here in the US. ;~)

You really should go read his article because Mr. Bean is one of the most knowledgeable HVAC guys around. Check out the rest of his website, too. There’s a wealth of information there.
The bottom line in all this is that you get what you pay for.
Related Articles
Should Flex Duct Be Banned by Green Building Programs?
Keep Your Elbow Rigid — A Lesson in Flex Duct Installation
Don’t Kill Your Air Flow with This Flex Duct Disease
This Post Has 15 Comments
Comments are closed.
Well, this is quite useful to
Well, this is quite useful to me, because the old Kraken in my attic desperately needs all of his tentacles replaced. Only the Kraken himself isn’t going away any time soon.
Oh, and you slipped in “Mr. Bean” on purpose, didn’t you? 😀
Thanks, Allison!
– John
A few comments: <
A few comments:
1)Mike McFarland is absolutely right, whether you intend to do a turn in the flexduct in the manner ideally described in the manual, it will never turn out that way. Everytime you have to do from a straight bend of over 20 degrees, use a metal elbow. You can’t do both streach out the ducts and get good radius bends at the same time.
2) If the ducts run through the attic DON’T HANG THEM They need to lay on the ceiling joist or bottom cord, streached out and insulation heaped over them. Remember they really should have more insulation than the ceiling.
3) Don’t use temporary tape (also called duct tape) to connect the flex duct inner liner to the metal takeoff, elbow, or register boot.
4) Use mastic at every joint, metal to metal and metal to plastic.
John Poole
John Poole: Well…well…he IS Mr. Bean. ;~) Now did you finish applying the Canadian-to-US exchange rate to his table?
John Proctor: Great advice. There’s one caveat to your attic suggestion, however. Heaping insulation over the ducts is fine in dry climates but can cause condensation on the duct insulation jacket in humid climates. The DOE’s Building America program recommends BEDs — buried, encapsulated ducts. By spraying closed cell foam on the ducts before burying them in attic insulation, you prevent the condensation problem.
Great post Alison! While we
Great post Alison! While we prefer sheet metal, especially for trunk lines, large duct systems can be exorbitantly expensive if done in all metal. There are times where flex duct (or sections of it) can help to reduce costs. In our retrofit work, we’d rather see a customer with a well design and installed duct system where flex is used appropriately, then have the homeowner keep a poorly designed and installed duct system because they can’t afford the cost to replace it with sheet metal.
The “zip ties” you referred to work very well IF they are tightened behind the first rib of the duct (with mastic applied to the sheet metal connection). Hand tightening of nylon ties won’t do the job. The only way to secure them consistently is to use a tensioning tool. These use a ratcheting mechanism to fully tighten the tie, and then cut it flush. No slipping – ever. They are required tools for all of our installers (required to have them AND to use them).
As long as flex duct is sized right (Manual D and a flex duct calculator), and installed right – less than 1/2″ sag, long radius bends (if any), and tight, sealed connections – it can work well.
I salute you sir,
I salute you sir,
Over the years, I have seen remarkable things on construction sites…major load carrying wood beams cut nearly in half to accommodate ductwork and my favorite…the ductwork seems to be the easiest place to throw trash, construction waste and even concrete.
If you are a brave soul, if you ever get the chance, use one of the television camera snakes to explore what is in the ductwork of many homes and commercial buildings.
As was once said: “We have met the enemy and they is us!”
living in a hot humid climate
living in a hot humid climate, I see the issues caused by lying duct on insulation on attic floor.
hanging flex with mininum sag with 3″ duct wrap is easier said than done. I’ve always watched closely the guys who do it well and learned from them.
always -2 people to run flex. just to open the bag of flex & streach the inner liner is impossible for 1 person to do alone.
always- mastic.paint on mastic or mastic tape.
always -3″ duct strap..wider width trumps narrow width and when properly suspended
the 3″ will not cause the duct to compress reducing air flow.
always- 90 degree ells at supply boxes.
always- test duct for air leakage. always.
having killed the kracken & replaced it with ductwork that both performs & moves proper cfm of air, takes time, experience & the want to do it right.
most hvac companies have low man on the job installing ductwork. no room in the bid for the time to do it right.
I stumbled into ductwork repair/change out,by testing before and after ducts were sealed by hvac companies. some cases duct leakage & air flow were worse than before the work was done.
so, I learned.
once the homeowner understands that the 30% duct leakage is air they pay to heat and cool that simply isn’t making into the living area..they understand.
next areas to address are oversized supply box pentrations, supply boxes that lift off the attic floor when supply grill is installed, and return air leakage.
if testing of ducts/returns was code this would be a step in the right direction.
as difficult to achieve as getting hvac companies to actually train their workers how to install ducts.
but in that perfect world….duct & return systems would be sealed tightly and the sham of duct cleaning, uv lights,
and air purification systems would die out.
good article.thanks.
Debbie
What is the estimated life of
What is the estimated life of zip ties? I’ve seen several in attics that have broken, due to the heat I assume, so I’m not a fan of them.
Stan – We haven’t seen any
Stan – We haven’t seen any break, but use high quality, heavy duty ties. We are also in the Pacific NW and 1) most of our duct systems are in crawl spaces, not attics, and 2)our temperatures are fairly mild. If you don’t want to use nylon ties, you can use metal clamps. You can even use three sheet metal screws behind the first rib or two of the duct, as long as you use mastic under the duct at the sheet metal connection.
I’ve been told to avoid using
I’ve been told to avoid using metal screws with flex duct because the flex can tear easily once you create a hole. The plastic zip ties zipped tight with the tensioner seems like the way to go.
When the latest (3rd) edition
When the latest (3rd) edition of Manual D was in development, there was a lot of discussion about friction rates of poorly installed flex. Texas A&M;, having studied this, provided data from its research for inclusion in the manual, the idea being to give designers an idea of real-world friction rates, and hopefully persuade diligent contractors to follow recommended installation practice.
I should point out that the ADC lobbied heavily to keep this data out of the book, but in the end, the data was included as Appendix 17.
Adam G.:
Adam G.: Yes, if you’re using zip ties, you absolutely have to have the tensioning tool. Even with pliers, you just can’t get it tight enough.
David R.: Yeah, it’s amazing the kind of stuff that finds its way into ducts. See the photo I recently shared on our Facebook page (facebook.com/energyvanguard). Here’s the photo.
Debbie: Good advice. I agree with you about wider support straps being better. As with most minimum standards, they’re the least you should do. Going above and beyond usually works better.
Stan: Yeah, I think nylon zip ties do have a shorter life in hot attics. I don’t know what their estimated life is, but the first thing to do is try to get ductwork into conditioned space.
Ryan S.: Yeah, I don’t think I’d want to hold flex duct to a connector with those screws either, now that I think of it. Now that I think about it, I don’t think I’ve seen it done in the field, either.
David B.: Thanks for the inside info. It’s nice to know that the data made it into the manual, despite their lobbying against it.
yes, Appendix 17 is for
yes, Appendix 17 is for informational purposes only – to show what happens when it’s done wrong. I also love Table A1-2 that shows how much doors need to be undercut as effective return air paths – it shows how ridiculous the concept can be.
Rob wrote:
Rob wrote:
“yes, Appendix 17 is for informational purposes only – to show what happens when it’s done wrong.”
Several committee members wanted to include some typical friction loss examples in the normative section, but ultimately ADC won that debate.
“I also love Table A1-2 that shows how much doors need to be undercut as effective return air paths – it shows how ridiculous the concept can be.”
That’s Hank’s sense of humor for you. Here’s a link for those who don’t own the book:
Manual D Table A1-2: Minimum Door Cut For Return Air
I’ve found that static and
I’ve found that static and fan watt do not move much when putting in extra metal elbows and such to make the ducts to taut.
May we please have discussion
May we please have discussion of preferred placement of in-attic furnace ducts resting upon and within the floor insulation, as presented here:
http://energyconservationhowto.blogspot.com/search/label/Attic%20HVAC
Good systems have little flow resistance in straight runs. Register resistance always dominates distribution. Keep ducts big for low resistance by using illustrated duct take-offs. Please see the captioned web photo album accessed by link.
https://picasaweb.google.com/108533770292578040917/InAtticFurnaceDucting