Step 1: Prescribe & prepare
Let’s take a look now at the steps to encapsulating a crawl space. Sealing the ground, foundation walls, piers, and vents is not as easy as it may at first seem. Using the correct materials, methods, and tools makes a big difference in the final result. Most of the photos on these pages are from a crawl space in Atlanta that was encapsulated in 2008.
Step 1. Determine if the crawl space can be encapsulated in its current form. If not, either make any changes needed to prepare it for sealing, or do not encapsulate. Encapsulating a crawl space can create new problems if it’s not done correctly, so in some cases, a crawl space should not be encapsulated. Two big issues that must be looked at carefully are bulk water problems and the possibility of backdrafting combustion appliances in the crawl space. Pest control also places some restrictions on the details of encapsulation.
You can still seal a crawl space that has bulk water problems or atmospheric combustion appliances – but only after eliminating the water problem and replacing the atmospheric combustion appliances with sealed combustion or non-combustion (i.e., electric) models. With water problems, most of the time the source is bad drainage outside, so that must be addressed. Sometimes you need to install a perimeter drain and sump pump in the crawl space.
For the best info available on this topic, go to Advanced Energy’s website and download their guidelines, titled “Closed Crawl Spaces: An Introduction for the Southeast.” Crawl space encapsulation is not suitable as a DIY project in most cases, so learn what you can and then call in a professional.
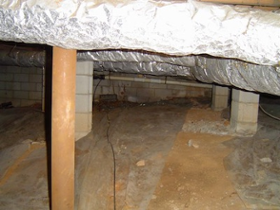
The photo shows the Atlanta crawl space before being encapsulated. This ground had about 75% coverage with a 6 mil polyethylene vapor barrier and was also connected to a mechanical room and finished basement. The homeowners had tried numerous techniques and products to reduce the smells and humidity in the basement, to little effect. They also had very cold floors in winter since there was no insulation in the floor.
The only bulk water problem here was the result of a lazy HVAC contractor who ran the AC condensate line out of the mechanical room and into a corner of the crawl space. The encapsulation company installed a condensate pump and ran the drain all the way outside, which is what the HVAC contractor should have done to begin with. No combustion equipment in the crawl space meant no possibility of backdrafting when the crawl space vents were sealed up.
Step 2. Install a plastic vapor barrier on the foundation walls and ground.
The walls were covered with a transparent plastic, starting about 3 inches from the top and going down to the ground. This plastic is cross laminated polyethylene with
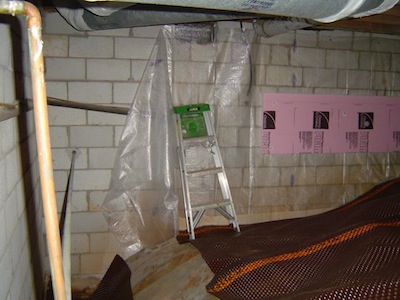
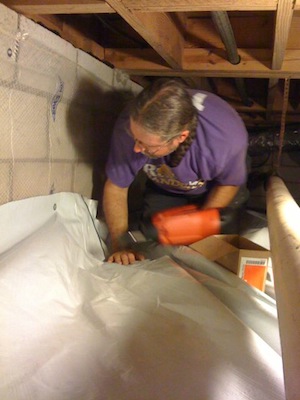
reinforcing scrim and will last much longer than regular plastic (6 mil poly). The plastic is fastened mechanically at the top with a gas actuated Hilti gun, and sealed to the top edge to the foundation wall with an adhesive. (The one piece of foam board you see in the photo at right was installed sooner than usual as part of a demonstration. Usually the wall insulation goes on last.)
Although you can’t see it, the band joist and any other places where wood meets concrete were treated with a borate solution. This protects the wood from termites, powder post beetles, carpenter ants, and wood decaying fungus.
Once those steps are done, the drainage mat is laid on the ground, to protect the plastic
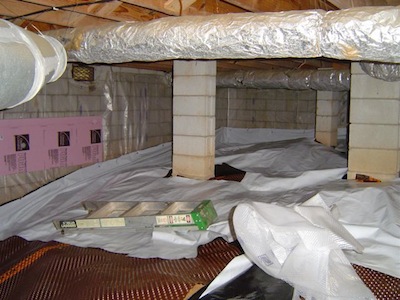
that goes on top of it and also to provide a drainage path if water does get below the plastic. Next the floor plastic goes down over the drainage mat. The photo at left shows the brown drainage mat with floor plastic across the top of part of it.
The floor plastic also is made of cross laminated polyethylene bonded together with a layer of reinforcing scrim embedded in the sheet. It’s thicker than the standard 6 mil poly sheets in most crawl spaces and is virtually impossible to tear. It can get holes poked in it by sharp objects (easily repaired with tape), but it will last a long, long time in a crawl space.
Where separate pieces of plastic meet, they overlap by at least a foot and then are sealed at the seam with a waterproof tape. At the foundation walls, the plastic goes up over the wall plastic and is fastened mechanically (see photo below) and then taped.
Step 3. Insulate the foundation walls and band joist.
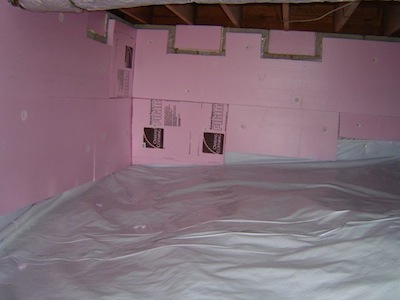
Once all the plastic is fastened and sealed at the foundation walls, the walls were insulated. The installer mechanically attached rigid foamboard with a powder actuated Hilti gun, so it’s there to stay. In this house they used 2″ thick extruded polystyrene (XPS) that yields an R-value of 10. A better foamboard product to use is Thermax, an R-6 per inch polyisocyanurate foam board made by Dow, because it has the fire rating to be left exposed.
Sometimes fiberglass is used on the foundation walls, although it’s not a good choice for this application. The same is true with open-cell spray foam. Even if they’re installed with a layer of plastic on the ground and between the insulation and the wall, water that pools at the base of the wall can wick up into a large section of the insulation, reducing its effectiveness tremendously.
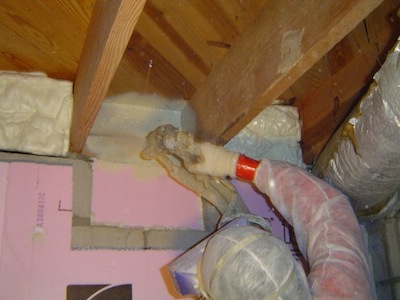
Closed-cell spray polyurethane foam is another good insulation that can be used on the foundation walls. In all cases, the installer should choose the best product for the application. Notice also the two separate pink blocks where the crawl space vents are. Foam board fills the big hole, and then spray foam seals the edges and makes it airtight.
To seal air leaks through the band joist as well as to insulate it, spray foam insulation, (either open-cell or closed-cell) is the best way to go. Here you can also see a close up of one of the vents in the crawl space wall with the foam board plug. Also, notice the strip of unsealed concrete at the top of the foundation wall and around the vents. This may be required in your area for termite inspections.
Step 4. Air-seal and insulate crawl space access doors.
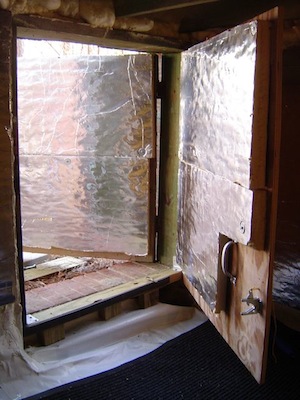
Since a conditioned crawl space needs to sealed away from external environments, we also need to make sure the crawl space door is airtight and insulated. The photo shown here is from a different house since the one above had no access to the outside. Also, this case was a little unusual in that the best solution here was to build a second door inside the crawl space. The foam board insulation you see on both doors here is polyisocyanurate (Thermax from Dow).
Step 5. Condition the air.
Since the crawl space is now isolated from the outside and also inside the building envelope, which defines the boundary between conditioned space and unconditioned spaces, the air must treated in some way. The building code specifies three ways to do this:
- Add a small amount of conditioned air from the heating and cooling system.
- Exhaust a small amount of air from the crawl space to the outside.
- Install a standalone dehumidifier.
The last of those options is the best. Even with a completely sealed crawl space, it can be difficult to get the relative humidity down below 50%, which is ideal. If you rely on the heating and cooling system that serves the house, the thermostat, which is not in the crawl space, may not help the crawl space air when it needs it most. Exhausting air means running a negative pressure in the crawl space, which will pull air in from the house and from the outside, since it can be difficult to seal the crawl space perfectly.
Running a dehumidifier just treats the air in the crawl space and easily gets the humidity
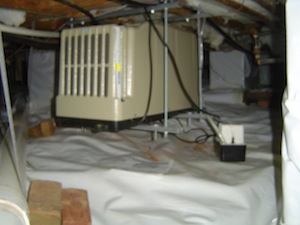
down below 50%. With a built-in dehumidistat, it will run when the crawl space needs it to run. Because it’s turning water vapor into liquid water, there’s got to be a way to drain it to outside. In a crawl space, often that means installing a condensate pump, though it’s also possible to use gravity to drain it into a sump pump, if one has been installed.
The best model available for crawl spaces is the Santa Fe Advance dehumidifier (shown here) made by Thermastor. Smaller, less expensive models will work, but most of them use far more electricity per pint of water removed, so the payback on the more expensive one makes it the best choice overall. It’s also made specifically for crawl spaces.
Conclusion. Once all these steps are completed (and they may not always happen in exactly the order shown here), the crawl space has an entirely different feel to it. It’s no longer the nasty, yucky place it was before the encapsulation. Any contractors or homeowners who have to go into the crawl space after encapsulation are happy to go in because the smells, the bugs, and the general unpleasantness are gone. Better still, the homeowners who live above the crawl space can breathe easier because their air is cleaner. They also have a more comfortable, efficient, and durable house. If you’re still wondering if you should encapsulate, consider these benefits.
Is It Bad When the Air Conditioner Runs A Lot?
I can't tell you how many times I've heard someone complain that their air conditioner runs all the time. Now,…
Allison Bailes is a wonderful teacher who has clearly spent a lot of time developing his teaching methods. He is very knowledgeable on the subject and is friendly and personable.

