The 3 Rules of Air Sealing
It’s not that hard really, at least in principle. You want to reduce the air leakage in your home so you keep the conditioned air inside and the cold air outside this winter. What’s the advice of all those stories that are so plentiful in the media this time of year? Caulk your windows and weatherstrip your doors. Every year it’s the same story. And every year it’s misguided.
If you really want to reduce your air leakage, follow these three rules of air sealing.
Rule #1: Seal the big holes first
To make a big difference in a hurry, find the big holes. Hint: it’s not the windows and doors. Mostly they’re in ceilings below unconditioned attics and floors over unconditioned crawl spaces and basements. Here’s what some look like.
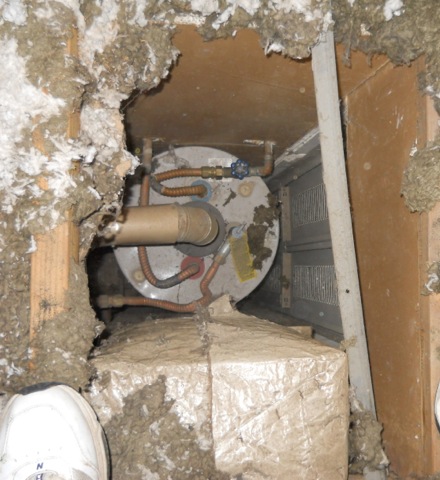
Mechanical chases—or whole rooms in this case—that aren’t sealed at the top. The photo above is from a 40 year old condo with tremendous air leakage.
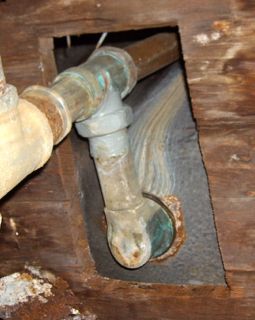
Bathtub drain holes are often the largest holes in a home.
Other big holes include strange things like the refrigerator vent a contractor cut in my inlaws’ ceiling and attic kneewalls with no sheathing on either side, which occurs where bathtubs are next to a kneewall. If your house isn’t completely intact, you can have a lot of air leakage, too. My condo was missing about half of the laundry room ceiling for a while because of a water leak from our neighbors upstairs. When we had it repaired, we dropped the air leakage by nearly 40%.
Rule #2: Seal the medium-sized holes second
Stands to reason, doesn’t it? You want to get the biggest bang for your buck, so go for the holes in order of size.
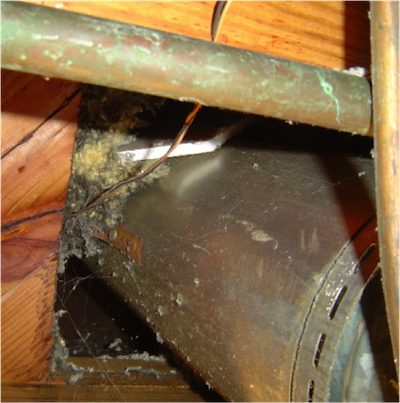
The medium-sized air leakage hole shown here is where a furnace flue goes from the basement through the first floor on its way to the attic. See that fluffy yellow and black stuff? That’s a clue that tells you two things. It’s blown fiberglass insulation. How’d it get there? It fell from the attic, so the hole where the flue goes into the attic isn’t sealed either. Why is part of the insulation black? Because a lot of air has been moving through that hole and carrying dirt with it.
Caution: When sealing around metal flues, do NOT use flammable materials. Fill the big part of the hole with metal or other noncombustible material and use fire-rated caulk for the remainder of the sealing here.
Rule #3: Seal the small holes last
When you’ve done all the big and medium-sized holes you can get to, it’s time to tackle the small holes.
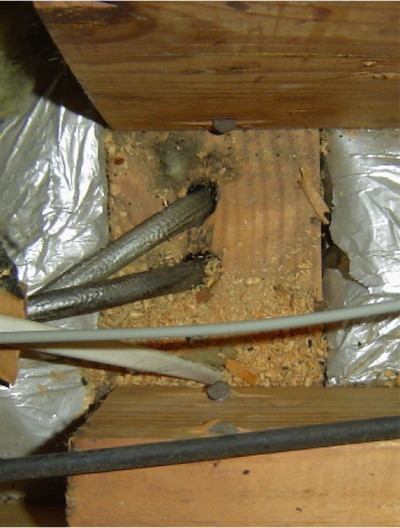
If you live in an older house, you’ll probably find a lot of small holes where electrical wires go from attics, crawl spaces, and basements into the framing, as shown above. Fill those holes with caulk or spray foam. It’s generally not a problem in newer homes because fire codes have required this type of sealing for a while.
Other small holes would include things like gaps and cracks around windows and doors. So that advice that the media like to give this time of year is OK, as long as you’ve already sealed the big and medium-sized holes.
You might still want to hire a home energy pro
If you’re a homeowner who likes DIY projects, you could tackle sealing these holes. Here’s why you might want to hire a home energy pro anyway. They can:
- Measure the initial air leakage with a Blower Door. This tells you what you’re starting point is. It can also find leaks that may have gone unnoticed.
- Find combustion safety issues. If you have combustion appliances, air sealing could result in backdrafting that poisons you and your family with carbon monoxide. Make sure that your home is safe by hiring a pro to test your home for combustion safety. This one shouldn’t be optional.
- Find funky building envelope problems. In some homes, air sealing the holes I’ve discussed in this article may have little to no effect. If your home has hidden connections to unconditioned spaces like garages and basements, those leakage paths may overwhelm your air sealing efforts.
- Measure the final air leakage with a Blower Door. This tells you how much improvement you made.
There’s a lot more to this business of air sealing than caulking your windows and weatherstripping your doors.
Allison Bailes of Atlanta, Georgia, is a speaker, writer, building science consultant, and the founder of Energy Vanguard. He has a PhD in physics and writes the Energy Vanguard Blog. He is also writing a book on building science. You can follow him on Twitter at @EnergyVanguard.
Related Articles
This Hole May Be the Biggest Air Leakage Site in Your Home
Two Open Doors to the Attic – A Building Science Nightmare
Air Barrier Sleuthing – Building Envelope Lessons for DET Verifiers
This Post Has 12 Comments
Comments are closed.
All that air sealing would
All that air sealing would piss my squirrels off something fierce. I’d be looking over my shoulder the rest of my life… 😉
Another good post Allison.
Another good post Allison. You’re right about the priorities in general but access challenges might change your methods.
When I was working in attics with poor access and tight working conditions it was usually more efficient to combine the medium and small hole work, going area by area. Get to the furthest point in the attic, move the insulation and seal all the holes you find. Move closer to the the access point and repeat. Depending on the age and construction of the home the small holes can be so numerous that they become the dominant leakage factor.
This summer I was in a house built in 1960. The electrician had drilled 3 – 4 holes into the top plate of every stud bay in the interior partitions. Very few had wires but they all leaked like crazy. The leakage reduction from sealing those was more than from removing and sealing the 40″ X 40″ whole house fan that had only metal louvers as a seal.
Attics are not fun or easy to work in so try to be as efficient as you can while you are up there.
John P.: I
John P.: I thought you were already having to look over your shoulder for squirrels.
Bill S.: Great point. I was going to mention accessibility but decided to leave it out to keep the article simpler and leave something for our brilliant commenters. I was also going to mention how a lot of little holes can add up to a really big one. Take the gap between top plates and drywall, for example. An eighth of an inch gap that runs 300 hundred feet is a 3 square foot hole. Or your example of all the extra wiring holes. That’s the first time I’ve heard that one!
First rule, when combustion
First rule, when combustion appliances are present, or ventilation in general could be an issue…….Test in, test out!
OOPS! I forgot an important
OOPS! I forgot an important step: PUT THE INSULATION BACK. Then move to the next area. And do it properly.
My theory on the extra holes was that someone had just purchased their first electric drill and was slightly giddy.
I don’t understand the
I don’t understand the bathtub picture. It does not make sense until I look carefully. It is up-side-down picture. Look at the drain leak stain. It suppose to leak down not up!!!
Went up to my attic a couple
Went up to my attic a couple weeks ago to try to tackle those small holes – after already paying a contractor to “air seal” the attic, they sortakinda missed things like the laundry chute open to the attic (aka “large hole”). But 20+” of cellulose actually makes it really hard first to find, and then to clear away enough to fix, those little holes. In the end, I bailed out.
Doing all that air sealing properly before somebody sprays a couple feet of cellulose in the attic would have been a good idea, in retrospect.
Dan O.:
Dan O.: Absolutely! Combustion safety is at the top of the list.
Leighton T.: It’s not actually upside down, but I can see you might think that. The water stains you see, though, are from the overflow up near the top of the tub.
Eric: Yeah, doing things in the proper sequence is important. One of the very first articles I wrote in this blog was Don’t Insulate Your Attic! The point of it was to avoid the problem you’ve had.
Alison,
Alison,
Could you show us HOW to seal some of these holes? The bathtub drainpipe is one of the biggies. I’ve got some Roxul mineral wool that I am going to use to insulate around chimneys, but where there is potential for something to get wet, I just don’t know what material to put there. Thank you for your always informative posts.
Lucy, One good way to seal
Lucy, One good way to seal the large holes under bath tubs is to cut a hole in OSB or plywood then cut it in half. Fit the 2 pieces around the pipe and air seal all of the joints.
I’m not a building/home
I’m not a building/home energy pro but I do use the stuff that is usually uncommon called common sence. Good article by the way this is a keeper for sure! I’ve noticed in rental properties that these are sometimes big issues (Holes of all sizes) I guess mainly it is because the owner does not usually pay the utilities. However this can cost the owner big-time in damages. Even in central Louisiana a home was left over a winter vacant most people seem to move in warm weather, etc. A water heater was not winterized/drained and by next renter was ruined. Moving on also these properties have a lot of little holes due to the “professional” installation guys for sattelite tv/internet/phone/etc. Sometimes cables get yanked out and new holes drilled with no one insulating the old holes in floors and other places including wall recepticles with really nice drafts. Also with older structures usually means poor insulation to begin with not even going to touch the building envelope on this one because it is non-exsistant. However, pull wall/switch/cable plates off and there is many small gaps that lead to a lot of energy loss over the whole structure. Last is under the kitchen or bathroom sinks in houses with custom built into place cabinets. You guessed it around drain pipes. I have found one that had to be at least 12″ x 20″ before! Oh last place is oven/stove top vent flues into attics. I don’t like to even bother with these things anymore and recommend a flueless replacement. Then insulate/fix the now big holes and presto now the overhead cabinet actually can be used for something. Just my experience with mostly older rentals, cause they are buildings too. And if utilities/energy bills are getting into the extremes for a renter they will move as soon as it is warm enough.
Great post and great comments
Great post and great comments. I particularly like Bills addition about small holes and Eric’s relating his experience.
My thought was there might be a # 4. Seal high, then low, then all around. Standard stack effect image helps convey the different value of sealing a the same size hole based upon its location in the envelope/enclosure.