How Airtight Can You Make an Older House?
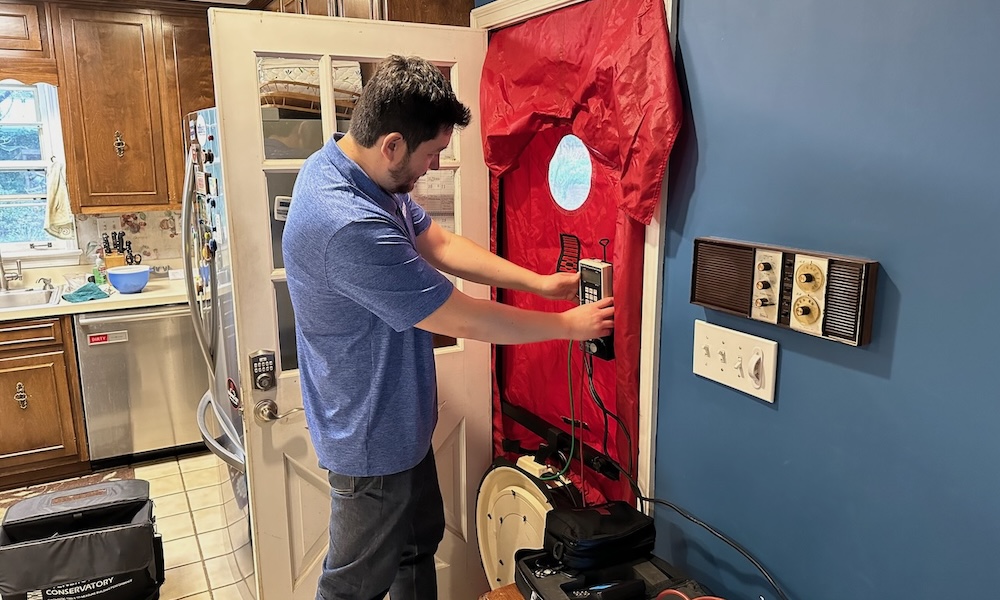
One of the best things you can do to improve your home is to make it more airtight. Yeah, it’s good for energy efficiency, but that shouldn’t be your main motivation. It’s good for indoor air quality. A good air barrier keeps those pollutants from your garage, crawl space, basement, or attic out of the air you breathe. It’s good for comfort. It eliminates the drafts and makes it easier for your heating and cooling system to do its job. And, following up on last week’s article, it’s good for noise reduction.
But how airtight can you make an older house? I’ve got a sampling of results from homes I worked on earlier in my building science career plus a history of the airtightness in my current home.
The difficulties of air sealing an old house
In my home performance contracting days, I did a lot of pre- and post-air sealing blower door tests. For a couple of those years, I also did the air sealing work. The good news is that you can make significant improvement in older houses. Here are a few of the results I got from making homes more airtight:
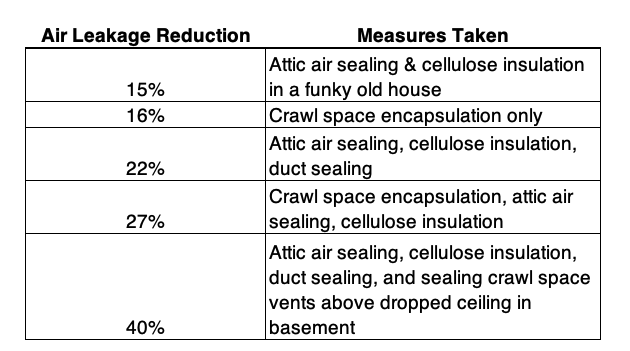
That fourth one had the highest air leakage I’ve ever measured: ~13,000 cubic feet per minute at 50 Pascals (cfm50). I measured that with a single blower door, so I couldn’t get the full 50 Pascals of pressure difference. I was able to get only a measly 15 Pascals, so the 13,000 cfm50 is extrapolated using what’s called a Can’t Reach Fifty (CRF) factor.
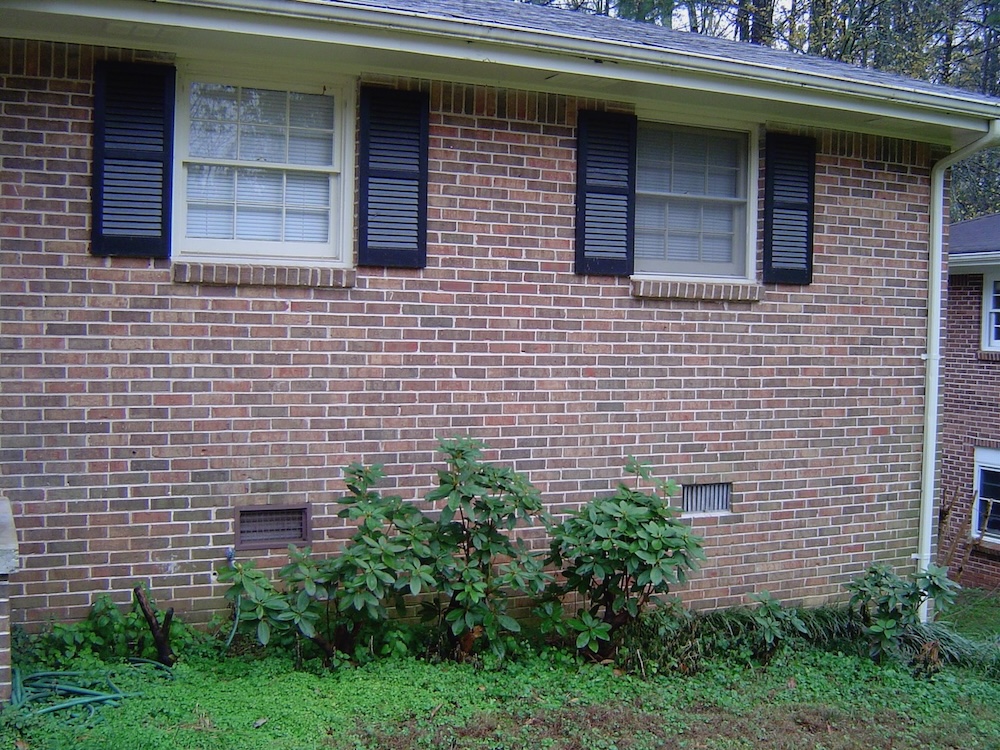
One of the easiest houses to reduce the air leakage in was the last one. That’s it in the photo above. Those two crawl space vents, though, aren’t there to ventilate a crawl space. They’re actually two big air leaks. On the other side of that wall is a finished basement. But no one knew they were air leaks because they were above the dropped ceiling. This being a relatively small house, sealing those two leaks alone probably got at least 15 of the 40 percent improvement.
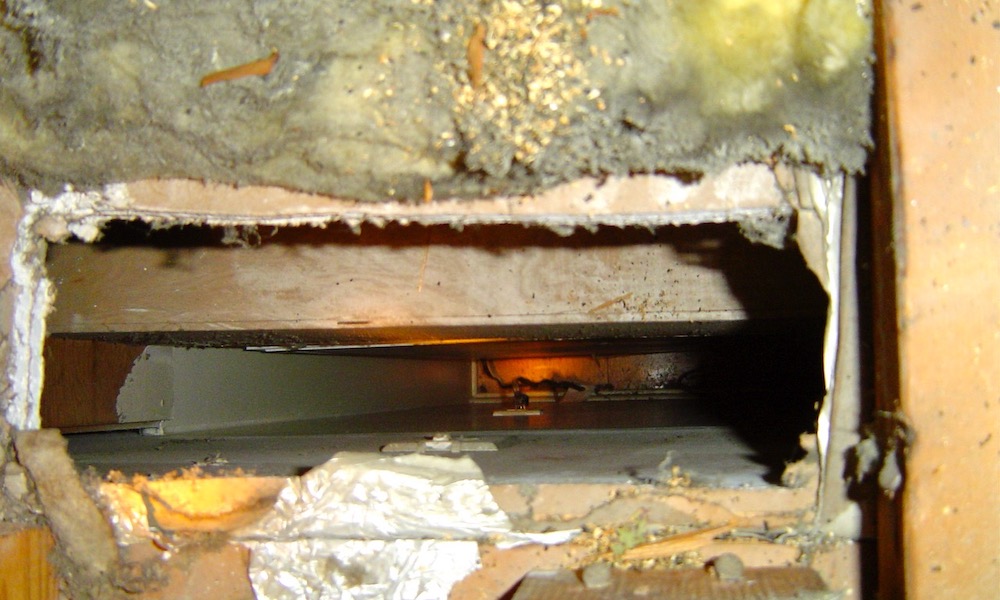
Another fun one that made a big improvement was the refrigerator vent while crawling through an attic. The photo above shows only about half of that hole. The other half was on the other side of the joist. Sealing that one hole up reduced the air leakage by about 10 percent.
So, yeah, it’s certainly possible to make old homes more airtight. But going beyond about 25 percent takes luck, persistence, or making some big changes to the building enclosure. Think gutting a house to the studs. It also takes skill because you have to understand air leakage and the air barrier.
Air barrier improvements in my home
I’ve lived at my house since 2019. Below I’ll show you the results of the blower door tests done on the house since 2012, but first let’s talk about what has happened to the house to improve airtightness. Here’s a table showing how things have changed from 2012 to present:
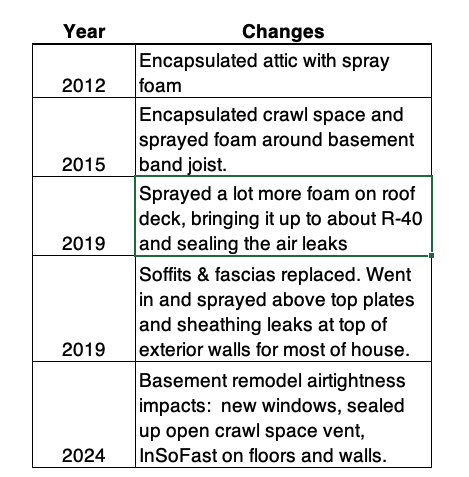
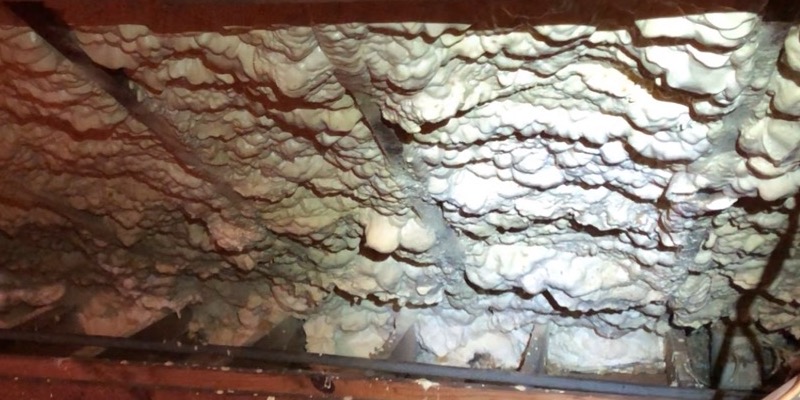
The previous owner (my father-in-law) had the attic encapsulated with spray foam in 2012. It was a pretty bad job, though, as you can see in the photo just below. They didn’t use enough spray foam so it didn’t have nearly the insulation it needed. But it also was quite leaky, as you’ll see in the test results later.
The second improvement in the list above getting the crawl space encapsulated. That must have helped improve the airtightness some, although I don’t have any blower door test results to show the change.
After we bought the house, I had Woodman Insulation come in and add a lot more insulation. They did a great job adding thermal resistance and improving airtightness.
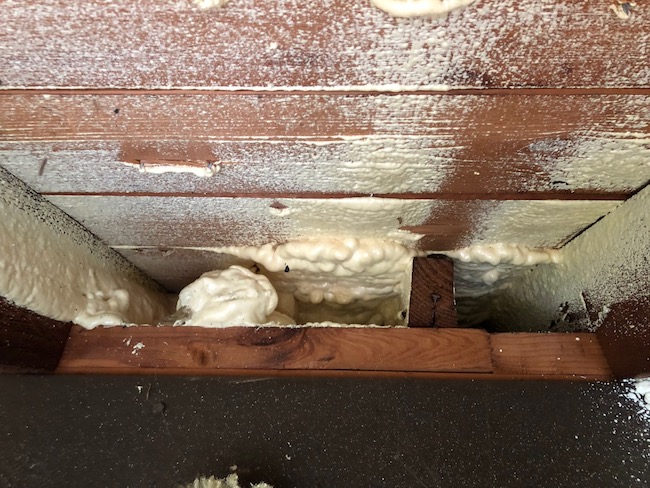
Shortly afterward, we had our soffits and fascias replaced. That led me to an important discovery. A lot of the rafter cavities at the eaves didn’t have much (or any) foam in them, as you can see in the photo below. Read the full article I wrote about that and the followup article on how I fixed it.
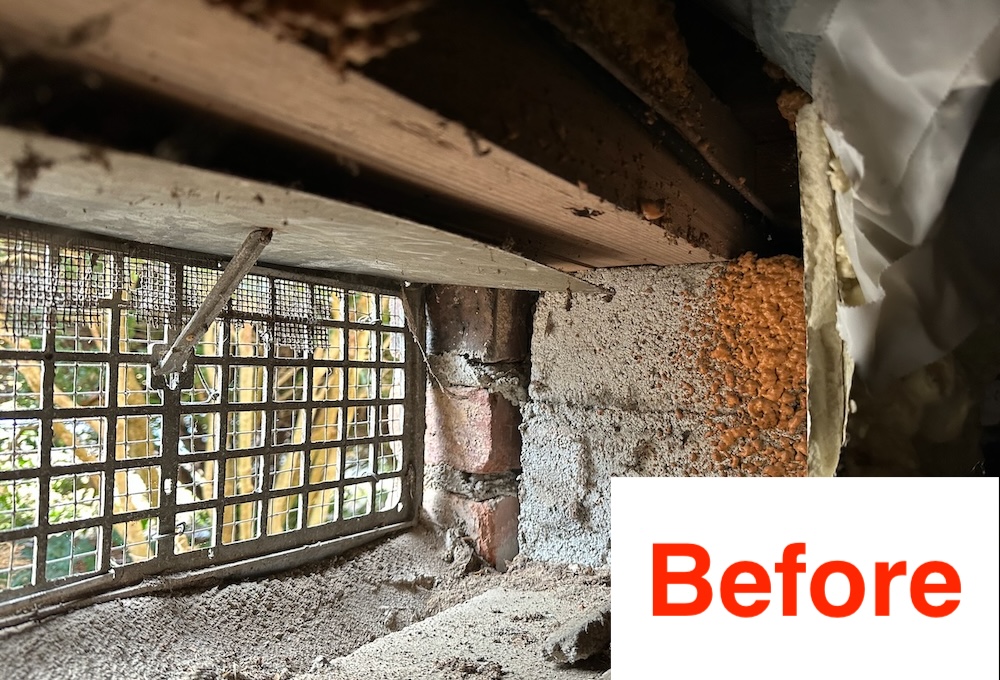
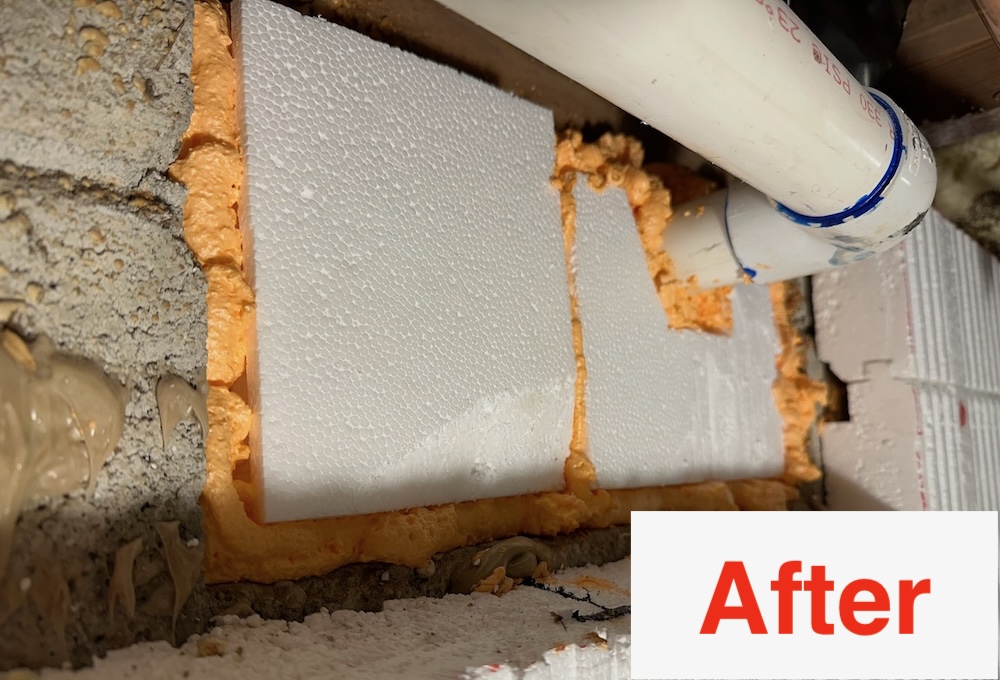
And finally, we started remodeling our basement in February of this year. We’ve done several things that have improved the airtightness, but one of the biggest holes I sealed was just like one I mentioned above. I knew we had three crawl space vents in the basement, but one of them was hidden until after demolition. Here’s what it looked like and how I fixed it.
All these things have made a huge difference in our home’s airtightness.
How much did it help?
The graph below shows how our blower door tests have improved. The columns show the test results before factoring in the size of the house. They’re measured in cfm50, shown on the left vertical axis. The line shows the results normalized to the volume of the house, measured in air changes per hour at 50 Pascals (ACH50) and shown on the right vertical axis.
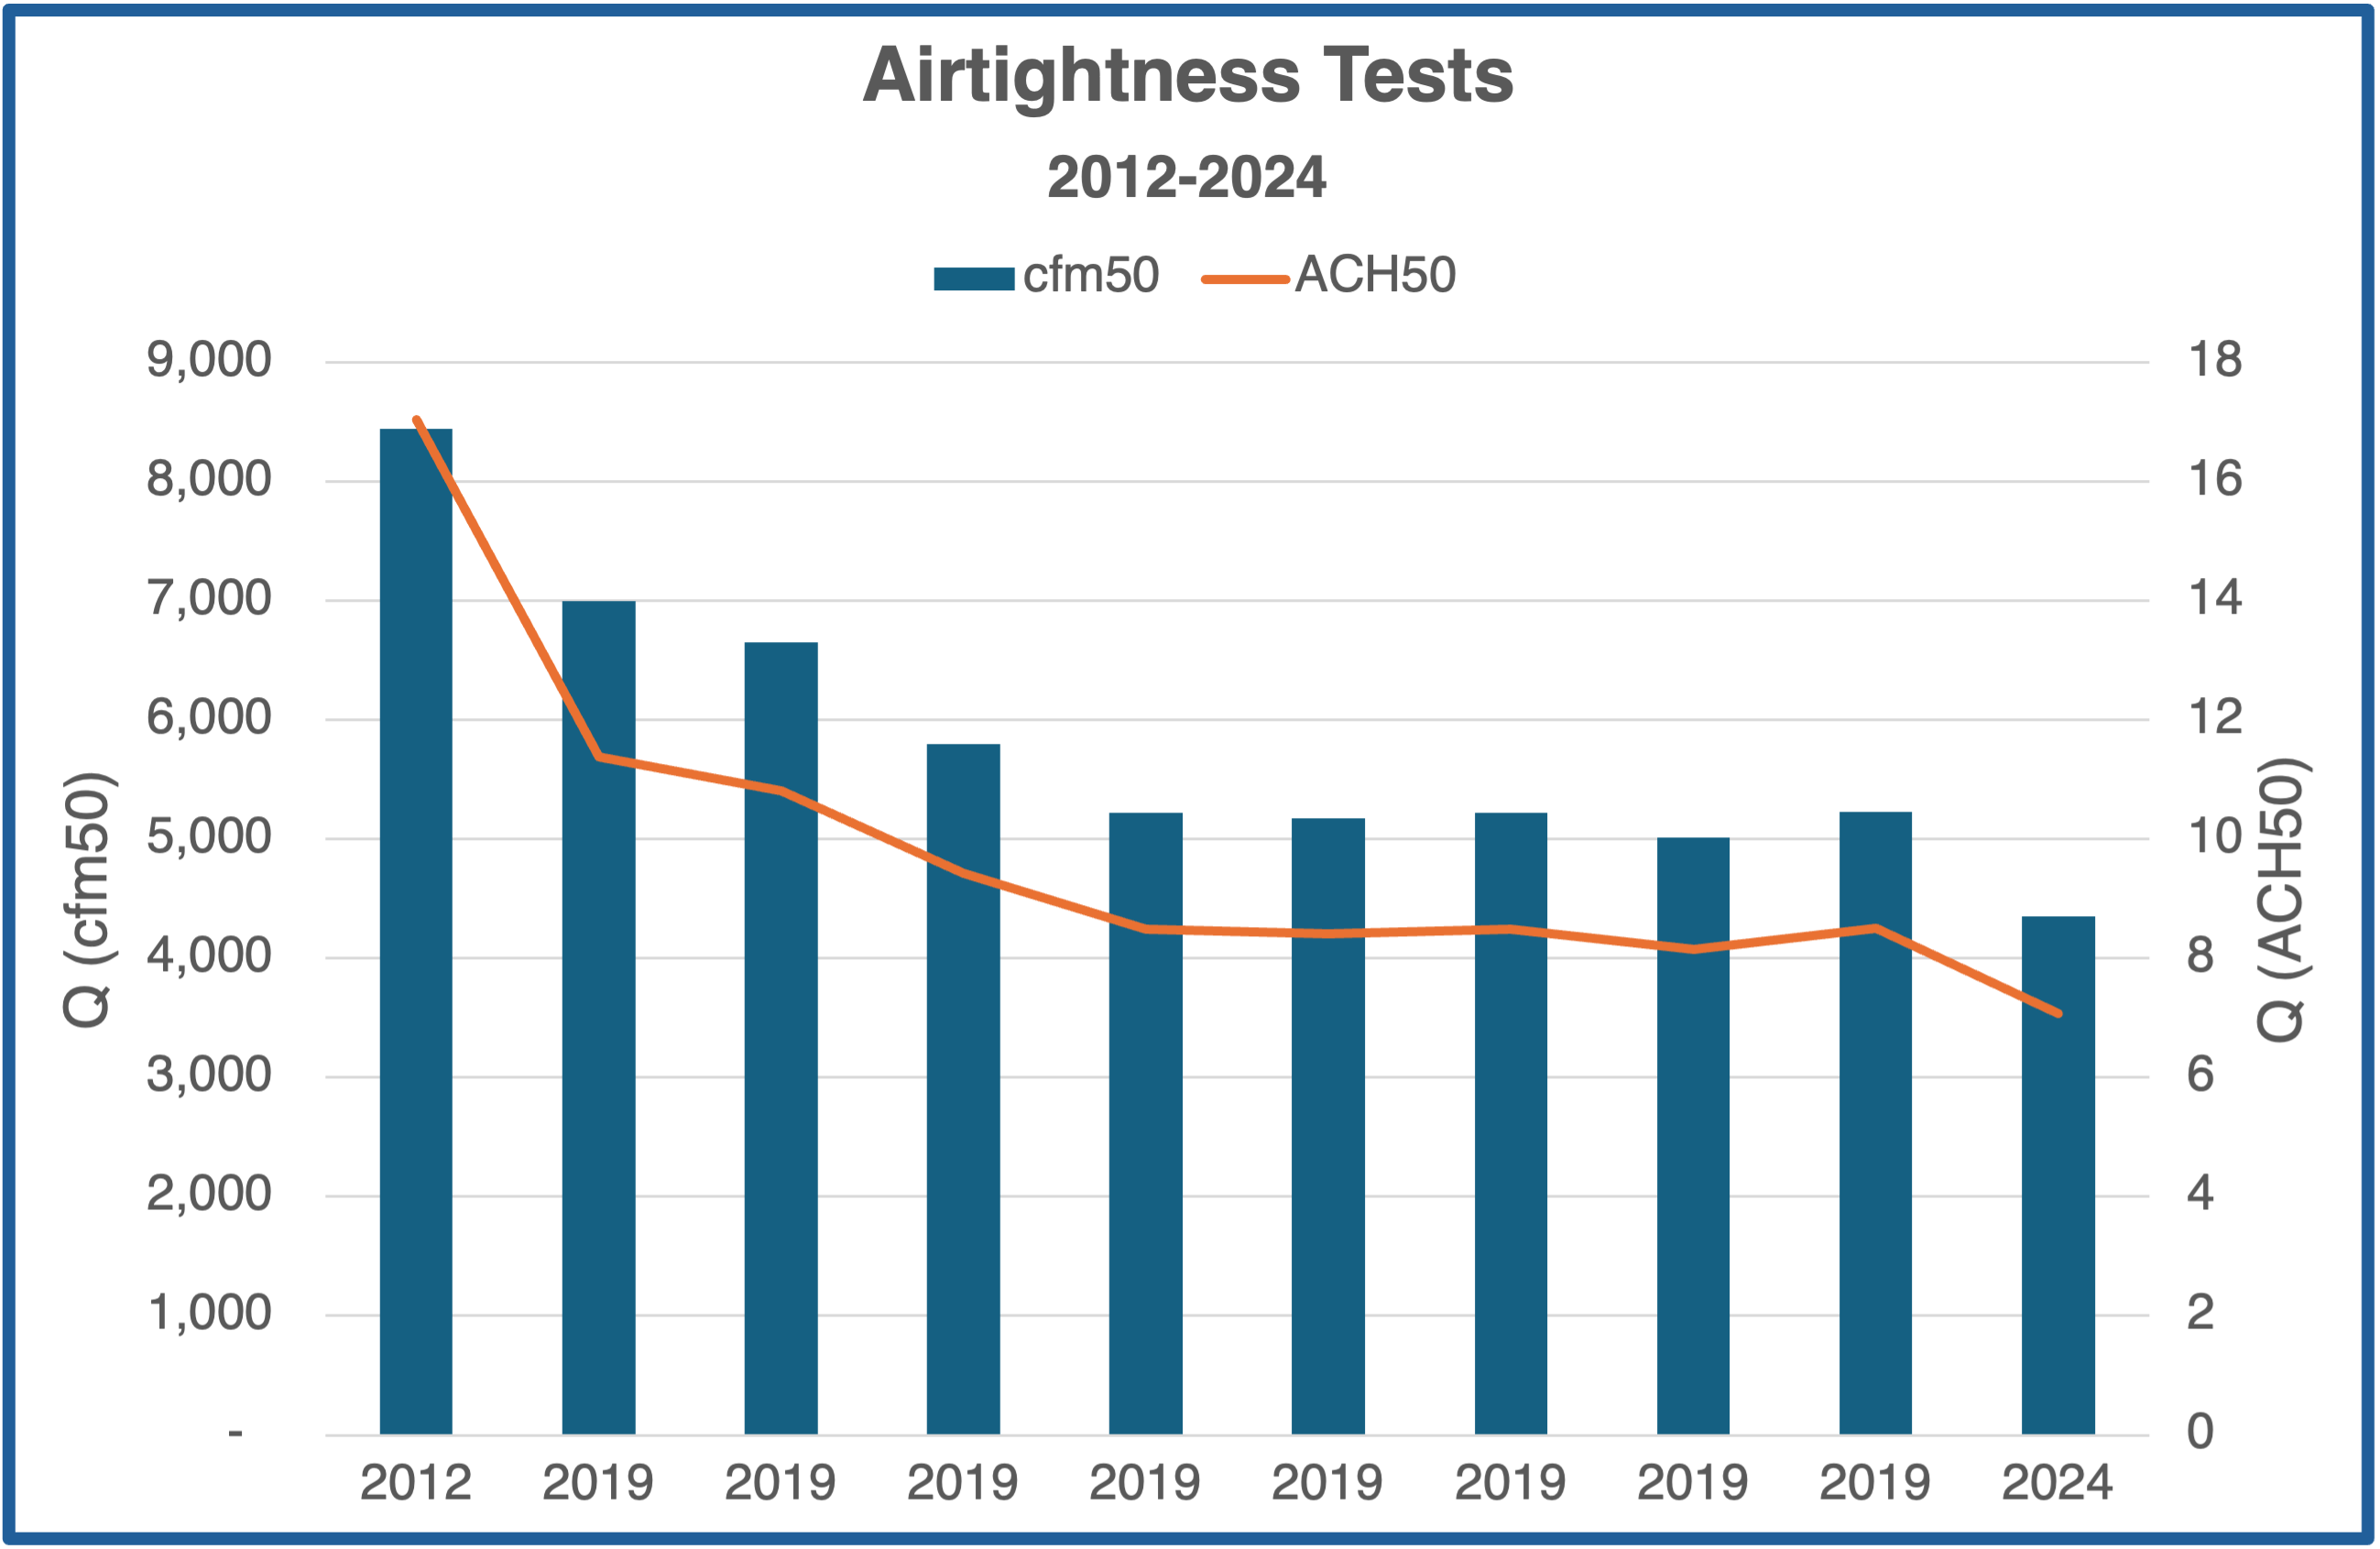
From the first test done before any airtightness improvements to the latest one with the basement partially done, we’ve improved 48 percent in the cfm50 result. The normalized air changes per hour result improved more. Do you know why?
The reason the ACH50 improved more is that encapsulating the attic added volume to the house inside the building enclosure. Encapsulating the crawl space added more volume. The ACH50 is basically just a unit change. You multiply by 60 to change minutes to hours and then divide by the volume to change cubic feet to air changes. When you divide by a bigger volume, you get a smaller ACH50 and hence greater airtightness by that metric.
Using that metric, our airtightness improved 59 percent from 2012 to today. And we’re now down to 7.1 ACH50. That would have almost passed the previous Georgia energy code requirement of less than 7.0 ACH50. The state now requires less than 5.0 ACH50, which I plan to get down to by the time I’m done with this house. That would be a 71 percent improvement overall. I’ve made this house more airtight than the condo I used to live in.
If you work in the field of airtightness, what have you found? If you’ve worked on your own home—or had others do it for you—what results have you achieved?
Allison A. Bailes III, PhD is a speaker, writer, building science consultant, and the founder of Energy Vanguard in Decatur, Georgia. He has a doctorate in physics and is the author of a bestselling book on building science. He also writes the Energy Vanguard Blog. For more updates, you can follow Allison on LinkedIn and subscribe to Energy Vanguard’s weekly newsletter and YouTube channel.
Related Articles
Spray Foam Insulation at the Edge – A Forensic Analysis
How I Achieved a 21% Increase in Airtightness
Do Airtight Houses Need Makeup Air?
Comments are welcome and moderated. Your comment will appear below after approval. To control spam, we close comments after one year.

re: air sealing and make up air for range hood: see the ROCIS Kitchen Range Hood brief, tips, webinars about depressurization problems and makeup air, https://rocis.org/kitchen-range-hoods/
Our 350 cfm range hood was not doing a great job of removing odors in our remodeled home (moderately tight).
Putting baking sheets behind the stove top & oven vent on a peninsula install helped lot, especially when roasting, baking, stir frying. BUT cracking open a nearby window did the trick (even tho my family complained initially about the cold draught).
tom: Do you have a downdraft vent for your range? Those always have more difficulty in capturing stuff coming off the cooktop or out of the oven. They’re often rated at more than 350 cfm, too, because of that difficulty.
Cracking a window open enough to get good draft is what I often recommend. And having a hood over the cooktop/range with a good capture efficiency. More here:
Range Hood Makeup Air: The Basics
https://www.energyvanguard.com/blog/range-hood-makeup-air-the-basics/
no, we have an under cabinet range hood (but no back or side walls). Deep volume (about 7 in?). See webinar slide of side shields in my kitchen
Hi Allison,
The new singles I have been testing lately are typically 1.0-1.5ACH50 or between about 500-700cfm50, which is really good (I’m in Ottawa ON- no ducts in unconditioned space…).
I find it useful when talking to clients that aren’t familiar with blower doors and air-tightness to use the ELA to illustrate the concept. For example, 100in2 is about the size of a piece of paper and that’s a good target (although tough in an old house) if you’re starting with 400in2 of leakage, which is common and more like an open window!
Franklin: Those are good airtightness numbers for new homes. Yeah, effective or equivalent leakage area (different metrics that use the same initials, ELA) are a good to illustrate the total size of the hole in a house. I’ve used a rough estimate of 1 square foot for each 1,000 cfm50 to do that. Using that, the hole in my house currently would be a bit over 4 square feet since my latest blower door number is 4,350 cfm50.
Allison, in the “Air Leakage Reduction/Measures Taken” table you list Cellulose Insulation in four out of the five measures. I am assuming all these are attic floor insulation. Since you also list Attic Air Sealing in each measure that contains cellulose insulation, what does cellulose contribute? We are discussing air sealing only, I do remember your other articles mentioning possible benefits vs. other blown-in types (such as reducing convection within the fluff).
Paul: Yeah, I probably shouldn’t have thrown that in there. I’ve read in something by Bruce Harley that homes with cellulose insulation are more airtight than homes with fiberglass, but that’s probably more for dense-packed walls than for blown cellulose in an attic.
I think a lot depends on how badly leaky the house is initially.
Here’s the results from one of our 2020 MLK houses:
2020 MLK – Energy Upgrades over weekend
Pre Blower Door: 3100 cfm50 Post Blower Door: 2550 cfm50 20% reduction
However, we encountered a very much leakier house in 2014, with a few large openings to the attic:
2014 MLK – Energy Summary (weekend of improvements)
Pre Blower Door: 8000 cfm50 Post Blower Door: 2600 cfm50 67% reduction
I wish we had done a pre- and post- test this January (time got tight).
We found a single hole from an unused 12″x12″ return boot. Sealing this was high bang for the buck!
[Shout outs to Jeffrey Sauls and Allison Bailes for helping out on this house!] -mikeb
Mike: Yeah, I’ll bet we did get quite a bit of improvement on this year’s MLK house. For readers who want to know more about this, see the article I wrote early this year:
Weatherizing an Old House: An MLK Day Service Project
https://www.energyvanguard.com/blog/weatherizing-an-old-house-an-mlk-day-service-project/
I did a series of retrofits with ORNL, 30 homes. The worst one was 22 ACH5O First weatherization got to 14, 2nd to 4. Often big leaks mask little ones, if you want to maximize the result you may need more than one test.
Bruce: An 82 percent reduction is a huge improvement!
oops, here is the ROCIS Kitchen Range hood link with guide, tips, webinars, resources. https://rocis.org/kitchen-range-hoods/.
See the Caveat supplement re: need to check depressurization, provide mechanical make up air, and confirm MA flow rates, pressure levels.
I wonder how much air leakage comes from ventilation devices like attic fans, dryer vents, and range hoods. Our house was designed to be very airtight and we only have one bath fan. The other bath is taken care of by the ERV. However, after moving in, we found that the bath fan didn’t expel the odors well at all. After 30 minutes, the toilet room still smelled. It turns out that the vent duct was installed incorrectly and the back draft damper was not able to open up. So, we could rip out the drywall and redo the duct, or we could take out the backdraft damper. I guess I probably should have had them redo the ductwork. Maybe that will be a future project to improve my house’s air tightness.
Don’t forget outlet boxes and gaps behind molding/trim!
In my experience I’ve found huge drafts coming through the wire penetrations of outlet boxes. The best tip for sealing them is to first upgrade to a good hospital grade outlet (they are specc’d to run cooler at higher overloads), and properly use a torque screwdriver to tighten the wire binding screws (NO push-in terminals). That guarantees the outlets will operate within their UL listed limits. Then I can go on and use a caulk tube with an extended nozzle to pump caulk into the gaps. When the above is done correctly, the maximum temperature the receptacle will reach is guaranteed to be below the maximum service temperature for Big Stretch caulk unless your circuit breakers are bad… if those are bad all bets are off anyways!
The other thing – it seems builders love to cover up shoddy drywall dimensional cuts with trim. I’ve found huge gaps of up to 1″ communicating with unconditioned spaces behind trim. It’s super easy to spot if there are carpets throughout the home, the dust tracking leads you right to it!