The Low Spark of Raised-Heel Trusses
A comfortable, energy efficient home begins with a good building enclosure. That means control layers. You’ve got to control the flows of moisture, air, and heat. Today, let’s talk about controlling heat and further, let’s focus on heat going through the top of the house. If you’ve read my Flat or Lumpy article, you know it’s better to have a uniform coverage of insulation rather than a lot of insulation in some places and little insulation in others. But you may not know about one place where most homes just can’t get enough insulation.
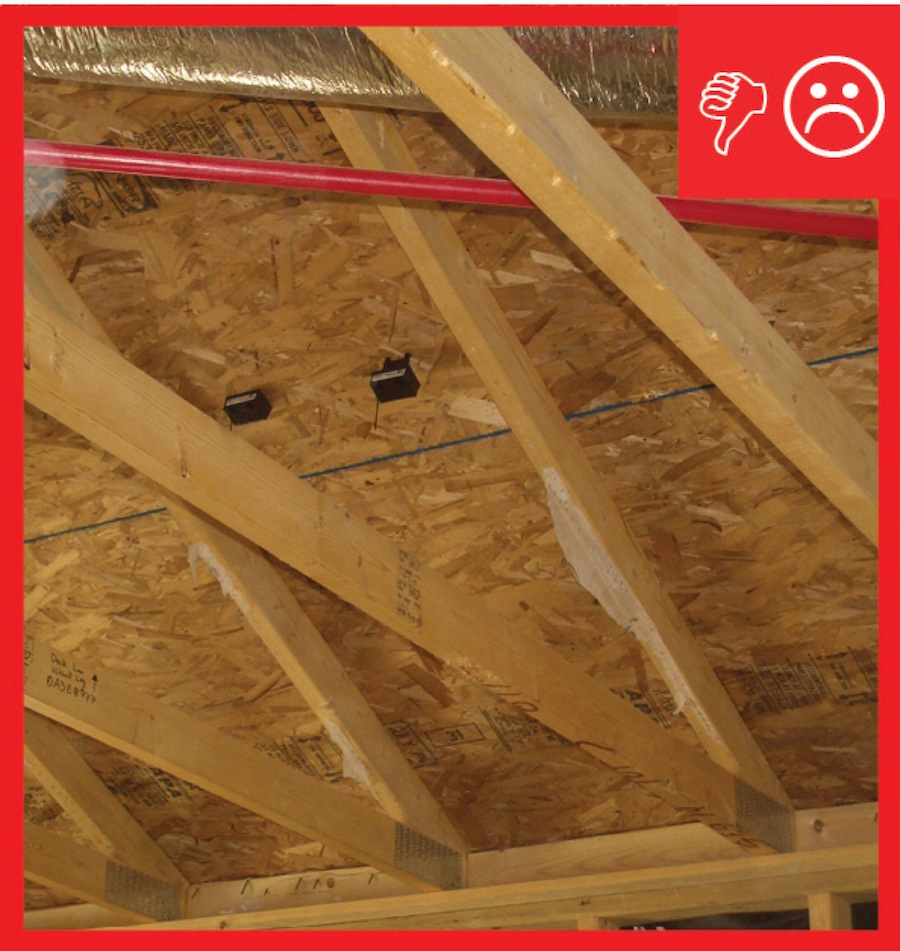
Yep. I’m talking about the space over the exterior walls, where the roof comes down and leaves little space for insulation. Take a look at this photo below. It’s from the Building America page on minimum insulation at the attic eave.
The trusses seem to be made from 2x4s, so there’s about 4″ of space for insulation over the exterior wall (bottom of photo). The rest of the attic will have about 12″ or more of blown insulation. Hmmmm. Is there some reason that the space over the exterior wall might have lower susceptibility to heat loss and heat gain? In summer, it could be a bit cooler there because of venting (not shown above). In winter, that spot is likely to be worse than the middle of the attic, again because of venting. Overall, though, there’s not good reason to have less insulation there.
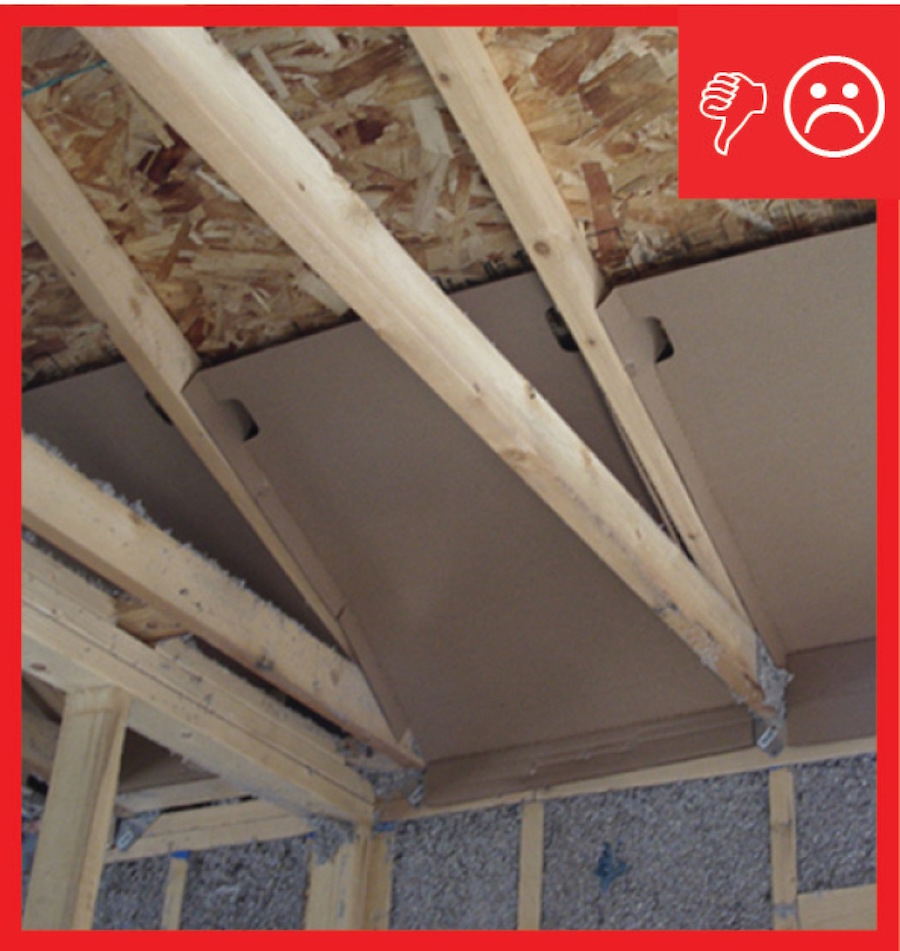
And speaking of venting, check out this Building America photo showing incorrect installation of the baffles.
The problem here is that the cardboard baffles are stapled to the inside of the top plate. In this house, as a result, there’s going to be absolutely no insulation directly over that exterior wall (unless it was corrected). That’s the kind of stuff that causes not only higher energy bills but also comfort problems because of reduced mean radiant temperature, durability problems because of condensation (including frost on the ceiling and walls in cold climates), and indoor air quality problems because of mold growth due to the condensation.
But we know how to solve this problem. The pen test will help you spot problems like this. The solution for roofs framed with trusses is something called the raised-heel truss, also called an energy heel truss or energy truss. (But be sure to see the name I propose below!) The diagram below comes from a paper by APA – The Engineered Wood Association titled Raised-Heel Trusses for Efficient, Cost-Effective, Comfortable Homes.
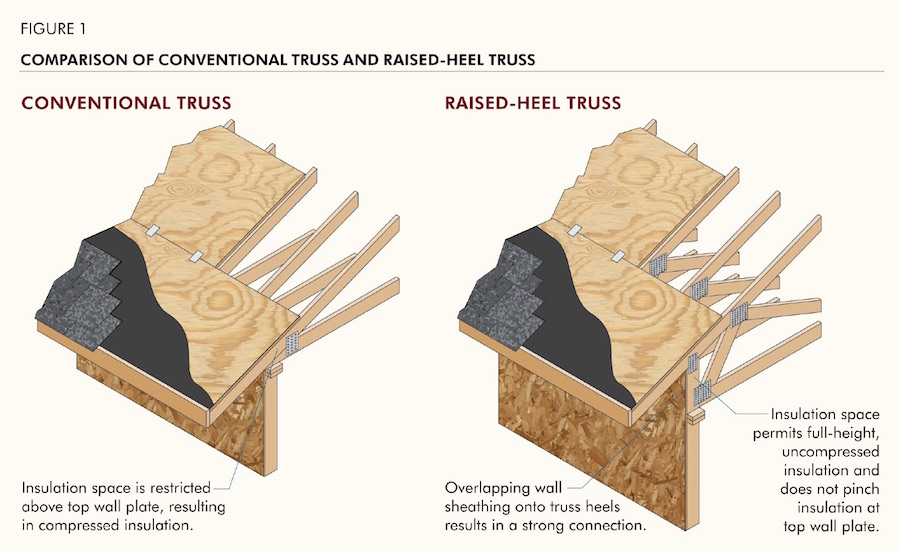
Note the extra height at the heel of the raised-heel truss (right) compared to the conventional truss (left). You can get about 15″ of space for insulation in raised-heel trusses. That’s a lot better than 4″, and it makes the attic insulation overall much closer (if not equal) to the flat side of things than the lumpy side. Insulation, like gravy, should not be lumpy, you know.
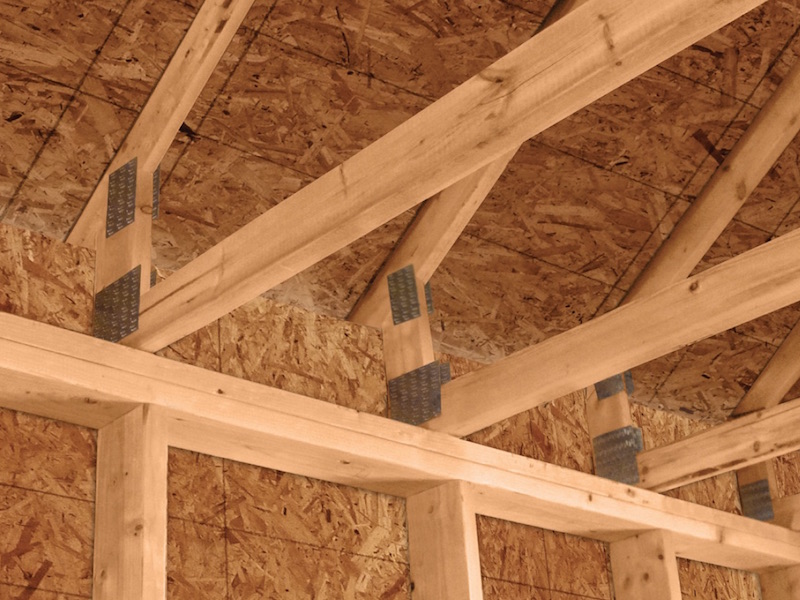
The Building America photo below shows a raised-heel truss and you can see even with the baffle for venting installed, there’s a lot of room for insulation.
Let me draw your attention to one more benefit of raised-heel trusses. You can run the exterior sheathing up from the wall onto the heel of the truss. That gives you a nice dam to prevent wind-washing, a common problem at the eaves of conventional roofs.
Those venting baffles shown in a couple of the photos above are supposed to prevent wind-washing, but when they aren’t installed, as is the case in many older homes, or when they’re improperly installed, wind comes up through the soffit vents and blows the insulation back into the attic. Even if an attic started with some insulation over the exterior walls, there may not be any there now if the attic is subject to wind-washing. That sheathing on raised-heel trusses makes it nearly impossible for the insulation on the edge to be blown inward.
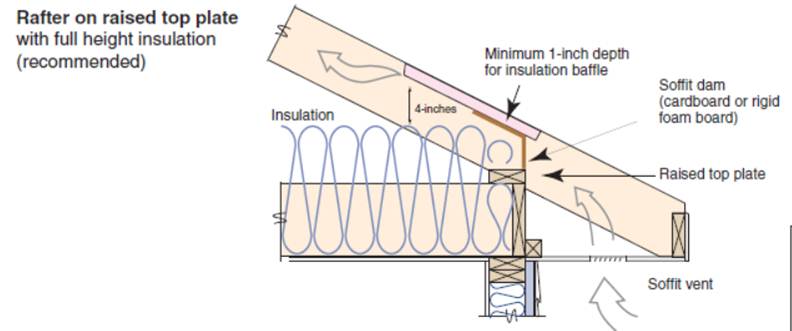
The same principles apply to roofs framed onsite. You need to adjust the framing at the edge to allow for more insulation over the exterior walls at the eaves. Here’s a Building America diagram showing how to do it by putting another top plate on the top of the ceiling joists.
If you’re building a house and not adjusting your construction techniques to allow for adequate insulation at the exterior walls, you’re missing a big opportunity. My only problem with raised-heel trusses, however, is the name. Raised, to me, indicates that the whole thing is lifted up. The top chord is higher but so is the bottom chord. Really, though, the whole thing is taller, not raised. So I propose we give these energy-saving trusses a new name: high-heeled trusses. Yeah! I like it. That’s got some serious low spark1.
Related Articles
Flat or Lumpy – How Would You Like Your Insulation?
Batts, Blown, or Sprayed – What’s the Best Attic Insulation?
The Pen Test — A Control Layers Tool for Architects and Contractors
Footnote
1. I may be dating myself with this reference to the classic 1971 song by Traffic, The Low Spark of High-Heeled Boys, but let me state for the record that I was only 10 years old when it came out and didn’t find out about it until much later. Now Joe Lstiburek, on the other hand, is an old guy who probably listened to the album in his bedroom after hockey practice and got yelled at by his parents for playing it too loudly. ↩
NOTE: Comments are moderated. Your comment will not appear below until approved.
This Post Has 27 Comments
Comments are closed.


Your pictures with raised
Your pictures with raised heel trusses show them installed on a double top plate with the trusses aligned with the studs. Why is there a double top plate instead of a single one? Do we just like the thermal bridging? Is there any structural reason to justify the double plate?
Good catch, Roy. First, those
Good catch, Roy. First, those aren’t my images. They’re from the Building America page on attic insulation at the eaves. Second, no, thermal bridging is a bad thing. We don’t like it at all. Not one bit. Ideally, there’s continuous insulation outboard of the sheathing, but that’s not the norm…not yet anway. Third, getting builders to move away from double top plates is difficult. They tie the exterior and interior walls together, and single top plates require stacking the trusses over the studs. It can be done but sometimes you gotta pick your battles.
I find it interesting that
I find it interesting that builders want a double top plate so that they can tie walls together. Metal nail plates or even truss connector plates could be used to tie walls together, right? Surely if these connector plates are suitable for trusses, they would work for walls. I worked residential construction in the 60’s and 70’s. Even with 2×4 studs on 16″ centers and double top plates, we still aligned the roof framing with the studs whenever we could.
Another reason that many
Another reason that many builders give for not liking single top plates is that the drywall no longer fits when using precut studs.
Shameless plug: a Do’s and Don’t Bother list on advanced framing from a builder: https://www.protradecraft.com/advanced-framing-dos-and-dont-bothers
Theoretically it would be
Theoretically it would be best to build the entire structure out of insulation but that just can’t be done with this equipment. As a builder I have had to find the balance bw structure and thermal performance. Insulation doesn’t hold the walls together nor can you nail moulding (and keep it straight) to max spacing studs, I’ve tried it and there are always complaints. Its easy to get tunnel vision on efficiency but there are many other factors involved. Exterior insulation or (my fav) a double stud wall give you the best of both worlds. Great thermal performance and it makes the lipstick look good too! If you forget the lipstick, trust me, someone will remind you and its usually the one paying the bill.
A few years ago, I was
A few years ago, I was involved with the TxAIRE homes project at the University of Texas at Tyler. We built two research homes. They were both quite conventional architecture for that area. One house used conventional construction techniques (2×4 studs, 16″ centers, insulated ceilings, etc.) and the other used a lot of advanced framing techniques (2×6 studs, 24″ centers, minimal header sizing, no cripples, single top plate, insulated roof deck, drywall clips instead of backing, etc.). We counted every stick of lumber in both houses and showed that the advanced framing house actually used slightly less wood (board feet) than the conventionally framed house with at least a 50% increase in wall R-value. I suspect that the framing labor was also less, but we didn’t track that. I was involved with these houses for several years after construction was completed and saw no problems structurally or aesthetically with the framing or drywall (1/2″ everywhere). These were starter home designs (1500 sq.ft., one-story) and in this area, no one uses ceilings less than 9′ high any more, so pre-cut studs and standard drywall sizes were not an issue. We did have some issues during construction such as improperly nailing on the header nail plates, but these were corrected. On the advanced house with 2′ stud spacing, the sheathing was still nailed on 16″ centers using the lines on the outside. Luckily I caught that problem before it was too late (The framers never noticed it). I realize that any changes to standard practices can cause problems, but I think that those can be overcome through training and inspections.
Any energy data available on
Any energy data available on the two houses?
Not much ever got published.
Not much ever got published. I was involved with the design, construction, and instrumentation, but then our research funding ran out and I had to find another job. The houses are still there, but there isn’t much research going on that I can see.
For what it’s worth, here is
For what it’s worth, here is my two cents as a structural engineer: Keep the double plate.
1.Structural diaphragms need continuous members at their edges so they can function AND they can be calculated more easily (most important for us!)
2.It would be a bad habit to start building single top plate walls all the time. What if there is a lack of coordination between the wall building and truss builder or installer? A single top plate joint can’t take ANY load. That to me is a risk that far outweighs any minimal gain you would get from thermal bridging in wood.
3.Most buildings aren’t inspected, so who is going to make sure those truss are really aligned with the studs?
Let me know what you guys think!
I am not a “structural
I am not a “structural engineer”, but I am an engineer that has taken some structural courses. If a single top plate “can’t take ANY load”, then how can a double plate be that much stronger? If I remember correctly, a beam that is twice as tall can handle 4 times the load for the same deflection, but that is assuming a solid beam. If you just stack two plates that are not bonded, it will only handle twice the load. I doubt that a nail every 16 inches between the two top plates would prevent much slipping between them, especially since the forces are with the grain. But either way, tightly connected or not, I don’t see how having something that is 2 or even 4 times something that “can’t take ANY load” is that much better. Either way I would still recommend aligned framing since that eliminate this issue, and a second top plate not only increases thermal bridging, it costs more.
In my opinion, the double top
In my opinion, the double top plate provides more Pros than Cons. In no particular order let me see if I can list the advantages.
1. The obvious one, it provides a solid, continuous bearing condition for Rafters, Trusses and Floor Framing so that theses members do not necessarily have to align with the vertical members below the double top plate.
2. It is a lot easier to achieve a continuous length. By staggering the splice locations you can have a continuous solid member unlike a single plate where you’re forced to bundle studs below the splice point.
3. It provides the opportunity to tie perpendicular walls at the plates. The upper top plate can be notched to receive the upper top plate from a perpendicular wall, thus tying the two walls together at that point to provide additional strength.
4. It gives a larger nailing surface for attachment of structural clips, straps and hold-downs in addition to crown molding, trim, sheathing and drywall.
I love when you dabble in
I love when you dabble in heavy Traffic.
I have always liked the
I have always liked the design of raised-heel trusses to add insulation above the outer wall. One thing I just don’t understand though, why do engineers/planners still specify more insulation in the uppermost ceiling area VS walls? I know that eons ago the stack effect was used as a rationale for additional ceiling insulation because that was where the largest delta T existed. But now every high efficiency home also includes either a mechanical ventilation system or a filtered/dehumidified mechanical air recirculation system – so it eliminates the stack effect by de-stratification. Now the largest delta T is either at the floor or in the basement walls. In fact, since attic air is always hotter than ambient air, the ceiling delta T now is the lowest. And yet the prescribed insulation values persist.
I think mostly because it’s
I think mostly because it’s cheap and easy to add more insulation over the ceiling. Adding 6″ more of blown cellulose insulation in the attic is simple. Adding 4″ more of foam insulation over the exterior is more difficult and expensive.
Prescriptive R-values for
Prescriptive R-values for ceilings are higher than walls because (a) ceiling insulation, typically fibrous, is not encapsulated on six sides, and (b) ceilings (under vented attics) are exposed to MUCH higher delta-T’s.
It’s useful to note that prescriptive R-values in the commercial energy code (IECC Section C402) are lower for roofs where there’s no attic vs. ceilings under a vented attic. The residential code doesn’t make such a distinction, probably because virtually all homes, until recently, had vented attics.
In homes with encapsulated attics with foam roof insulation, I typically specify 1.5 x wall insulation for the roof. A house with R13+R5 walls would get R28 roof. This often requires additional paperwork to satisfy building inspectors. Or use the performance compliance path.
David – is this true for all
David – is this true for all USA climate zones, or just 1-3 (the hottest) due to AC loads? I’m in Zone 5 (on the border with 4) and my (semi-vented, 1932) attic is usually a little warmer than ambient but not terribly so, and we are considered a “heating-dominant” area – where slightly warmer attics in the Winter would be a good thing. It would seem like having a properly vented attic area (with air chutes running from soffit to peak so as to better cool off the roof deck and minimize re-radiation) in hotter zones would also minimize AC loads and so preclude higher R-values. Just looks to me like the DOE just used a non-mechanical ventilation/de-stratification/marginally vented attic situation to give prescriptive R-value info. I do remember one blog where the builder used the same R-value in walls and ceiling because of this (although it was a very high, “super insulated” value). I’m also guessing that this would all be moot if you use one of the building design modelling software packages that would take ALL characteristics into consideration.
The prescriptive codes are
The prescriptive codes are indeed a sledge hammer. Even in CZ6 where cooling is not much of a factor, the commercial code requires R49 for a ceiling under a vented attic versus R30 for a non-attic roof. There is some logic to that: You can’t count on atticT being higher than ambientT in cold weather. Think just before sunrise after a day or two of sub-freezing overcast skies. Also, it’s well known that fiberglass is subject to a reduction in R-value when house-attic delta-T exceeds more than about 35F. And then there’s the possibility of wind-wash.
You wrote: “It would seem like having a properly vented attic area (with air chutes running from soffit to peak so as to better cool off the roof deck and minimize re-radiation) in hotter zones would also minimize AC loads and so preclude higher R-values.”
Not so much. even with proper venting, it’s not unusual to see a 30F or 40F bump over outside ambient in an attic. Still, as long as HVAC can be located inside conditioned space, it generally cost less to build a vented attic with similar or better performance compared to an encapsulated attic.
BTW, encapsulated attics (or cathedralized ceilings) still need more R-value than a wall (I typically specify 1.5:1) since roof surfaces tend to get much hotter than walls due to more direct sun angles and (typically) dark roof coverings.
@Allison, it’s worth noting
@Allison, it’s worth noting that raised heel trusses can be designed so that the bottom chord extends past the plate to form the bottom of the soffit, simplifying and potentially lowering the cost of building the soffits. A scissor truss can also have a raised heel.
Good points, David. Trusses
Good points, David. Trusses can take a lot of different forms. Extending the bottom chord out for the soffit makes more work for installing the wall sheathing over the truss heel, since now the framers have to cut slots for the truss chords.
Are raised heel trusses not
Are raised heel trusses not used because of aesthetic reasons or is it because interior space restraints continue to dominate the placement of HVAC equipment in the attic.
Now that HVAC system is in the attic the builder must use ocSPF to encapsulate the attic so the dwelling can meet blower door requirements and not have to worry too much about duct leakage.
@JC, I think it’s mostly a
@JC, I think it’s mostly a lack of familiarity. Good for Allison for shining a light on this.
As for your other comment — I think most multi-story and slab-on-grade homes are still being built with HVAC in vented attics. Although I certainly don’t condone that practice, most builders would rather pay a bit extra for duct mastic than for encapsulating the attic with SPF.
JC, I agree with David. I
JC, I agree with David. I think a lot of builders just aren’t aware of raised-heel trusses. (That’s not true for the ones who read this blog, though!)
Love the “Traffic” reference,
Love the “Traffic” reference, Allison. Some trivia: the raised heel truss is/was also known as the “Arkansas truss,” developed for the “Arkansas Project” in the 1960s. A bit about that project here: https://buildingscience.com/documents/insights/bsi-018-westford-house
When framing the cut rafters
When framing the cut rafters for the raised heel system how would one go about strapping the rafters to the wall in an efficient manner? It seems to me that typical truss-to-plate connectors would not be useful. The idea of raising a truss such as this is a no-brainer to become standard practice/
I had a new house built in
I had a new house built in 2008 with energy heel trusses. This house is built at the top of a steep ~130′ cliff along a bend in a river gorge. This is a beautiful place with great views, but there are one or two times every winter when it snows and then there is a strong wind that blows snow into the attic because of the updraft caused by the cliff. Snow drifts next to the house are often 4 to 6′ deep after these wind storms. (This spot is a place where eagles play in the strong updrafts when it is warmer out) Because of wind washing, some of the snow makes it under the insulation and there is some slight staining of the ceiling sheet rock. I have done quite a bit of building myself, and am looking for a design detail that will allow me to restrict air flow through the soffit vents on this side of the house. I’d like to do this from inside the attic. The roof pitch is 7/12 and the attic insulation is a single layer of kraft faced R38. One thing I am thinking of doing (after restricting air flow into the attic) is to add another layer of unfaced R19 insulation running perpendicular to the direction the trusses run. Please let me know if you have any recommendations about how to solve this problem.
Bill,
Bill,
I see no response to your post. I’m building a new home in Zone 7/8 intersection on a large lake with similar off water winds in the winter. I am contemplating building a home roof with no roof ventilation by not installing eve vents and using spray foam insulation under the roof deck which will help avoid the similar problem of snow moisture that you experienced. Downside is conditioning space in the attic that is not used except for possible installation of AC ducts in the attic. Problem with that is introducing moisture via leaking duct work in the attic but with closed cell foam hopefully that will not be a problem with rotting deck boards. I have also heard some discussion regarding a polystyrene foam board placed above the roof decking but it has been difficult to find information on that concept but it would have to be used in conjunction with spray foam under the deck board to get the minimum R-50. Would you have ever considered a non-ventilated roof system if your were building the home new today?
I am following up on my
I am following up on my original posting. I did quite a bit of research about the best way to protect the fiberglass insulation that is often left exposed behind the soffits after making this posting. The recommended way to protect the fiberglass is to continue the sheathing (typically OSB) above the top of the wall to within 3 or 4″ of the underside of the roof sheathing. This detail directs any air flow over the top of the insulation and into the attic. It has the additional advantage that the trusses are tied to the walls with sheathing.
In my case, it would have been a lot of work to remove the soffits and then install additional OSB, etc.
I came up with a good way to accomplish the same goal. I made some 1/2″ exterior plywood panels that fit between adjacent trusses and between the top plate of the wall and the roof sheathing. I made these panels about 1/2″ narrower and 1/2″ shorter than the opening, so the plywood itself easily fit into the space. Then I stapled a folded double layer of double bubble around the perimeter of the plywood. The double bubble creates gasket that makes a good seal between the trusses, the top plate and the sheathing. I used a hole saw to cut 3 2 1/2″ holes in the plywood. These holes were in a row near the top of the panel. Then I solvent welded 3 1/3′ long pieces of 2″ PVC plumbing pipe (a 10′ length cut in 3 pieces) into the holes simply by cutting 1/2″ pieces of 2″ PVC tube and then slicing them so I could spread them to fit around the PVC on both sides of the plywood and solvent welding them to the tube. These ~3′ long pieces of PVC acted as a handle that allowed me to insert the plywood baffles between each set of trusses from the attic. It was pretty easy to do this while laying on a couple of 2 by 8 planks resting on the ceiling joists. I put a 2 by 2 between each set of trusses about 3′ above the energy heals and then used deck screws to fasten the other end of the PVC tubing just under the roof sheathing. I completed the windward side of the attic with about 2 days work. There is still a good amount of ventilation in the attic, and no risk of ice damming. 3 PVC tubes provide about 10 sq inches of ventilation. I was able to complete this work in the early winter because everything was done inside the attic. Thought I’d pass on this solution because it is pretty simple and the materials are all quite inexpensive and readily available.