My Duct Systems on Low-Static Mini-Split Air Handlers
I’ve written about the load calculation and equipment selection process I went through for the new Mitsubishi* ducted mini-split heat pump in my house. Now let’s take a look at the design and performance of the duct systems for the two air handlers.
Laying out the ducts
The schematic diagram below shows the three zones for our main floor, two of which are served by the ducted mini-split. On the left (green) is the bedrooms zone, and on the right (pink) is the common areas zone. The sunroom just got a new ductless mini-split last week. (I discussed the imbalance created when I would open the sunroom doors before getting the wall-mounted unit in my previous article.)
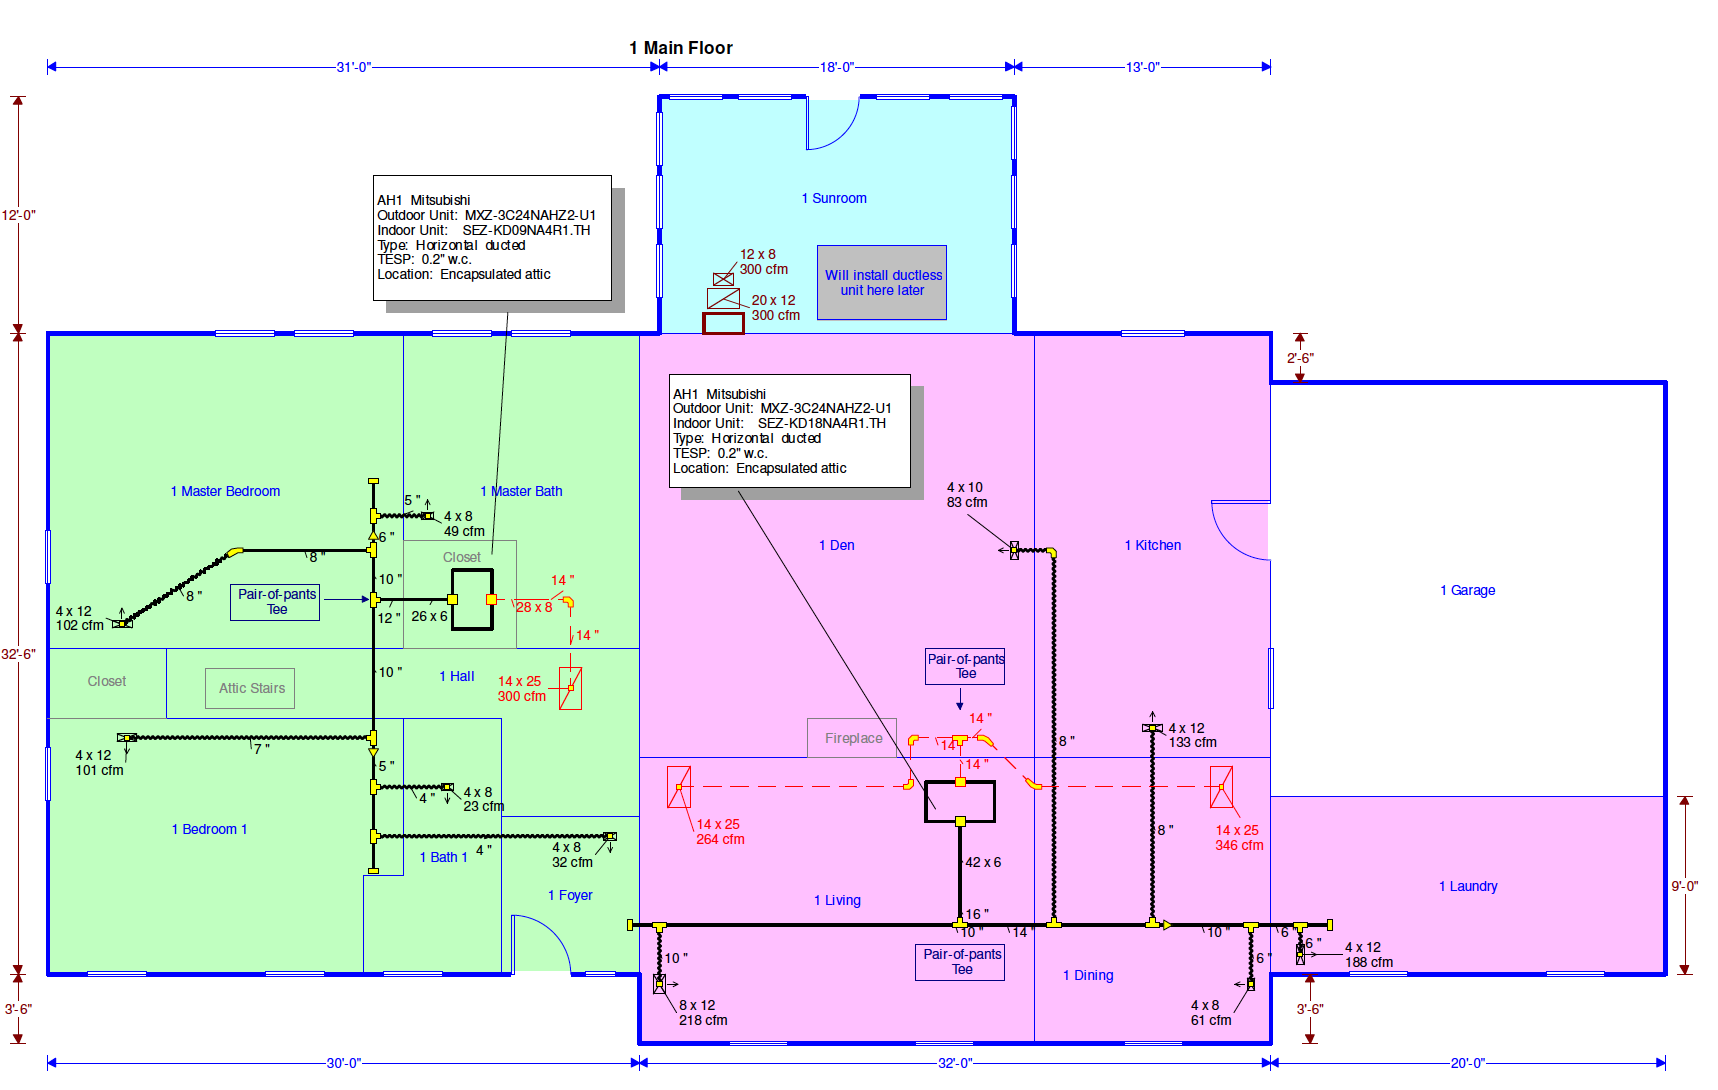
The first thing you might notice when you look at the duct plan is that there seems to be a lot of ductwork for a couple of low-static air handlers. As I wrote last year, the length of all the ductwork isn’t what determines how well an air handler will move air. It’s the resistance. Even with a low-static air handler—and these are designed for up to 0.2 inches of water column (i.w.c.)—you can have a long duct system if you use good fittings and keep the velocity low.
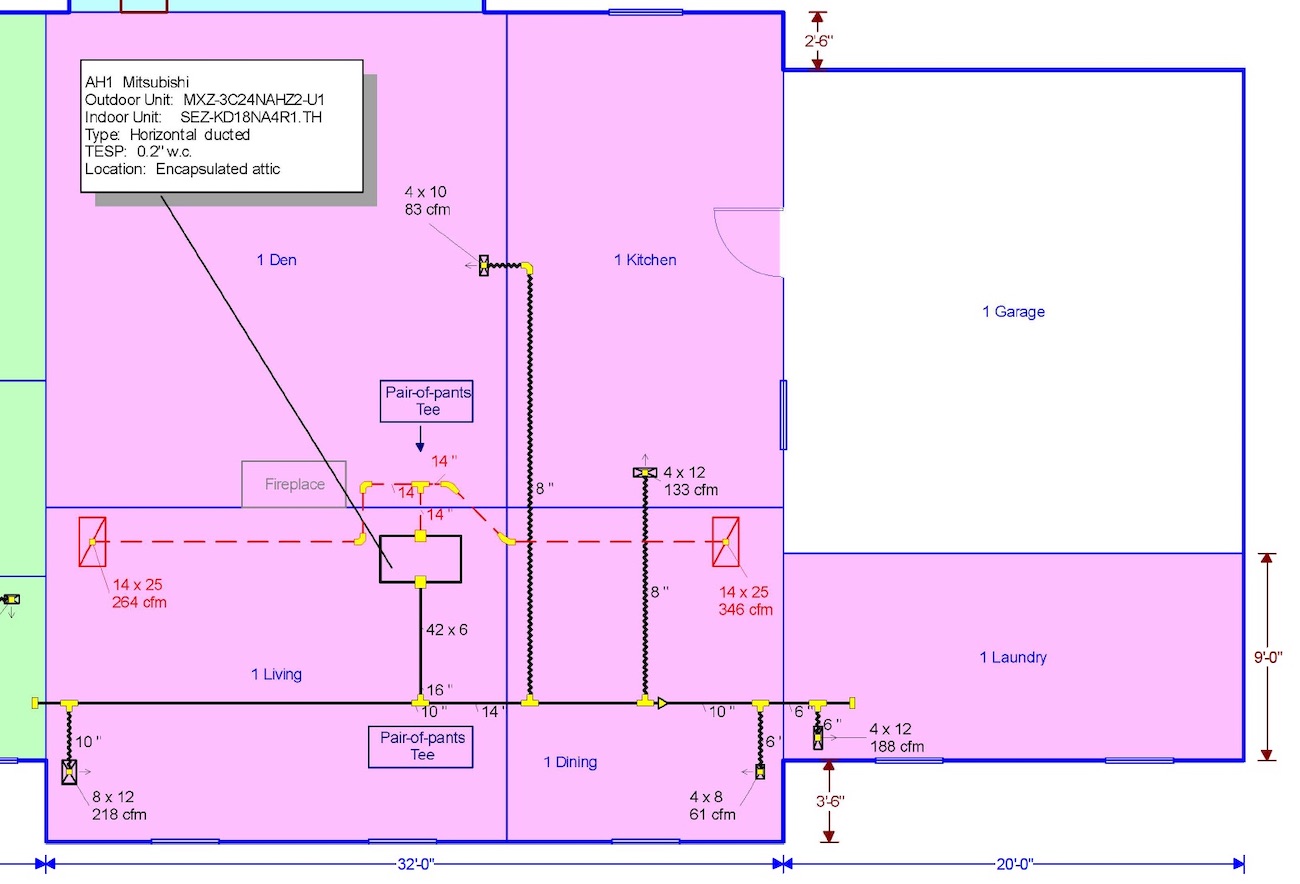
So you can see it better, I’ve included the two zones as separate diagrams below. In the common areas zone, we’ve got five supply vents and two returns. If you’re wondering why the return trunk line has those two extra 90 degree turns on the left and two 45s on the right, well, that’s because reality gets in the way sometimes. I designed that trunk to be nice and straight, but the fireplace and the height of the roof interfered. So we had to put some extra turns in.
Another thing you may wonder about is why I have a supply vent in the living room design for 218 cubic feet per minute (cfm) of air flow. That’s a lot for one vent. We usually try to keep each vent to 150 cfm or less, but I couldn’t find a good way to make that work here. All the supply vents are curved blade registers so most of the air shoots across the room, aided by the Coanda effect. It’s the only place in the house where we can feel air blowing on us, but it’s not a problem in that location because we’re usually just walking through.
The bedrooms zone, shown below, also has five supply vents and one return. We didn’t have to make any adjustments to the layout in this system.
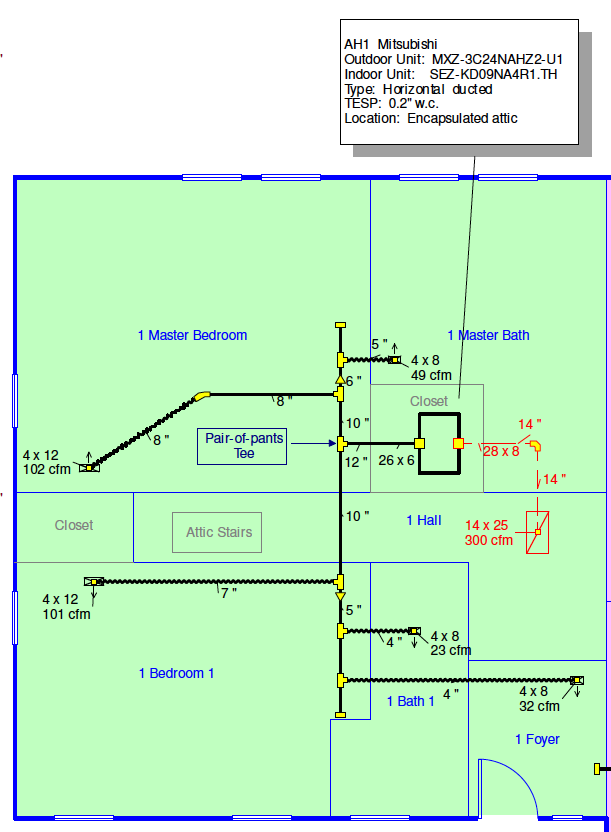
The three filters on the two air handlers are all the same size. Although it shows 14″x25″ on the diagrams, the supply house didn’t have that size available so I went with 16″x25″. My first choice was 14″x25″ so the installers wouldn’t have to cut any ceiling joists, but cutting them and putting in headers wasn’t that difficult for them.
Designing for low resistance
We use Wrightsoft’s RightSuite Universal for our HVAC design at Energy Vanguard, and that’s helpful in laying out the ducts and checking the velocities in each section. We can get good air flow by doing three things: using good fittings, keeping the velocity as low as possible in the ducts, and following my two rules for flex duct (use it only for straight run, and pull the inner liner tight).
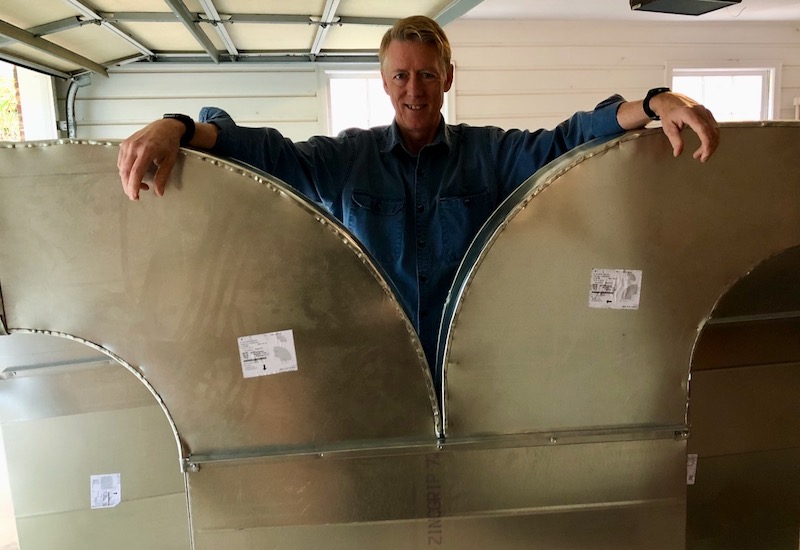
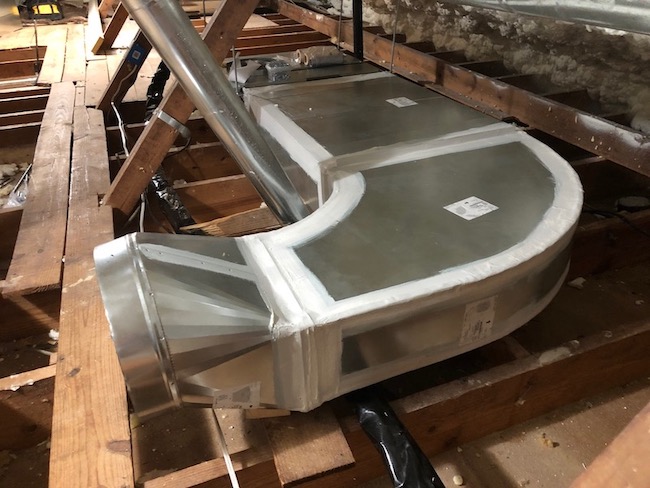
The lead photo for this article shows me with a pair-of-pants tee used on one of the air handlers. The photo below shows a nice radius elbow on the return side of the air handler serving the bedrooms. Those fittings make a big difference, but a lot of people look at the wrong side of those turns. It’s the inner part of that turn (the throat) that has the most impact on turbulence. I see a lot of elbows that have a nice curved radius on the outside (the heel) and a sharp 90 degree turn on the throat. Don’t do that.
The other factor we use when we design duct systems is the velocity. Keeping the velocity as low as possible—really low in conditioned space, higher in unconditioned attics—keeps the resistance low. Since the pressure drop changes as the square of the velocity, cutting the velocity in half (say, 450 fpm instead of 900 fpm) reduces the pressure drop to a quarter of what it would be at the higher velocity.
No matter how you go about sizing the ducts, you want to end up with low enough resistance to get good air flow without having to use a lot of energy in the blower. The measure of how well you did in your design is the measured total external static pressure.
The proof of the pudding…
…is in the testing. (By the way, I’m sure you know the proof isn’t in the pudding, right?) With these low-static air handlers, we want to keep the total external static pressure below 0.2 inches of water column (i.w.c.). How well did we do? The photo below shows the reading for the air handler serving the common areas zone. That’s 0.14 i.w.c. with MERV-13 filters in the return filter grilles. Pretty good, eh?
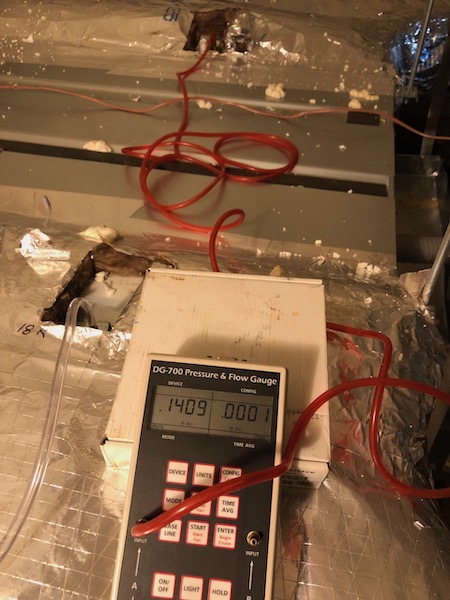
I’ve written in detail about the filter testing I did when I changed out the dirty MERV-8 filters that we used for nearly seven months and replaced them with clean MERV-13 filters. (If you didn’t see that article, you should go read it so you can find out which had the higher pressure drop – the dirty MERV-8 or the clean MERV-13.) The brand new MERV-13 filters I just installed had pressure drops of 0.08 to 0.09 i.w.c. What that means is the majority of the pressure drop in the whole system was across the filters. The total was 0.14 i.w.c. for the common areas with a filter pressure drop of 0.09 i.w.c., meaning the rest of the return and supply ducts, fittings, coil, balancing dampers, and supply registers had a pressure drop of only 0.05 i.w.c.
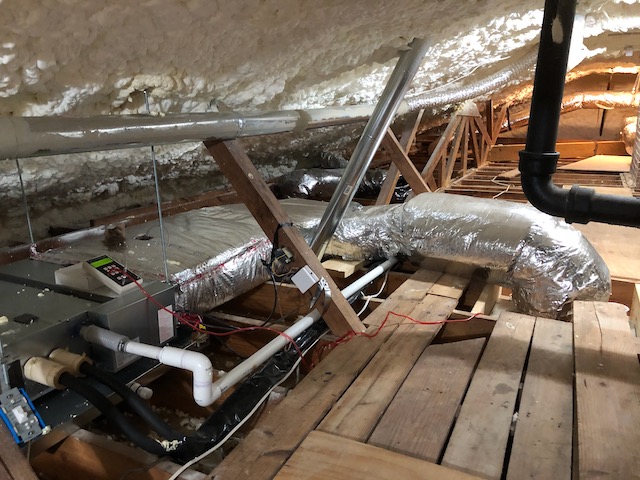
In the photo below, I measured the pressure drop for the return duct on the bedrooms zone. The clear hose measures the lowest pressure in the return plenum near the air handler, and the red hose is measuring the pressure at the bottom of the elbow right above the filter grille. That filter had a pressure drop of 0.08 i.w.c., and the total external static pressure was 0.13 i.w.c., again leaving 0.05 i.w.c. for everything else.
That return duct has a rigid elbow, a short piece of flex duct, a transition piece from 14″ round to the rectangular radius elbow shown two photos above, and a straight section of rectangular plenum. The pressure drop through all of that was—are you ready?—an astonishingly low 0.0014 i.w.c. Does that blow your mind?
I didn’t measure the pressure drop across any of the supply duct pathways, but the rest of the pressure drop (0.05 i.w.c.) would have to be across them, including the balancing damper and register.
So far, the system has performed admirably well, not only in terms of pressure drops in the ducts and across the filters but also down below the attic where we spend our time. It’s super quiet. The distribution in the rooms is really good (with that exception about the sunroom before we got the new wall-mounted unit); I haven’t had to mess with the balancing dampers at all. And, although I haven’t measured it yet, I’m sure the energy used to move the air is really low.
Allison Bailes of Atlanta, Georgia, is a speaker, writer, building science consultant, and founder of Energy Vanguard. He is also the author of the Energy Vanguard Blog. You can follow him on Twitter at @EnergyVanguard.
* Disclosures: Mitsubishi gave us a discount on the equipment and Canton Heating & Air gave us a discount on the installation. I’m really happy with both and would say good things about them even without the discounts, though.
Related Articles
My Undersized Ducted Mini-Split Heat Pump
My Low Pressure-Drop, MERV-13 Filters
The Basic Principles of Duct Design, Part 1
Busting a Myth About Low-Static Ducted Mini-Splits
NOTE: Comments are moderated. Your comment will not appear below until approved.
This Post Has 20 Comments
Comments are closed.

The picture is cropped at the
The picture is cropped at the bottom so I cant tell exactly what is connected to the meter. Is the red hose the only circuit connected or does the clear hose connect to another port below? Is this a twin circuit manometer? Otherwise it’s only looking at half of the TESP.
Steve, the photo at the
Steve, the photo at the bottom shows the measurement of the return-side pressure drop without the filter and grille. I used the port for the filter measurement on one end (red hose) and the port for the return-side external static on the other.
Allison,
Allison,
Just curious how you will get the blower out of the bottom of this air handler if/when it fails, lying so close to the floor. Maybe there is a door in the ceiling underneath that is hard to see in the photo.
Good eye, Danny. They couldn
Good eye, Danny. They couldn’t get that air handler any higher. We’re going to remodel the master bathroom/WIC/bedroom below within a few years and at that time, we’ll put an access panel in the ceiling of the closet. The other air handler does have enough space beneath for servicing.
We have this same issue,
We have this same issue, there is no servicing panel on the top it is only from underneath! I think if the fans blow then it will be cheaper to replace the whole air handler than cutting holes in ceiling!
Actually, the saying is “the
Actually, the saying is “the proof of the pudding is in the eating”. Measurements are all nice and geeky, but what about the living experience? You already know the different contributors to human comfort, and how low air temp is in comparison. Given the Atlanta area, in an older-design house (much more leakage, much less insulation) why is there no separate dehumidification (for the many times that the indoor temps will not be triggering the AC)?
David, you must have missed
David, you must have missed the last paragraph. That’s where I wrote about our living experience. I probably will add dehu at some point but I want to see how well the system does without it this summer.
That’s gonna be a great
That’s gonna be a great system. Cheers to that.
Greetings from the UK!
Greetings from the UK!
I have a very similar setup using oversized ductwork for the application to ensure air velocity remained low thus reducing the static pressure although 1200btu and 9000 btu air handlers.
System works great in cooling but in heating I have had to boost the static pressure of the fans in the controller settings as the hot air was struggling to be felt at floor level.
Do you have the same?
Richard, no, I haven’t had
Richard, no, I haven’t had that problem. We went through the whole winter this year and the heating worked fine. Maybe our ceilings (8 feet high) are lower than yours?
Where are you finding coils
Where are you finding coils with such low pressure drop? I usually ask the contractor what coil he wants to use. I consider myself lucky if I get one with less than 0.15″ wc. Usually they are well over 0.2.
Dave, I was just about to
Dave, I was just about to call out Allison on that faux pas. The coil is built into the air handler so it’s already accounted for in its available static spec. The 0.20 IWC is the available pressure AFTER the coil. This is true for virtually all air handlers, as opposed to furnaces, which don’t have an internal coil.
In practice, when verifying a new duct system install for an air handler, it’s not necessary to test the pressure drop across the coil. But it’s a useful to get a baseline measurement for future reference so you can tell when the coil needs cleaning! That requires an additional test port to be drilled between the coil and blower.
D’oh! That slipped right by
D’oh! That slipped right by me when I wrote the article. Yesterday, though, it did occur to me that I’d made that mistake but I didn’t get back here to fix it. I’ll do so now.
Dave, as David Butler already
Dave, as David Butler already pointed out, I was wrong about the pressure drop across the coil and have revised the text above. The system we’re using, though, is by Mitsubishi:
You can read more about it in the article I wrote about the load calculation and equipment sizing:
My Undersized Ducted Mini-Split Heat Pump
Got one Allison. When I
Got one Allison. When I started doing load calculations back in 2003 and came out on the winning side of the arguments oversizing with the HVAC contractors in our area, the next thing I heard was, “OK but you can’t get the air where you need it.” That was when we started doing duct design.
The most extreme system we have done was a 5500 sq.ft. passive house conditioned with a single 2-ton air handler. Very pretty and worked just fine. That was the only time we’ve had the county inspector ask to see our loads!
Do you have an email monthly
Do you have an email monthly ?
Would be interesting to know
Would be interesting to know if the Cielo Smart thermostat/controller is effective at addressing the “air handler doesn’t modulate as low as the compressor causing lack of dehumidification” problem.
@Jon, not sure where your
@Jon, not sure where your quote came from (not from this article), but the issue you refer to is real, and it’s not necessarily a thermostat/control problem. There are two issues at play… First, the air handler simply may not be able to modulate low enough to provide adequate latent capacity regardless of whose control is used. This is especially true for multi-splits, where there’s an inherent imbalance between blower capacity during single zone calls and minimum compressor capacity.
Not being familiar with the Cielo thermostat and controller, I took a quick look and it apparently mimics the IR commands produced by an OEM hand-held remote, so in that regard, it can’t fix a problem that’s inherent with the equipment.
BTW, other third-party thermostats typically rely on 24VAC relay control as opposed to the proprietary digital controllers sold with mini-splits (and virtually all other variable capacity systems). Relay-based thermostats should not be used to control variable capacity equipment as this forfeits the ability to track room temperature (google PID temperature control). At least the proprietary controller can operate the blower over its full range, whereas all a relay can do is turn the blower on and off.
Allison,
Allison,
1. How does the system perform when doors are closed to rooms with supplies but no returns?
2. Would you recommend this type of install in a non-encapsulated attic?
3. Is all the ducting in this install done in rigid duct?
Thanks for addressing this
Thanks for addressing this type of installation. I have a couple questions. What was your (design) effective duct length on the systems? And your (design) available static pressure after filter and grilles? What was your friction rate? As I design these low static systems in wrightsoft, I lose my friction rate if I have any length at all. If the friction rate falls below .06 don’t I lose control of determining fitting length thus throw the whole design out of whack?