Reading the Roof After a Snowstorm
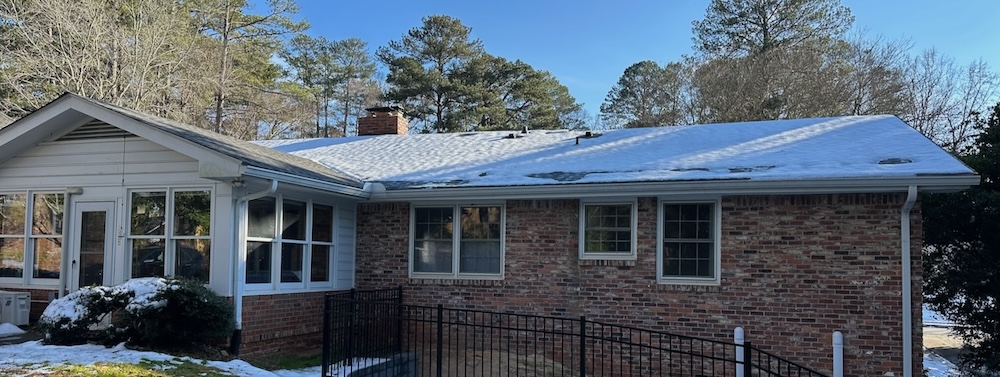
Do you know how to read a roof after a snowstorm? When you do, it tells you something about how good the building enclosure is. We had that opportunity here last weekend. We got 2 or 3 inches of snow in Atlanta last Friday and it stuck around for a bit. On Sunday, I went for a walk around the area where I live. It had been mostly at or below freezing on Friday and Saturday. Then the sun came out, and it warmed up on Sunday. So I went out to read the roofs and take some photos.
Before we get started, the basic idea here is to understand heat flow from the conditioned space below the roof up to the roof and the snow on it. That heat can come from poor insulation, air leakage, duct leakage, or poorly insulated ducts.
Ready? Let’s start with the video.
Ambient temperature and sunshine
One of the first things to scope out is which direction the roof faces. The lead photo above is the north-facing side of my roof. Notice all the snow there. The photo below shows the south-facing side. On the day I took these photos, it had been sunny all day. The temperature was above freezing from about 11 am till 7 pm that day, with a high of 43 °F (6 °C).
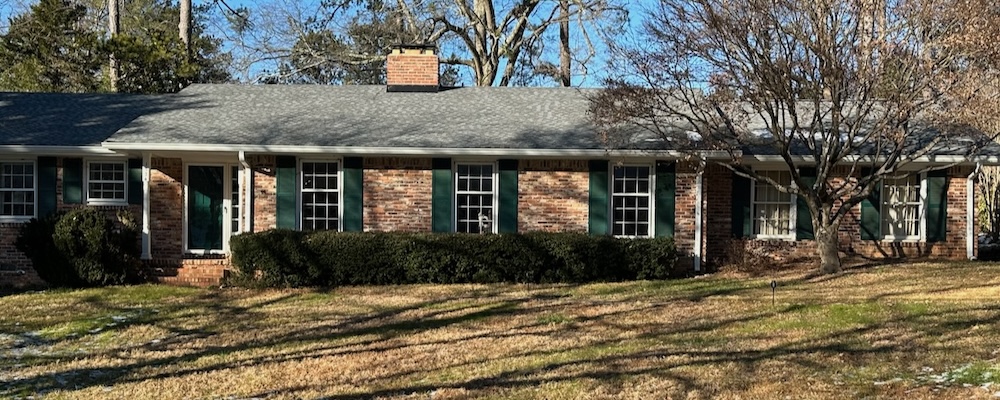
And that’s why the front, south-facing side had no snow on it. All of the snow on the ground in the front yard had melted, too. It wasn’t heat from inside the house that melted the snow on the south side. It was above-freezing temperatures and sunshine.
A range of snow melt patterns
Now let’s look at some photos of other houses nearby. In all of them, I’m looking at the north side of the house.
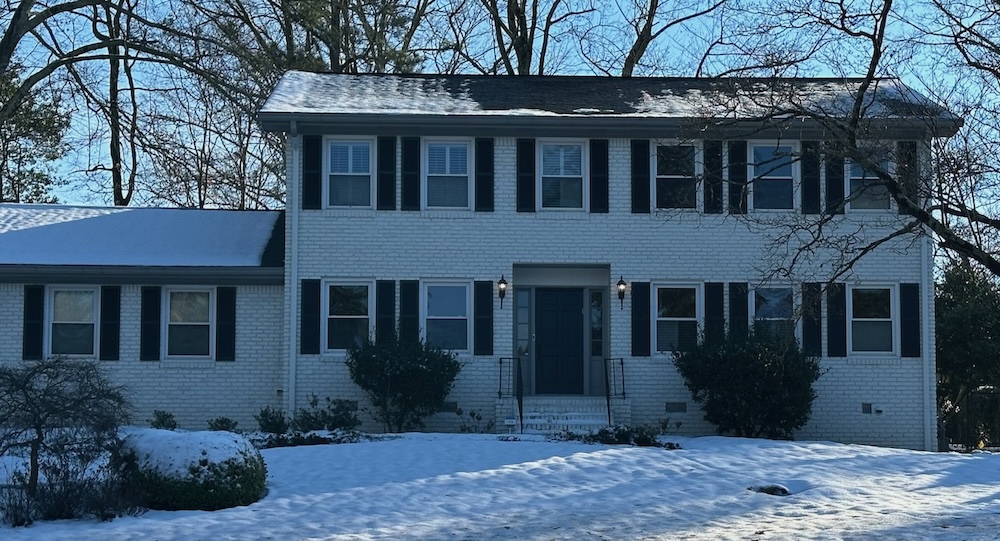
The first one (above) has a bit of snow left on the upper roof. The middle part had lost all its snow. Perhaps there’s a furnace or ductwork in that area? That could give off enough heat to melt snow in that type of pattern. And that would be in addition to the heat getting into the attic from air leakage and lack of insulation. Without going into the attic, it’s hard to pinpoint the exact source of heat.
On the lower left roof, there’s a lot of snow. But that roof is over the carport so there’s no source of heat below to melt the snow.
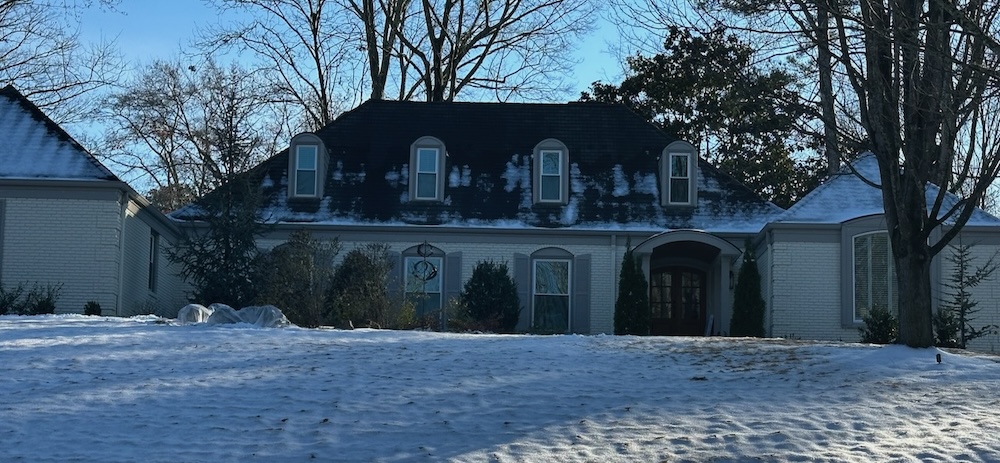
Ah, dormers! They’re notoriously difficult to insulate and air seal properly. With four dormers on the house above, there’s a lot of heat loss there. There are also some vaulted ceilings in there, and they also are rarely insulated and sealed well. Complex roofs usually have a lot of heat loss.
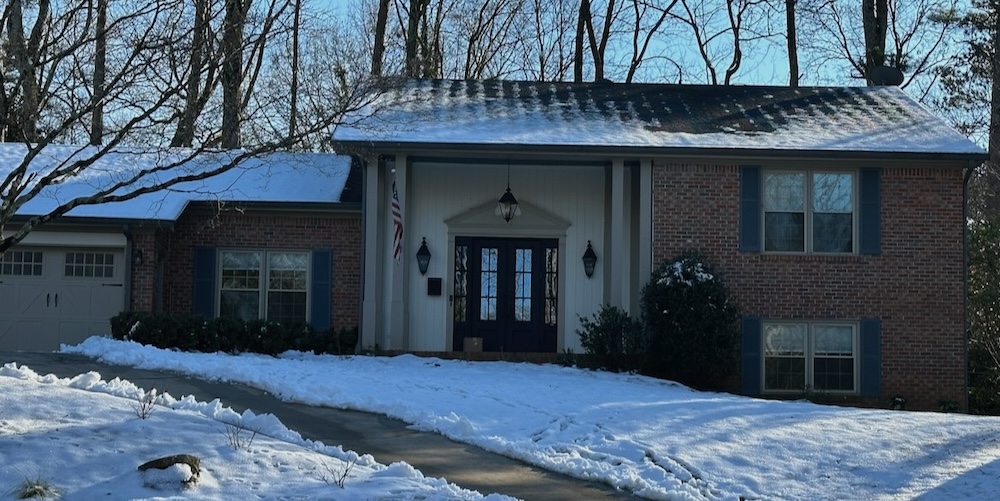
This one is similar to the first one in this section. Garage on the left with lots of snow. Some snow on the roof with a V-shaped pattern. The snow over the front door is still there for the same reason there’s snow on the roof over the garage. There’s no heat source below.
One thing that stands out in the photo above is the pattern of roof rafters. Wood has a bit of thermal resistance, so the snow lasts longer right above the rafters.
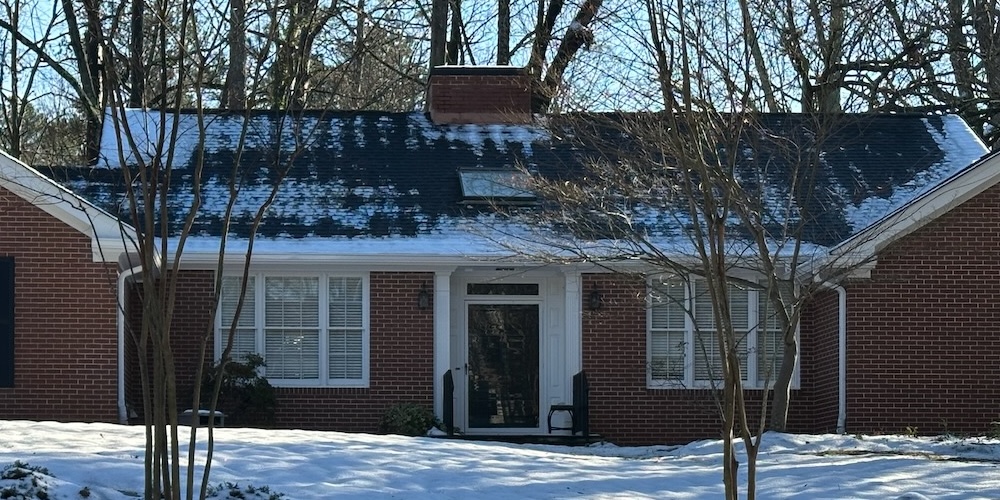
This one has an interesting mix of areas with snow and a lot of melted areas. Notice that there’s no snow right around the skylight over the front door.
The four houses above are typical for heat loss to the roof. The air leakage, poor insulation, and duct leakage put enough heat at the roof deck to melt most of the snow…but not all of it. So we know there’s been some attempt to reduce heat flow to the roof.
A really bad one
Here we have a classic. It looks like this house has no insulation at all and probably a fair amount of air leakage. If it were just air leakage, there’d likely be more snow down lower. Since warm air rises (the stack effect), heated air leaking into the attic would affect the upper parts of the roof more than the lower parts.
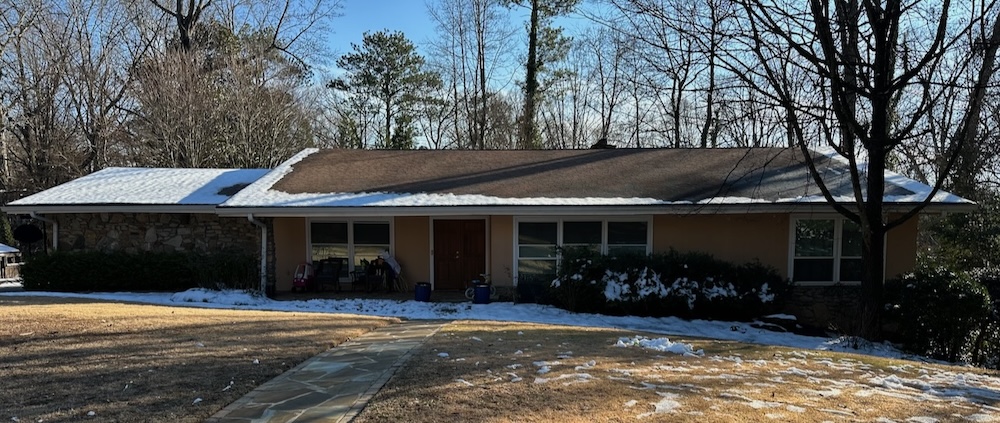
The only snow left on this roof is over the unconditioned spaces: the carport on the left and the overhangs at the perimeter.
And a couple more good ones
It turns out that my house isn’t the only one around here that does a good job controlling heat flow at the top of the house. Let’s take a look at two others.
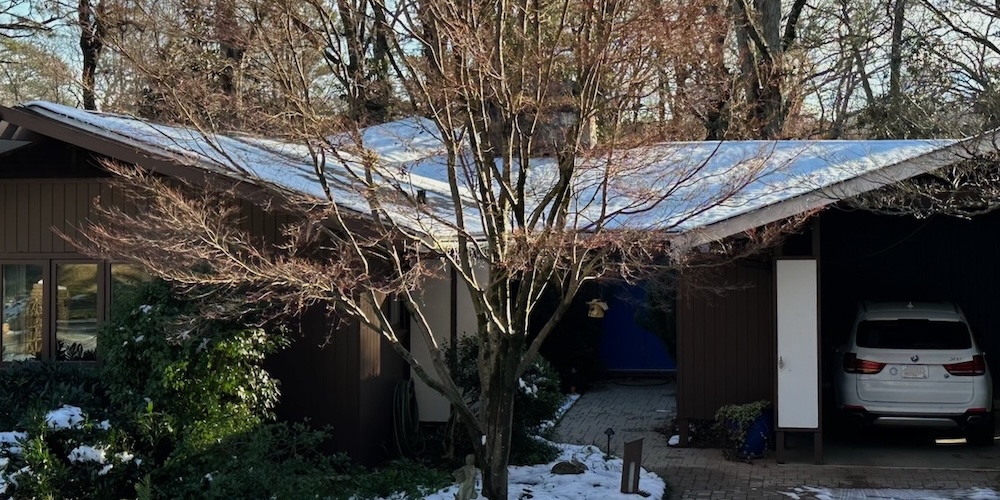
I know exactly why this house has so much snow on the roof. It’s the house my wife grew up in. Back in early 2009, I did a lot of work in the attic to air seal and insulate it for her mother and step-father. And you can see the effects…sixteen years later!
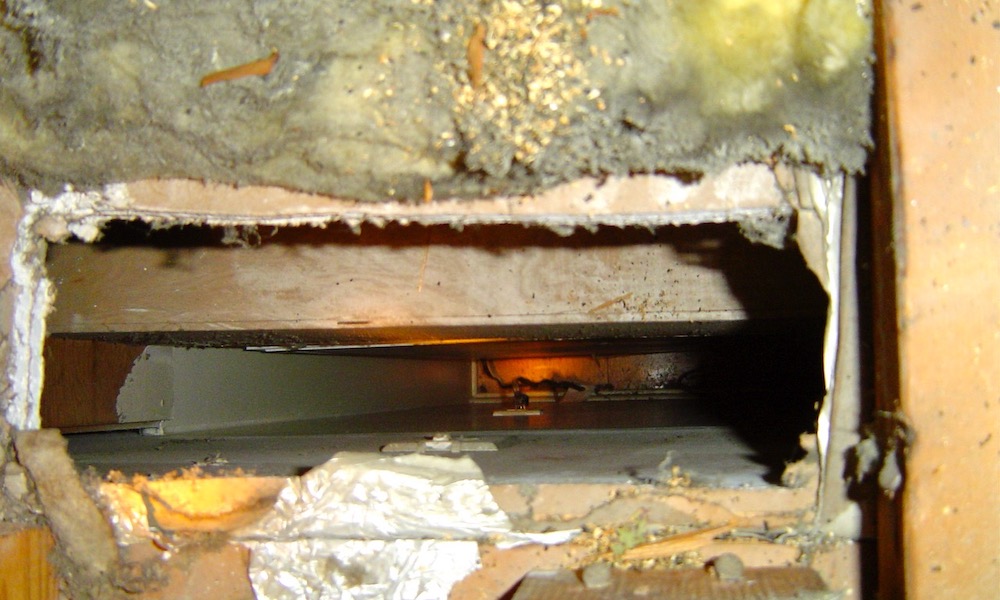
If I hadn’t fixed this house, it would look a lot like the others. It has a lot of can lights and the insulation wasn’t great. But the biggest single source of heat to that attic before I came along was the refrigerator vent (above).
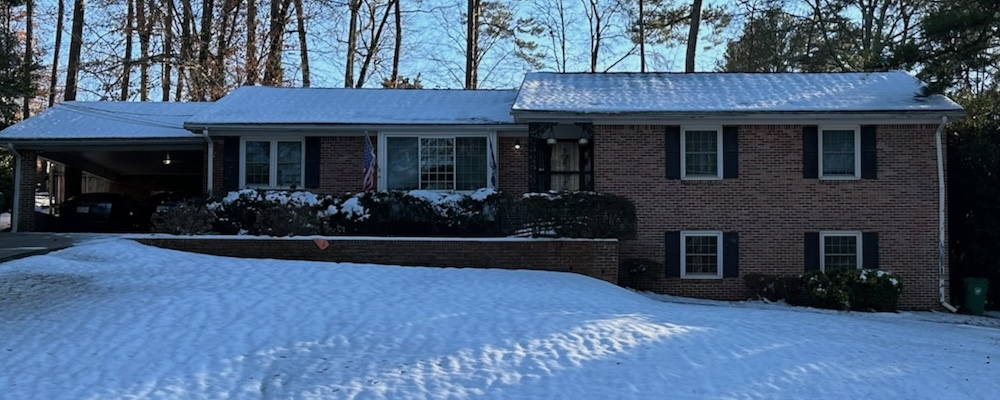
The house above is pretty good, too. There’s definitely some heat loss going on here. You can tell because the rafter pattern is showing. But it’s better than most of the other houses around here.
A close reading of my roof
Now, lets dive into some of the snow-melt details on my roof. I’ve labeled three of the interesting areas in the photo below.
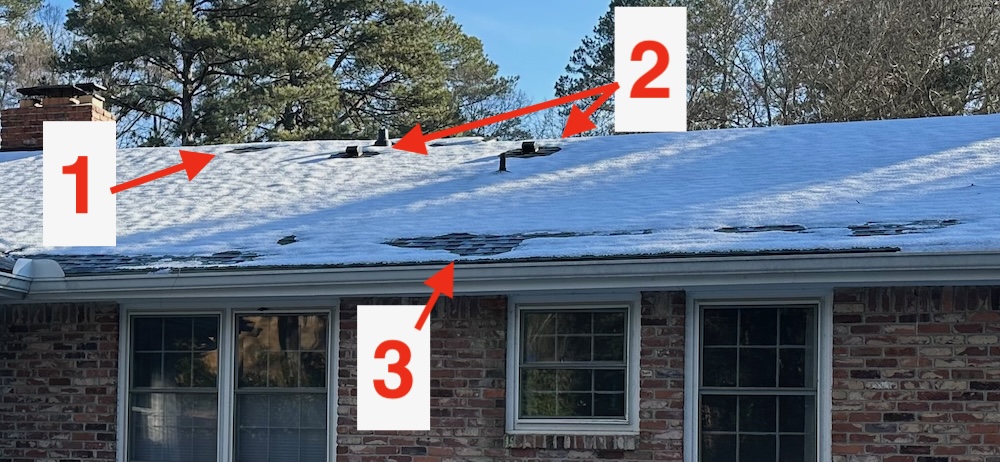
1. Site of former furnace flue. We had our shingles replaced last year. I took advantage of that to have some of my unnecessary roof penetrations removed. There’s a patch of shingles showing here because that’s where the old furnace flue went through. I need to get up in the attic and get that part insulated again.
2. Bathroom exhaust fan vents. There are two terminations for the bath fan ducts with a ring of shingles showing around them. Why? The open-cell spray foam in my attic wraps tightly around where they go through the roof. The problem, though, is that the ducts are metal. The attic is warm, and some of that heat gets carried away through the metal duct. Since we got our Zehnder energy recovery ventilator going, we’ve hardly used the bath fans, so it’s mostly conduction through the ducts.
3. Site of former plumbing stack. You may recall in my article about removing roof penetrations that I had two plumbing stacks removed from the eaves. This is where one of them was. I wasn’t able to get up there and re-insulate when they had it open, so we have some extra heat loss there.
Also, the other patches of snow-melt along the eave are probably from the lack of spray foam insulation above the exterior walls. When we had our soffits and fascias replaced in 2019, I ran around spraying foam in those places, but I wasn’t able to stay ahead of the work crew the whole time. I missed a few places, and it might have been where the snow is melted here.
Thermal imaging without an infrared camera
Snow and frost on the roof can help you find out how bad your home’s heat loss is. The more frost and snow, the better. But you have to understand all the reasons why the snow may have melted. Even on a perfectly insulated and air-sealed roof, snow can melt from exterior heat sources. If the temperatures are above freezing and the sun is shining, you have to look for the places that are protected from that heat. That’s why I looked at the north sides of the roofs. If I were in Auckland, New Zealand, I’d look at the south sides.
What interesting snow-melt patterns and heat sources have you found?
Allison A. Bailes III, PhD is a speaker, writer, building science consultant, and the founder of Energy Vanguard in Decatur, Georgia. He has a doctorate in physics and is the author of a bestselling book on building science. He also writes the Energy Vanguard Blog. For more updates, you can follow Allison on LinkedIn and subscribe to Energy Vanguard’s weekly newsletter and YouTube channel.
Related Articles
Snow on the Roof – The Poor Man’s Infrared Camera
A Tale of Two Roofs – Frost, Snow, and Attic Heat Loss
A Dramatic Illustration of a Compromised Building Envelope
Comments are welcome and moderated. Your comment will appear below after approval. To control spam, we close comments after one year.

I’ve call it the “poor mans thermal camera” for years. Once you realize this you can’t unsee it. I’ve got to be careful not to get in an accident rubber-necking roofs some mornings.
Here in Michigan there is such a thing as too much snow. With depth you start to loose subtle distinctions in areas that melt but more slowly. It’s hard to beat a fresh inch on a bare roof for analysis like you got there.
Andy: Yeah, it works best with just an inch or two, or even a thin layer of frost.
Nice roof surfing. A cloudy post-snow day would’ve been even better.
Paul: Yeah, probably. But this was still pretty illuminating.
We had about 6″ of snow here NW of DFW and the better half actually brought up reading the roof in the snow as she wanted to see how much different it was since adding insulation the previous fall.
Well it looked great over the several days it took to melt off. No obvious heat from the house melting it from the inside. It was nice and even as it warmed up and the sun hit the south side of the roof.
The first 2″ of snow was heavy wet snow followed by a loose layer of sleet before it continued to snow more over the next day and we ended up with basically 6″ of very wet and heavy snow. Sadly I didn’t have any snowcone syrup as it would have made decent snow cones at one point.
And FYI snow covered rubber conveyor belt is not the best thing to walk on. It’s slick as….. Ask me how I know.
I do plan on adding more insulation in the attic after other work is done. Would like to encapsulate the crawlspace at some point but the ROI isn’t there especially since we wan to move eventually and there are few companies that do it here as crawlspace houses are a rarity here as few were built after the 60s and even then they were not common except for cheaper built houses.
Robert: Nice work improving the building enclosure to reduce heat loss through the top!
Sadly I didn’t take any pics. And this is a house built in 1960 crawlspace foundation with brick veneer walls. (I hate brick for cladding in TX) Our energy usage for heating and cooling went down allot for a $500 investment. I also insulated over the garage but not as much as I would have liked all around. Future project to add more.
But next time it rains and the temp is right I need to take pics of the shop walls. You can clearly see the difference between the walls I have added insulation to and those that haven’t. It’s a red metal building and the square tube to the skin will dry that area out fast and you can easily see the bones of the building. But one wall at a time and have to finish the other half of the roof in there too.
It seems like on the houses that I have seen, the snow is thinner over the rafters than it is between them. I attributed this to being due to the heat capacitance of the rafters which results in them taking longer to cool down as compared to the sheathing in between.
Roy: If snow or frost is thinner over the rafters, I think that would indicate an insulated roofline. In the photos of the houses here that have a lot of heat loss, the snow over the rafters melts after the snow over the cavities.
I do think the heat capacity of the rafters comes into play and wrote an article on that a few years ago. It got quite a few comments, including from you.
A Frosty Heat Loss Puzzler
https://www.energyvanguard.com/blog/a-frosty-heat-loss-puzzler/
I have houses with both insulated roofs and insulated ceilings in my neighborhood. I hope it snows again this winter so I can look closer at them and figure this out. I forgot about your previous blog on this. I used to learn something new everyday. Now I relearn something old everyday.
Yeah, I know what you mean! This getting old thing brings all kinds of surprises.