Soundproofing a Wall – The Basics

You know how the sound from that TV in your den comes right through the wall and you can hear every word? Or the annoyance of your neighbors when their lawn maintenance crew comes every Saturday afternoon right when you want to take a nap? How about the sound of that annoying, interminable music in Energy Vanguard’s automated answering system? Well, I can’t help you with the last of those (do we even have music?), but let’s talk about soundproofing a wall. And just to be clear, I’m talking about sound transmission through a wall, not the sound that bounces around within a room.
The complexity of sound transmission
Sound is a wave. Unlike light or magnetism, this kind of wave needs physical matter, a medium, through which to travel. That property of sound waves, of course, led to the brilliant tagline for the 1979 movie, Alien: “In space, no one can hear you scream.” There’s nothing to vibrate and carry the sound waves in space; hence, no sound transmission.
So, the best way to reduce sound transmission would be to live in a vacuum. You’d have a short life but you wouldn’t be bothered by noise. In addition to being dead, you’d also be broke because turning your house into a vacuum chamber wouldn’t be cheap. Therefore, I’m going to take a leap and assume the vacuum technique won’t work for you.
With air in our homes, we can hear that scream through the wall. Or the blender, the dog, or the rototiller in the next room. Sound is a wave that vibrates matter between the source and the sensor, your ear. Most of the sound we want to reduce begins its path in the air. Some, though, is from an impact, like banging your head against the wall.
Then there’s the issue of frequency. High-pitched sounds, like whistling, have a high frequency of vibration. Low-pitched sounds, like Johnny Cash singing A Boy Named Sue, have a low frequency. Sounds of different frequency behave differently, especially when traveling through solid materials.
And that brings us to the basic techniques for reducing sound transmission through walls:
- Breaking the pathways through solids
- Adding mass
- Breaking the pathways through air
Before we move on, though, let me throw one more thing out here. The BS and Beer Show did an episode on the science of a quiet home last month and one speaker made an important distinction. Sound is any vibration that can be heard. Noise is unwanted sound. There’s also a lot of other good info in that show, so click over and watch it to learn more.
Breaking the pathways through solids
To reduce sound transmission through the solid parts of a wall, we can apply one of the same tactics used in reducing heat flow through walls. For heat flow, we want to eliminate thermal bridges. Those are the pathways with low thermal resistance that rob heat from a house in winter or allow it to enter the house in summer.
Likewise, we want to eliminate acoustic bridges to reduce noise. When a sound hits the outer surface of a wall (e.g., drywall), the sound wave in the air can get the molecules in the solids oscillating, too. Then the wave moves through the solids as long as there’s a continuous path. Break that pathway, and you help reduce the transmission of sound.
One way to do that is by building two walls with a gap between them. When the sound hits drywall on one side, it goes into the studs of the first wall. Then it hits the air gap. To continue, the sound wave would have to go back into the air. Then back to solid in the second wall. Each step can reduce the amplitude of the sound waves, thus making it quieter on the other side.
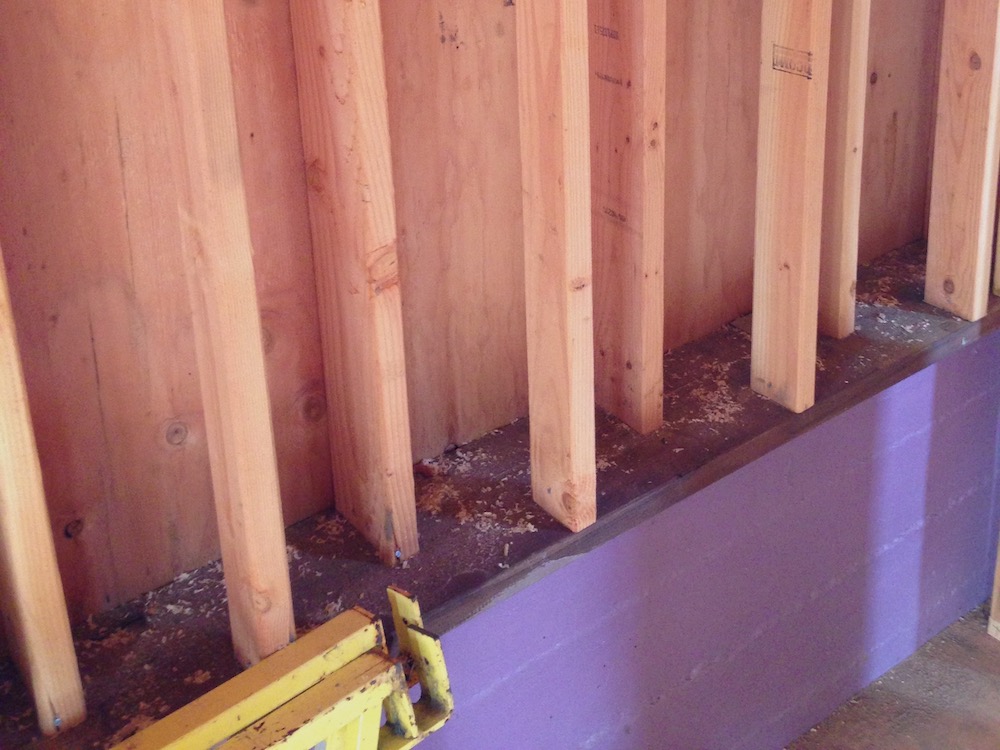
Rather than building two separate walls, you could do a staggered stud wall (photo below). That’s really just one wall with a separate set of studs for each side of the wall. That breaks the continuous path between studs but not between the top and bottom plates of the wall.

The way I chose to do it in my basement renovation was to use two sheets of drywall with a soundproofing material called Green Glue between them. The Green Glue is an acoustical material that makes it difficult for sound waves to continue from the first sheet of drywall to the second.
Yet another way to break—or reduce—the acoustic pathway is to use resilient channels. They’re long metal pieces that attach perpendicular to the studs to decouple the drywall from the studs.
Adding mass
Walls with more mass are also good for reducing sound transmission. Think about how well you can hear through a thick concrete wall, for example. One way to add mass to wood-framed walls is with a product called mass-loaded vinyl. It can be difficult to work with, and vinyl isn’t the most environmentally sound material.
The way I did it in my house was to use two layers of thick drywall. The standard drywall thickness is 1/2 inch. When you’re adding mass this way for soundproofing, 5/8 inch thick drywall is most commonly used. The short video above shows how we did that.
Breaking the pathways through air
Sounds that begin in the air in one room have the easiest time infecting the next room over when they have an unbroken pathway through the air. You’re familiar with this technique if you’ve ever closed a door to keep noise out of the room you’re in.
But sound waves don’t need a full door. Even small holes on one side of a wall can let sound waves into the space between. Then if there are holes on the other side, the sound can continue right on through. That’s why airtight homes are also quieter homes.

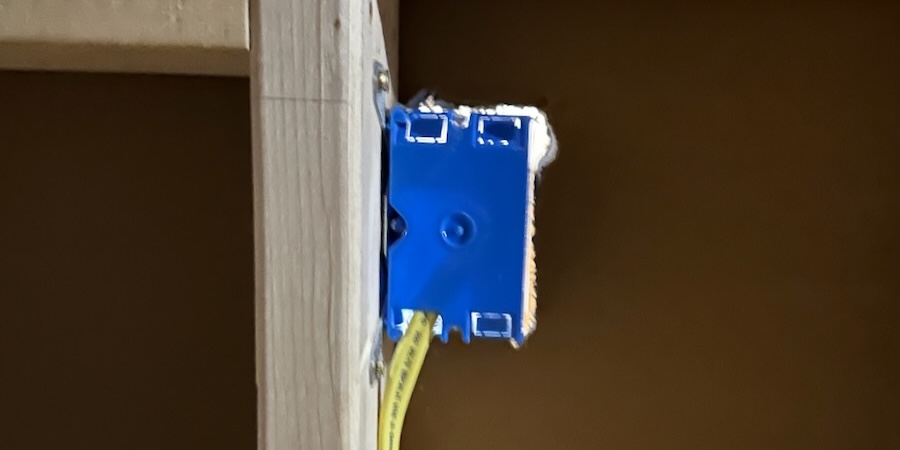
The photo above shows a standard plastic electrical junction box. You can see light coming through the wall around the perimeter of the box. It also can come straight through the box. Those holes the wires go through have big spaces around the edges.
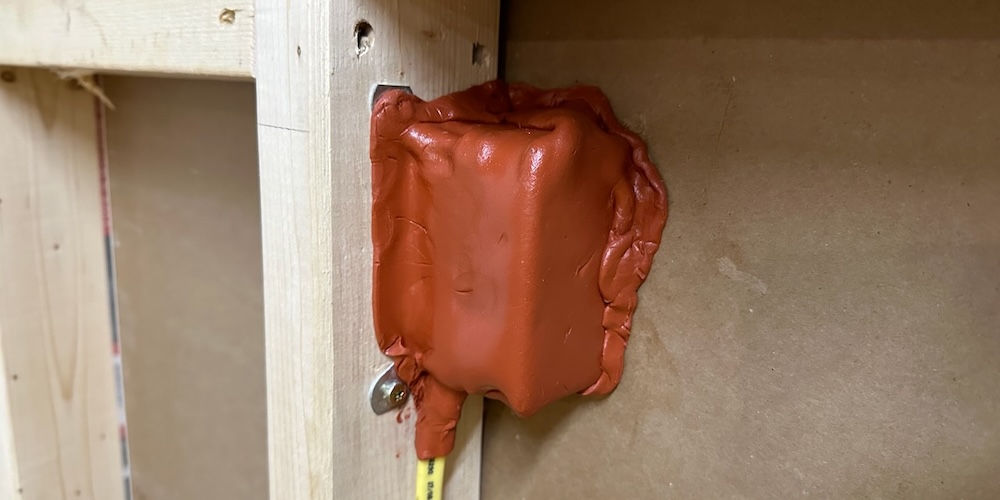
You can use regular air sealing spray foam to seal up those holes. A better way to reduce sound transmission, though, is to use acoustical putty pads. The video above shows how that works.
Rating wall assemblies for noise-reducing quality
When you’re trying to decide which wall assemblies to use to keep things quiet, there are a couple of numbers you need to know about. The first one is called the Sound Transmission Class, or STC. It’s a rating for how well an assembly reduces the transmission of airborne sound. The higher the number, the better it will be at keeping things quiet.
A standard 2″ x 4″ wood-framed wall with 1/2 inch drywall on each side and no cavity insulation has an STC rating of 34. Going to double 5/8 inch drywall on one side raises that into the 40s. Keeping the double drywall on one side and then putting fiberglass or mineral wool insulation in the stud cavities and putty pads on the junction boxes raises it to 50 or higher. And that’s considered a pretty quiet wall!
But there’s a lot of complexity here. You still could have a noise problem even with a high STC rating. That’s because of the role of frequency. If the noise you’re trying to limit has a significant amount of low frequencies, it can still come through a wall with a high STC rating. So if you live near an airport or have a budding drummer in the house, going with more mass in the wall will help more than just a high STC rating.
The other rating you’ll see mentioned in the soundproofing world is the Impact Insulation Class, or IIC. That person banging their head on the wall in the other room makes impacts. The same happens when someone walks with hard soled shoes on the hardwood floor above you. As with STC, the IIC rating is better when the number is higher. It’s usually applied to floors above occupied spaces.
So, the two ratings cover airborne transmission of sound (STC) and impacts that travel through solid materials (IIC). For walls in homes, the main one to know is STC. But there’s one more set of initials that we need to mention here…
Indoor Environmental Quality
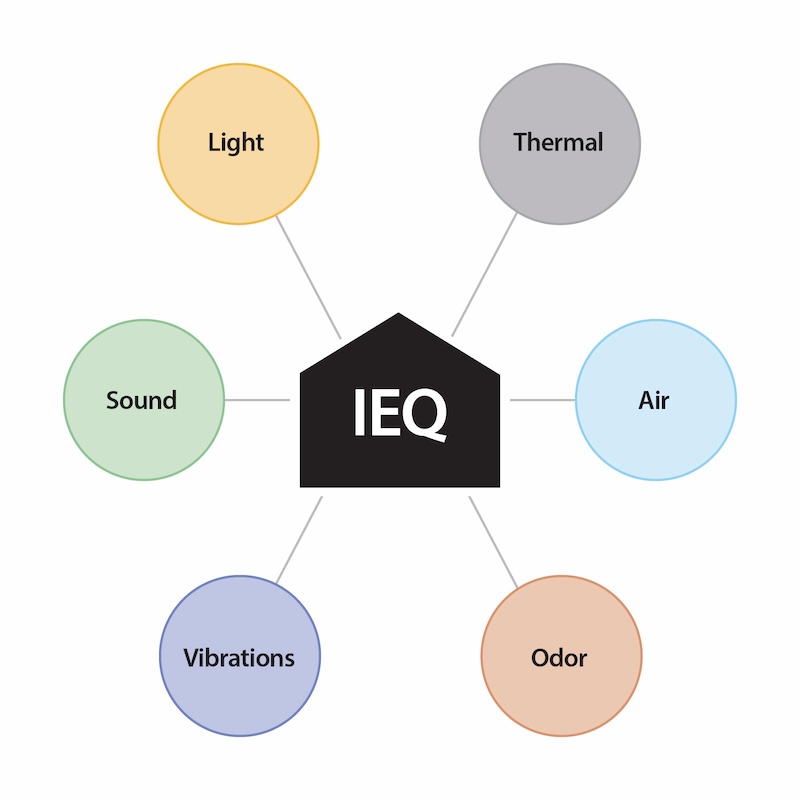
Most people know about IAQ, indoor air quality, but not nearly as many are familiar with IEQ, indoor environmental quality. When you’re designing, building, or remodeling a home, it should be top of mind.

As you can see from the graphic above, sound is an important part of indoor environmental quality. So learn what you can about reducing noise transmission through walls, floors, and ceilings, and you’ll make people happier when they benefit from your knowledge. Now, if only we could find a way to improve automated answering services that foster peace and tranquility, the world will really be a better place.
Allison A. Bailes III, PhD is a speaker, writer, building science consultant, and the founder of Energy Vanguard in Decatur, Georgia. He has a doctorate in physics and is the author of a bestselling book on building science. He also writes the Energy Vanguard Blog. For more updates, you can follow Allison on LinkedIn and subscribe to Energy Vanguard’s weekly newsletter and YouTube channel.
Related Articles
Do You Need an Extreme Home Makeover to Get a Soundproof Home?
Remodeling? Here Are 7 Reasons Not to Skip the Air-Sealing!
How to Fix a Leaky, Underinsulated Exterior Wall
Comments are welcome and moderated. Your comment will appear below after approval.

Good info. A couple of other tricks I learned when building a recording studio. A great product is Quiet Rock, a specialized drywall with a sound-dampening layer sandwiched in the middle. It’s expensive but easy to install and is not subject to being shorted out, a problem with the RC channel and long screws. Use acoustic caulking in the corners. Another good product is Rockwool insulation vs. fiberglass or cellulose. It is made of crushed rock and is much denser, limiting the transmission. Low frequencies are harder to cancel than mids and highs. For HVAC, use flex ducts and make at least two 90-degree bends in the run; that will cancel the sound waves, too. Good article, as usual, keep up the good work.
We used Quiet Rock or a similar gypsum product with an internal membrane on a research house during one of my previous employments. The installers hated it because you can’t just score the paper and break it. You pretty much have to cut it with a saw.
Allison, are the putty pads rated for use on electrical components?
Also, in my distant past as a construction supervisor I was asked to apply sound-deadening techniques to an office used by high level management officials. I began by applying 1 1/2” strips of pond rubber to the entire interior stud and plate surface, We also used rock wool insulation between the studs and door jamb gaskets and sweeps. I wanted to coat the solid core door as well, but management stepped in and said “Enough!” I guess they were happy, I got no complaints.
First, your suggestions are helpful, but primarily for new construction or a deep remodel to the studs. Here are some suggestions for existing homes, apartments and office buildings:
(1) Seal all air openings: As you noted, aur leaks = sound leaks. Gaps in walls, e.g. around receptacles, will allow sound to pass through. Gaps around pipes and wiring in the ceiling create the same problem. DAP 230 is a good solution for small gaps. Use the ‘Window and Door’ version of Great Stuff foam for larger gaps. This is easier to apply and readily available, compared to acoustic rubber pads.
(2) HVAC vents: Sound travels easily through the air — including HVAC ducts and vents. Are ducts shared with a noisy neighbor? If so and if possible, seal all vents into and out of your room.
(3) Double up your drywall: As you noted, additional mass helps. There is a better way to double-up drywall, however. For walls and ceilings, mount another layer of drywall over the first one, and use DAP 230 to ‘glue’ them together. DAP sealant is flexible – which deadens sound vibrations. Apply three full tubes of DAP 230 to each 4′ x 8′ panel. This will form a flexible connection between the sheets of drywall, to attenuate sound. You can use a few screws to hold the second interior sheet in place, but remove them after DAP dries. Leave a small gap around each edge and joint — so the interior drywall sheet does not touch the floor or ceiling — and fill the gaps with DAP 230. Note: for the ceiling this requires a panel lift – and probably a contractor.
(4) Floor: Depending on how your building is constructed, noise will still be transmitted through the floor and wall joists. This is more difficult to block. DriCore panels will help on the floor. They have a rubber layer on the bottom to block moisture — which also attenuates sound. Carefully seal all of the edges and joints with DAP 230 to block air and sound leaks. Then cover the DriCore with 1″ of Foamular 250 foam board — again applying tubes of DAP 230 between the DriCore and foamboard to create a layer that will attenuate sound. Then install 3/4″ plywood for your new flooring. (Foamular 250 has 25 PSI of compressive strength, which is ideal for residential floors and concrete slabs.)
(5) Windows: New triple-pane fiberglass windows significantly reduce sound transmission. Leading manufacturers include Marvin and Andersen. Casement and awning style windows seal much more effectively than standard double-hung.
I hope this is helpful,
The Tamarack Return AIr Pathways are also good at reducing sound transmission with the baffle. That along with solid core doors and insulation in the wall cavities help. We also added 6″-8″ of insulation in the floor joists with our Warmboard-S install – that also helps to dampen noise from above.
I replaced everything except framing, foundation, and roof on my 1960 rambler (basically a 1200 sf rectangular box) in 2022 so had the opportunity to treat as new construction. We added a half bath, creating a layout with bedrooms on one end, bathrooms on each side of a center hallway, and kitchen and living room on the other side of the house.
I filled all of the stud and top plate penetrations, and all significant cracks between them where they were nailed together, with fire rated foam or caulk. I also spray foamed behind and around all the electrical outlets. I used Rockwool for exterior walls, then decided to insulate the interior walls around each bathroom. What a difference it made!
We have definitely enjoyed the benefits of these improvements. Inside, we have no cold air coming through the power outlets. Sound-wise, we rarely hear anything going on outside, including cars driving by, wind, rain, etc. We usually don’t know it has rained overnight until we look out the window (no rain gutters dripping) unless it rains with thunderstorm intensity. The master bath and kitchen share a wall and from the kitchen we can only tell someone is in the shower if we consciously think about it and listen closely. In the morning, when I’m in the room across the hall from our bedroom, my wife will come in with wet hair and I am often not even aware she’s been in the shower. And if one of us calls the other from the kitchen or living room to a bedroom (intending to be understood), we’re only aware something was said, but not what – we have to get into the same room or yell loudly for that. So it seems the insulation around the bathrooms has not only reduced sounds going into and out of those rooms, it’s also minimized sound going from one end of the house to the other (by providing TWO insulated walls in between). For anyone wanting quiet, I HIGHLY recommend insulating interior walls (bathrooms at least).