The Science of Sag – Flex Duct and Air Flow
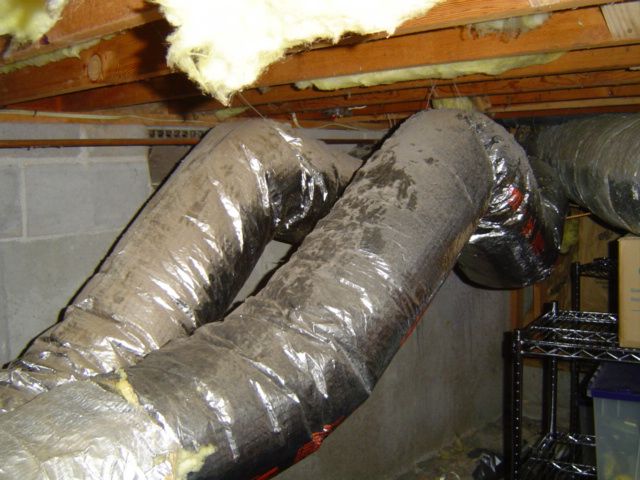
Sagging flex duct is bad for air flow. We all know it. We all talk about it. It turns out there’s research data to prove it, too. Texas A&M did a study a few years ago to look at the pressure drop that occurs for different levels of compression. If you’re not familiar with this study, the results may astound you.
Papers about scientific research aren’t always the easiest reading, but stick with me and I’ll see if I can make this one as painless as an Irish Car Bomb. (I’m talking about the drink, not an actual bomb, silly!) The paper I’m writing about here is titled, Static Pressure Losses in 6, 8, and 10-inch Non-Metallic Flexible Ducts, (pdf) by Kevin Weaver and Dr. Charles Culp. If you’d like to read it, click that link in the last sentence and dive in. If not, let me give you what I see as the big takeaways in their work.
What they did
Briefly, the researchers set up a test apparatus that let them control the air flow through a section of duct, both rigid and flex. Then they changed some of the properties of the flex duct to see what happened to the air flow and static pressure. The diagram below shows the test apparatus.

The variables they looked at were:
Compression of flex duct – How long was the duct compared to its maximum stretch? They looked at 5 variations here: maximum stretch and compressions of 4%, 15%, 30%, and 45%. Note that compression in this use refers to the degree that the duct wasn’t stretched out to its full length. It has nothing to do with being squeezed around the middle.
Support – They supported the flex duct in two ways. Either it was completely supported on a board, or it was supported on 1.5″ wide joists that were 24″ on center. The board-supported duct had only compression. The joist-supported duct had both compression and sag.
Sag – With joist-supported duct, they looked at natural sag and long-term sag. The difference between the two is that long-term sag represents and extreme case.
Duct size – They used 6″, 8″, and 10″ diameter round ducts.

The table above shows the amount of sag for the different compression percentages and duct sizes. Note the highlighted cells. They point to the sag for the 6″ duct, which is the size I’m going to focus on in this article. At low compression, the natural and long-term sag are the same. When you get up to 30% sag, though, they begin to diverge. At 45% compression, the 6″ duct has 7″ of natural sag and 11.5″ of long-term sag.
What they found
The researchers looked at the static pressure in inches of water column (i.w.c.) versus air flow in cubic feet per minute (cfm). They compared what happens in various states of compression for flex duct to what happens in rigid metal duct. Each graph below is for a different compression, beginning with a perfect installation that has no compression.
Also, each graph suffers from the tendency of academics to make things too complicated. They show as many as 12 curves on one graph. Ughh! I didn’t have time to replot the data and make them easier to understand, so I’m going to direct your attention to the data for the 6″ ducts only. They’re the ones with the circles for data points. Just ignore all the triangles and squares.
0% Compression. What you see in the first graph is that there’s essentially no difference between perfectly installed flex duct and rigid metal duct. The curves for the two types overlap almost perfectly when you pull the inner liner of flex duct tight.

4% Compression. The second graph shows what happens when you leave just a little bit of slack in the inner liner of the flex duct. It’s just 4%, but notice the big difference between the flex and the rigid metal duct here. The joist- and board-supported flex overlap each other but are both significantly higher than the rigid metal duct.
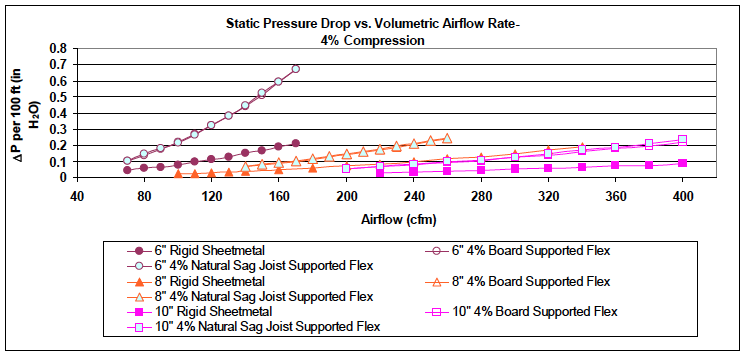
Looking at the 6″ duct data (the circles), find where each curve crosses the 0.1 i.w.c. static pressure line. If you read the air flow for each, you’ll see that the 4% compressed flex is moving about 70 cfm, whereas the rigid metal duct is moving about 110 cfm. Wow! That’s a huge difference and we’re only at 4% compression!
What this analysis shows is that the lower the curve on this graph, the better. The higher it is, the worse it is.
15% Compression. The performance of flex duct at 15% compression is significantly worse than sheet metal and also worse than flex at 4% compression. We can tell it’s gotten worse than at 4% compression because the scale of static pressure has increased. At 0% compression, the maximum static pressure was 0.225 i.w.c. At 4% compression, it rose to 0.8 i.w.c. Here at 15% compression, the static pressure scale goes all the way up to 3 i.w.c.
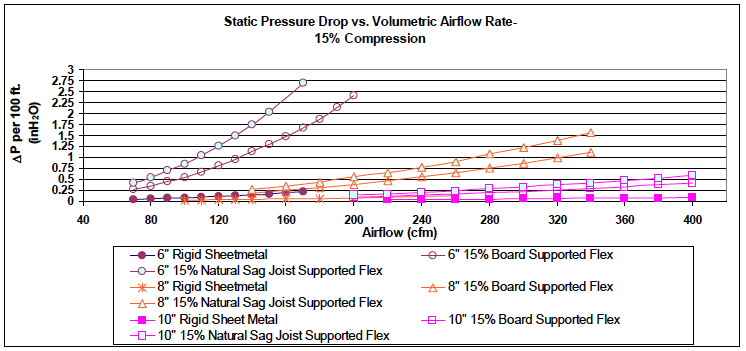
In addition, we see a new pattern developing. Now we see a difference between joist-supported and board-supported flex. You know which one is worse without even looking, right? (Recall from the last graph that the higher the curve, the worse it is.)
Another way to look at this is to notice that to keep the 70 cfm we had at 0.1 i.w.c. with 4% compression, we now have to have 0.25-0.5 i.w.c., depending on whether the flex is board- or joist-supported. Higher pressure means more fan power, which means more energy use.
30% Compression. Again, we see a big drop in performance. The curves move up. The maximum on the pressure scale this time is 7 i.w.c. To maintain 70 cfm in flex with this level of compression, we need 0.5-1.0 i.w.c. That is, more fan power and more energy use.
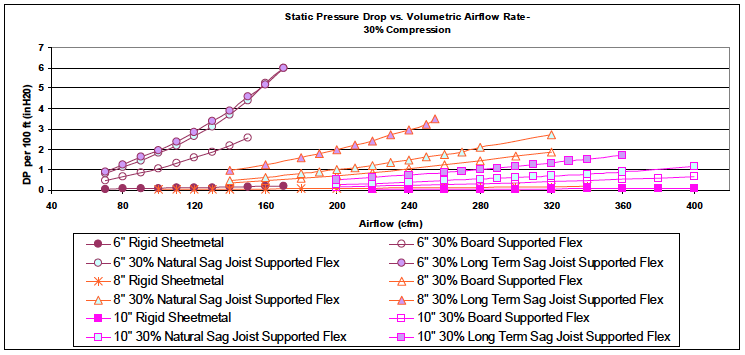
Also, they’ve plotted the other type of joist-supported data, those for long-term sag (i.e., worst case). Natural and long-term sag aren’t so different at 30% compression, though. Hmmm. I wonder what the 45% data will show?
45% Compression. Surprise! Surprise! Well, OK. There’s no surprise here. Everything again is much worse. The scale now goes up to 9 i.w.c. The flex with long-term sag is significantly worse than the flex with natural sag, which is worse than board-supported flex.

And to get 70 cfm of air flow in the ducts, we need nearly 1 to nearly 2 i.w.c. of pressure.
The big takeaways
Actually, that’s a pretty good title for this section. The big takeaways are that flex duct not pulled tight takes away a lot of air flow if you have a fixed-speed blower or it takes away a lot of your money if you have a blower that tries to maintain the flow no matter what it does to the pressure.
Also, apparently these data were the subject of a lot of debate on the Manual D committee. According to David Butler:
“When the latest (3rd) edition of Manual D was in development, there was a lot of discussion about friction rates of poorly installed flex. Texas A&M, having studied this, provided data from its research for inclusion in the manual, the idea being to give designers an idea of real-world friction rates, and hopefully persuade diligent contractors to follow recommended installation practice.”
He wrote that in a comment in my earlier article about how to install flex duct properly. In that article I posted a related diagram from the Air Diffusion Council’s installation manual for flex duct. It showed that when flex duct has 15% compression, you should double the friction rate. When it has 30% compression, you should quadruple the friction rate. (They don’t discuss 45% compression.)
If you look at these data from the Texas A&M study, you can see that the doubling and quadrupling are actually a bit optimistic. For joist-supported flex at 30% compression, for example, it’s more like a factor of 10, not 4.
Of course, you could use the data from this study to aid your design, and they do show all this now in Appendix 17 of Manual D. To design for proper air flow with improperly installed ducts would be downright stupid, though. If you can’t install it properly, use rigid metal duct.
Is flex duct worth the effort?
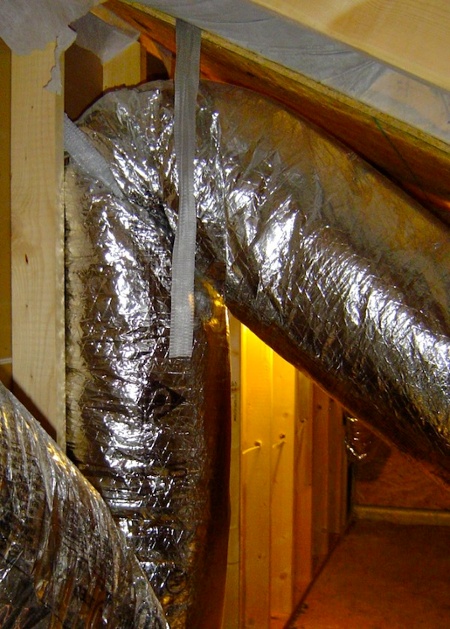
In my opinion, flex duct is just fine as long as you don’t abuse it. Pull it tight. Use it mainly for straight runs. Occasionally, you may find a place where you can make a long, gentle turn, and that can be OK. The analysis done by the Texas A&M researchers, however, applied only to straight runs of flex duct. It doesn’t apply to the extra turbulence you get when you make a mess of turning the air. If you do really stupid stuff, like put a sharp kink in it as shown below, that only adds to the problems of the liner not being pulled tight.
The problem is that most flex duct is installed horribly. The two photos I’ve included in this article are a tiny part of my collection. (Be sure to check out my new favorite duct disaster!) But installers get away with it by oversizing the heating and air conditioning systems so the bigger blower might have a chance of making the house reasonably comfortable.
There you have it. Flex duct can work, or it can go horribly wrong. Now, you bring the Guinness, I’ll bring the Jameson and the Bailey’s, and we can start discussing the deeper issues like double-stud walls versus exterior insulated walls, the proper metric for measuring the airtightness of Passive Houses, and whether or not Joe Lstiburek can stand on his head, drink a beer, and sing O Canada all at the same time. And after a couple or five Irish Car Bombs, we may all be standing on our heads.
Allison A. Bailes III, PhD is a speaker, writer, building science consultant, and the founder of Energy Vanguard in Decatur, Georgia. He has a doctorate in physics and writes the Energy Vanguard Blog. He is also writing a book on building science. You can follow him on Twitter at @EnergyVanguard.
Related Articles
How to Install Flex Duct Properly
Don’t Kill Your Air Flow with This Flex Duct Disease
The 2 Primary Causes of Reduced Air Flow in Ducts
Image Credits: Top & bottom flex duct photos by Energy Vanguard. All other images from research paper by Weaver & Culp.
NOTE: Comments are closed.
This Post Has 10 Comments
Comments are closed.

Well, if you won’t say it, I
Well, if you won’t say it, I will. The flex duct industry (represented by Ralph Koerber of ATCO and ADC Engineering Committee chair) fought tooth and nail to keep Culp’s research out of Manual D. The ADC position was (and presumably still is) that flex should be installed with 4% or less compression and that data regarding the impact of poor installation practice has no place in the standard.
However, in recognition of ACCA’s education mission (its design standards have always tended to be somewhat instructive), the consensus of the Manual D Review Committee was to:
“Instruct designers to follow flex duct manufacturers’ installation instructions (in the body of the standard) and to provide guidance (in an Informative Appendix) that allows designers and others to assess the impact of (and possible diagnoses after the fact) poor installation practices.”
Thanks for the article.
Thanks for the article.
Allison,
Allison,
One of the “big takeaways” I gleaned from your Mastering Building Science course (where you touched on this topic), was that very short runs of flex duct were fine, and actually desirable, for connecting branches of rigid duct to supply registers, in the interest of ease of making the connection, and also reducing the transmission of noise or vibration to the register. So, when I re-do a few of my existing Krakens, that’s the only application of flex duct I’m planning leverage.
~ John
John Poole touched on
John Poole touched on something that crossed my mind as I read Allison’s fine article during breakfast this morning: it’s been my understanding that the original intention for flex duct was to act as the final run of duct off a metal trunk to feed diffusers mounted in a suspended ceiling, as this method delivered both sound attenuation and flexibility for the spaces beneath the ceiling should they be reconfigured at some future date.
If this is true, it makes me wonder where and when it was decided to do whole house installations with this material. While the research data and field experience do state that if flex duct is installed properly (as a whole house delivery method) it will perform adequately for its intended design, the ease of which this material can be installed tempts the installer to become fuzzy in decisions regarding how it should be run and supported. It seems each time we make a form of fluid delivery easier to install (flex duct, CSST for black pipe, etc.) it reduces the skill level required for installation while raising the consequences for poor installation techniques. While metal duct systems are not immune to poor design and installation decisions, how often does one come across poorly designed and installed residential metal pipe duct systems vs. poor flex designs/installs?
I know flex duct use will not disappear. Therefore, information such as in Allison’s article is vital for HVAC personnel as well as end users to know about. The only way to raise expectations about our trade, that I know of, is to teach how it should be done properly to all affected by it. Thanks, Allison, for another great contribution to this effort.
My father was a commercial
My father was a commercial tinner, so some of my earliest memories are of the two of us installing gravity for forced air conversions. The skill level required, at least when working with Dad, was considerable and all but obsolete at the residential level. Which is why we started installing Unico.
I can design a forced air system for high or low efficiency but training a tinner takes 4 years and training for a proper high velocity system takes three installations. The drawings and flexibility of design and installation, taking into account the central, round plenum, common return and ease of installation, I would not be investing in conventional tin furnaces for new construction.
The future is clearly in a hybrid.
I agree with all of this but
I agree with all of this but it is a shame as an excellent install can be achieved with all hard elbows and turns, tight straight runs of flex and only a little more labor than it takes to do a poor job. I have reworked the duct work in my house and a friends and in each one we spent less than $200 on hard fittings, straps and high end tape. Two of us spent about 12 hours (6 each) total on each job and removed more than 1/3 of the flex. The improvement in air flow and comfort in both houses was almost unbelievable. It would have taken only a tiny portion of those 12 hours we spent redoing the system to have done it right to begin with.
All too common to see the
All too common to see the bends, twists and compression of flex ductwork. It is also ALL TO COMMON for a homeowner to ask “why” their energy bills went up when they just put in a higher SEER unit with a Variable speed air handler. It’s too hard to say “just look at the duct”. We use an analogy of airplanes and arrival times to make our point. Goes something like this:
You booked your flight to London 6 months in advance and know exact arrival times (barring delays at the gate). The problem the airline has is that they have NO idea of the winds and weather that day, but they have to get you there on time. With the wind at their back…they get you there at the same time with less effort (less gas $). With the wind in their face, they get you there at the same time with MORE effort (much more gas $). The variable speed air handlers are acting like a rigid time schedule and doing their best to get you there (to your point of comfort) and do it either with the wind…but more times AGAINST the wind! They maintain your comfort, but at a cost!
Thanks for posting Allison! As always…great stuff!
My understanding is that the
My understanding is that the Air Diffusion Council once was a good source for information about terminals and terminal design. As far as I can tell it was taken over my the flex duct manufacturers who use it to promote their product in spite of all the failings and problems with the product.
As mentioned above, If you insist on using flex duct, use it only for straight runs– use metal for the rest.
Just a home-owner here with a
Just a home-owner here with a question. Regarding the practice of using metal for trunk runs and duct for straight-branch runs… does this recommendation hold true no matter where the ductwork is located (in conditioned or unconditioned/attic space)?
I ask because one of the local HVAC contractors I am talking with (after requesting a metal trunk run) mentioned it didn’t make sense (to use metal duct) here in Phoenix. He claims metal ductwork gets “too hot” when in the attic space. Is there any merit in his claim?
@Max, I’m guessing that
@Max, I’m guessing that contractor made up such cockamamie story because his crews don’t know how to work with metal. The underlying duct material is irrelevant in terms of heat loss/gain as long as it’s equivalently insulated and sealed.
That said, I would rather see a crappy flex duct system fully inside the envelope than a beautiful metal duct system in a Phoenix attic. With a large enough blower, it’s usually possible get a poorly installed duct system to balance out. The additional blower energy required to do that would be a lot less than what’s lost by running ducts in an unconditioned attic.
If enough home buyers would ‘just say no’ to attic ducts, builders and home designers would come around.