2 Ways to Get the Best Insulation in Your Home
Insulation is a wonderful thing. It saves energy. It makes buildings more comfortable. And it’s pretty inexpensive considering how long it lasts (or should last). I get asked a lot for my opinion on the best insulation to put in a building and my answer is straightforward: The best kind of insulation is a well-installed insulation. I like fiberglass. I like cellulose. I like spray foam. I like mineral wool. I like blown, sprayed, batt, and rigid insulation. Yeah, different materials have different properties, with their advantages and disadvantages. But if it’s installed well and protected by good water and vapor control layers, it should do its job for a long, long time.
So, what are my two ways to make sure you get the most out of your insulation? Both have to do with installation.
1. Request a minimum thickness.
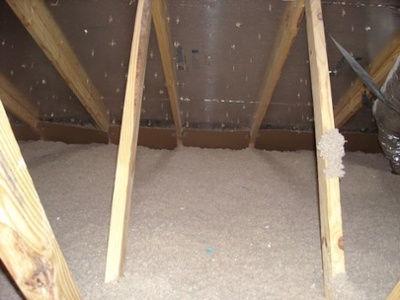
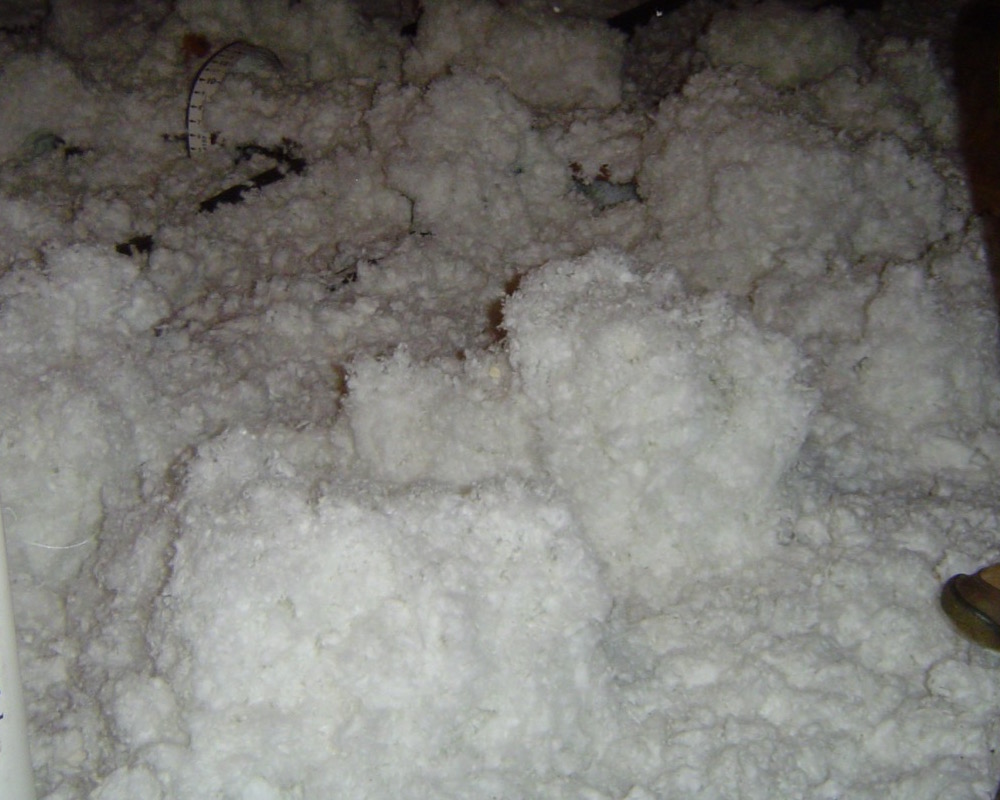
Way back in 2010 I wrote an article called Flat or Lumpy – How Would You Like Your Insulation? I refer to it now and then but it’s important enough to make it the highlight of this article. The point of the article was that if you install insulation uniformly, as in the lead photo above, you’ll get much better performance than from insulation installed (or later disturbed) like you see in the photo below. Flat beats lumpy.
In that article, I showed an example of an attic done two different ways. First, you insulate the attic uniformly to a thickness that gives you R-30 everywhere. You can’t do this in a typical attic because the roof framing doesn’t give you enough space over the eave walls to get full thickness so you’d have to do something like use raised heel trusses. But we’re going to assume here that you get full thickness everywhere because that’s what you should be doing, even if it’s not required by code.

In the other scenario, I looked at what happens if you take the same amount of insulation and install it so that you have enough thickness for R-10 on one side of the attic and R-50 on the other side. Your first guess may be that the average resistance to heat flow would be R-30 since 10 and 50 average to 30.
But you’d be wrong. In the Flat or Lumpy article, I showed the calculation and it comes out a lot less than R-30. In fact, at R-17 it’s about half. That means you have almost twice as much heat flow even though you have the same amount of insulation.

So, rule number one is to make sure your insulation contractor isn’t selling you on average thickness. That means they’re getting away with selling you less R-value.
Where this matters the most is when you have less thickness of insulation. For example, if you’re using closed-cell spray polyurethane foam, you’re getting an insulation with a much higher R-value per inch than many of the other insulation types. So you usually get less thickness.
In a 2×4 wall where you need R-13 to meet code, spray foam contractors usually install two inches of closed-cell spray foam. Since it’s usually rated at about R-6.5 per inch, that means if, say, 25% of your wall has only 1.5″, you get about R-10 there instead of R-13. If the rest of the wall is right at 2″ thick, your average R-value in the cavities is 12, not 13. You’re not getting what you paid for.
Even if you’re not building a new home, you can still take advantage of this property of insulation. If the insulation in your attic is lumpy, as in the second photo of this article, you can save energy and probably enhance the comfort of your home by spreading it out uniformly. Remember: Flat beats lumpy.
2. Request Grade I installation quality.
In addition to making sure you get the thickness to achieve the R-value you’re paying for, you should also make sure the insulation is installed in other ways that ensure it achieves maximum R-value. RESNET created an insulation grading protocol back in 2006 and certified home energy raters have to use that protocol for every rating they do. When they’re inspecting a house, they have to determine the R-value for each insulated assembly and also the grade, I, II, or III. Grade I is the best, Grade III the worst.
The protocol is based on looking for two things. First, the amount of missing insulation determines what grade it might be. Here’s the RESNET diagram, with the dark areas representing gaps in insulation.
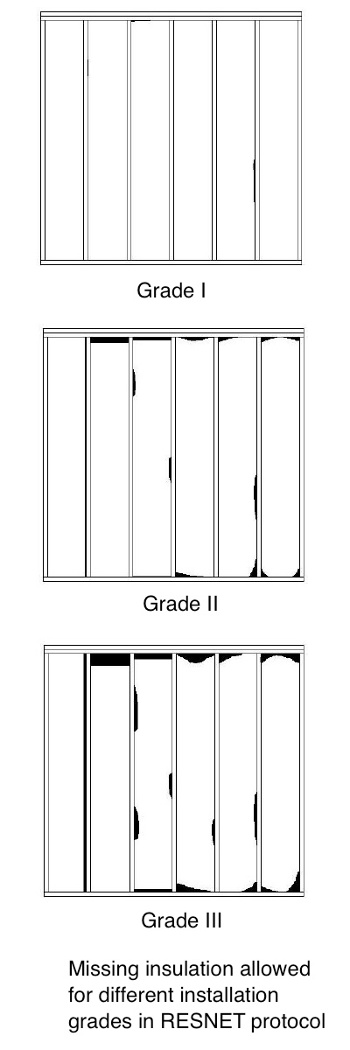
Officially, Grade I means essentially no gaps, Grade II can have up to 2% gaps, and Grade III can have no more than 5% missing insulation.
The other factor is compression and incomplete fill. The insulation might fill the cavity completely from side to side and top to bottom but still have a reduced R-value if it’s compressed or doesn’t fill the cavity completely from front to back. (I’m thinking of walls when I use those directional terms. Adjust as necessary for ceilings and floors.) I wrote a thorough explanation of the grading protocol back in 2012, so check it out for more detail.
And let me say something about compression here. It’s not the most heinous sin to commit with insulation. Sometimes it’s unavoidable. If you put R-19 fiberglass batts in an enclosed 2×6 wall, for example, they will be compressed. That happens when you put a 6.25″ batt in a 5.5″ space. The result is that the R-value per inch goes up and the total R-value goes down. That R-19 batt yields R-18 in that case. (See my article on compressed insulation for more.)
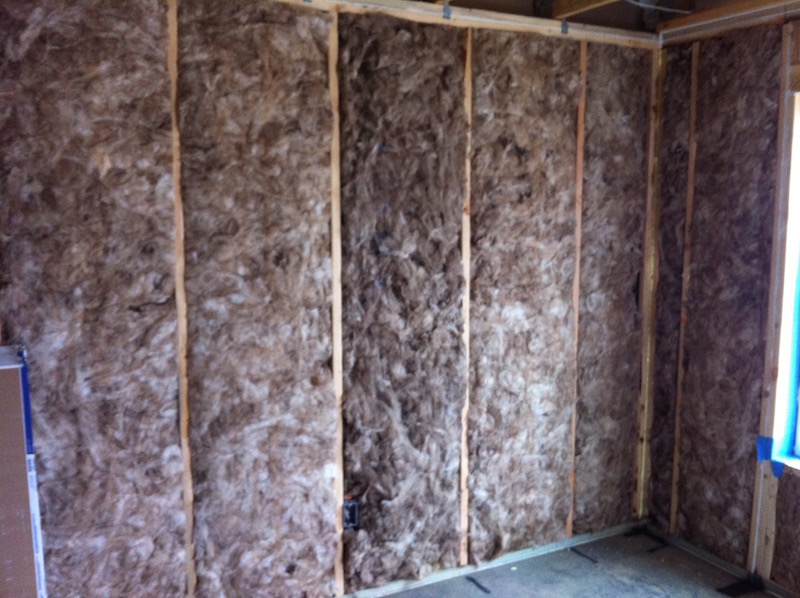
And yes, Grade I is possible with fiberglass batts, too. I’ve seen it done a few times, as in the photo above from a Habitat for Humanity project in Nashville.
Takeaways
When you get insulation, you want to make sure you get the full R-value you’re paying for. Do these two things:
- Insist on having it installed to a minimum thickness, not an average thickness.
- Insist on Grade I installation quality.
By the way, if you read the manufacturer’s instructions for installing insulation, they generally align with Grade I installation quality so you’re not really asking for anything special here.
This certainly isn’t all there is to getting a good insulation installation. Before you ever get to the installation part of the job, way back in the design phase, it’s a good idea to see what you can do to eliminate thermal bridging and make sure you can get full thickness everywhere (as with raised-heel trusses).
Insulation is important. And for a lot of it, you get only one chance to get it right for the three or more decades until the house gets gutted. It’s good to understand how it works.
Related Articles
Flat or Lumpy – How Would You Like Your Insulation?
Attic Stairs – A Mind-Blowing Hole in Your Building Envelope
The Layers and Pathways of Heat Flow in Buildings
How to Grade the Installation Quality of Insulation
NOTE: Comments are moderated. Your comment will not appear below until approved.
This Post Has 39 Comments
Comments are closed.
What does “random fill” mean
What does “random fill” mean in relation to spray foam?
Allison: What are your
Allison: What are your thoughts on using unfaced glass fiber batt insulation vs. paper-faced or foil-face batts? I claim that the paper or foil face is only used so that the installer doesn’t have to touch the glass fibers and that it is ineffective as a moisture retarder or air barrier and probably results in “lumpier” insulation. Also, it makes it harder to inspect to see if you have Class I installation.
Paper (aka Kraft) faced
Paper (aka Kraft) faced insulation is fine because the paper performs as a vapor retarder. I’ve never seen foil-faced batts in the South and I can’t image why you’d need them unless it met some weird code requirement.
Aside from being able to easily pull out unfaced batts for inspection of insulation around wiring and behind outlets, I don’t see any substantial difference in being able to determine the grade of install between paper-faced and unfaced batts.
JC: If you look at the above
JC: If you look at the above photo with unfaced batts, it is easy to view the installation quality without pulling out anything. If you were to look at a comparable photo with paper-faced, I don’t see how you could inspect it without pulling out every batt. As far as the paper acting as a vapor retarder, I have problems believing that, since you have an unsealed seam around every stud space.
IMO this photo looks like
IMO this photo looks like Grade 1.
https://energyvanguard.com/blog/57644/In-or-Out-Where-Does-the-Paper-Facing-of-Batt-Insulation-Go
JC, the key part of your
JC, the key part of your comment is “looks like.” Here’s the full photo I took of that insulation:
[[{“fid”:”2332″,”view_mode”:”default”,”fields”:{“format”:”default”,”field_file_image_alt_text[und][0][value]”:”Grade III installation of fiberglass batt insulation with a kraft paper facing”,”field_file_image_title_text[und][0][value]”:”Grade III installation of fiberglass batt insulation with a kraft paper facing”},”link_text”:null,”type”:”media”,”field_deltas”:{“1”:{“format”:”default”,”field_file_image_alt_text[und][0][value]”:”Grade III installation of fiberglass batt insulation with a kraft paper facing”,”field_file_image_title_text[und][0][value]”:”Grade III installation of fiberglass batt insulation with a kraft paper facing”}},”attributes”:{“alt”:”Grade III installation of fiberglass batt insulation with a kraft paper facing”,”title”:”Grade III installation of fiberglass batt insulation with a kraft paper facing”,”class”:”media-element file-default”,”data-delta”:”1″}}]]
As you can see, the installers left a gap that provides a view of what that insulation looks like behind the facing. (I don’t know why they left the gap.) Here’s a closeup of the gap:
[[{“fid”:”2333″,”view_mode”:”default”,”fields”:{“format”:”default”,”field_file_image_alt_text[und][0][value]”:”Grade III installation of fiberglass batt insulation with a kraft paper facing, closeup”,”field_file_image_title_text[und][0][value]”:”Grade III installation of fiberglass batt insulation with a kraft paper facing, closeup”},”link_text”:null,”type”:”media”,”field_deltas”:{“2”:{“format”:”default”,”field_file_image_alt_text[und][0][value]”:”Grade III installation of fiberglass batt insulation with a kraft paper facing, closeup”,”field_file_image_title_text[und][0][value]”:”Grade III installation of fiberglass batt insulation with a kraft paper facing, closeup”}},”attributes”:{“alt”:”Grade III installation of fiberglass batt insulation with a kraft paper facing, closeup”,”title”:”Grade III installation of fiberglass batt insulation with a kraft paper facing, closeup”,”class”:”media-element file-default”,”data-delta”:”2″}}]]
It’s clear they left voids in all four of those lower cavities. They didn’t split the insulation around the pipe in the left bay. It looks like they did chink some insulation behind the junction box, but overall, this is grade III. But if all you see is the paper facing, you’re right. It “looks like” grade I.
The facing seems to be only for the convenience of the installers. I prefer unfaced batts and that’s what I used when I gutted and remodeled my bathroom two years ago. Here’s what grade I looks like there:
[[{“fid”:”2334″,”view_mode”:”default”,”fields”:{“format”:”default”,”field_file_image_alt_text[und][0][value]”:”Unfaced fiberglass batt insulation, grade I installation”,”field_file_image_title_text[und][0][value]”:”Unfaced fiberglass batt insulation, grade I installation”},”link_text”:null,”type”:”media”,”field_deltas”:{“3”:{“format”:”default”,”field_file_image_alt_text[und][0][value]”:”Unfaced fiberglass batt insulation, grade I installation”,”field_file_image_title_text[und][0][value]”:”Unfaced fiberglass batt insulation, grade I installation”}},”attributes”:{“alt”:”Unfaced fiberglass batt insulation, grade I installation”,”title”:”Unfaced fiberglass batt insulation, grade I installation”,”class”:”media-element file-default”,”data-delta”:”3″}}]]
You still have to pull the insulation out to make sure it fills the cavities completely but you don’t have to tear any paper facing to do so.
Trickery with your cropping
Trickery with your cropping of photos !!! 😉
The full picture is too funny. I bet their rolls were of a fixed length and they didn’t have enough insulation to fill in the gaps. Reminds me of a time when I saw sheetrock crew cover a void like that on an exterior wall of a luxury townhome.
This raises another question.
This raises another question. If you are using unfaced batts (which I think that we all agree now are preferable), what do you do when there is an electrical cable (Romax) crossing the stud space? The cable is typically in the middle of the wall cavity. Do you pull the insulation behind the cable, go over the top of it, or slit or split the insulation so that it is on both sides of the cable?
I still remember installing these batts in my youth. For each house, that was the most miserable week of my life — 1 day of installation and 6 days of itching afterwards.
Maybe, maybe not. I would
Maybe, maybe not. I would claim that it depends on the batts behind the paper, not the paper itself.
I agree with you, Roy, for
I agree with you, Roy, for all the reasons you stated. Unfaced batts are definitely the way to go.
I believe you should cover
I believe you should cover unventilated attics and outsulation for a complete picture.
Armando, if I were going to
Armando, if I were going to provide a complete picture, I’d have to discuss the partial differential equations for heat and moisture flow (below) and talk about all kinds of things that would take attention away from the main point of this article.
[[{“fid”:”1328″,”view_mode”:”default”,”fields”:{“format”:”default”,”field_file_image_alt_text[und][0][value]”:”wufi partial differential equations heat moisture flow”,”field_file_image_title_text[und][0][value]”:”Partial differential equations for heat and moisture flow”},”link_text”:null,”type”:”media”,”field_deltas”:{“1”:{“format”:”default”,”field_file_image_alt_text[und][0][value]”:”wufi partial differential equations heat moisture flow”,”field_file_image_title_text[und][0][value]”:”Partial differential equations for heat and moisture flow”}},”attributes”:{“alt”:”wufi partial differential equations heat moisture flow”,”title”:”Partial differential equations for heat and moisture flow”,”class”:”media-element file-default”,”data-delta”:”1″}}]]
Diff E. Q!
Diff E. Q!
Allison, my company has long
Allison, my company has long advised it is NOT OK to partially fill a wall cavity with spray foam. Many bad things can happen – and in fact your above analysis does not take into account that you will have large thermal gradients within that hollow cavity if not filled with addition insulation of some other type. You can’t ignore the science that the framing itself can have significant influence on the temperature of the interior cavity – especially where using 2×6 at 12″ oc (which seems to be popular where I live). The backside of the sheetrock does not receive anywhere near the full benefit of the intended insulation. We have done thermal studies on this. It’s easy for anyone to do.
BUT ON ANOTHER SUBJECT ENTIRELY (sorry for the rant) – I used to live in a home with an attic that had blown cellulose insulation. I bought it new. The attic was tough to get to so I maybe only went up there once a year to check on things. By the time we sold the home I had started work in the building industry and so I noticed that the blown cellulose had “aged” – by that I mean it had settled significantly, and was dirtier than the nice clean product I had seen when we bought the product. I’m sure humidity (from inside and out) weighs it down at ALL TIMES of the year. In retrospect I’m wondering if I should have been going into the attic every year and with a wire rake I fashioned out of a pole and coat hangers (it looked so bad I did this before we moved so it wouldn’t fail inspection) trying to re-loft the insulation. What do the manufacturers and installers say about this? We still recommend blown cellulose often where budgets can not use our roof panels, but I still wonder about the need for lofting over time.
I used to teach a heat
I used to teach a heat transfer class and we would analyze heat transfer through a wall to compare the effects of various mechanisms of heat transfer. If you have a vertical 3.5″ cavity filled with still air, the R-value is about 21. This is a lot better than the typical R11-R15 that you get with 3.5 inches of insulation. So why bother with insulation? Because the air will not be “still”. If you have about a 30 F temperature difference across that air space, the R-value drops to about 3 due to natural convection in the air space, and that is assuming that you have blocked long wave radiation with a perfectly reflective surface on one side of the cavity. If you don’t have that reflective surface, you will only have about R1. So why do we put insulation in the wall cavity? It stops natural convection and blocks long wave radiation. Since the only significant heat transfer mechanism with insulation in place is conduction, you do want a material with a high R-value, but again, its main value is to block natural convection and radiation.
The homes that I build in
The homes that I build in coastal North Carolina consistently achieve a blower door test well below 2 ACH (NC code is 5 ACH max). What I tell my clients is that heat moves in three ways: conduction, convection and radiant. We try to address all three in some manner but the real kicker is that convection trumps all else (IMHO). If air is moving through the house envelope anywhere you are wasting you money on the other two. So our first energy dollar is always spent on sealing the envelope first. If I can spend it on closed cell stray foam and get the benefits of stopping convection, reducing conduction, AND dramatically increasing the structural integrity (hurricane resistance) of the building, that is money well spent.
Thomas, just to be technical,
Thomas, just to be technical, which is a bad habit of mine, energy loss through due to the bulk movement a fluid from one place to another is “advection”, not convection “Convection” is a combination of “conduction” (heat transfer from a surface to a moving fluid) and “advection” (bulk movement of the fluid). For my wall analysis, I was ignoring any bulk movement of air (advection) through the wall cavity. I will agree that sealing the envelope is important too, but I don’t think that I would say that it “trumps” all else.
So hear is another question (or two): Does spraying foam insulation in the wall cavity sufficiently seal the wall assembly, or do you still need a properly installed air barrier? I would still think that you need the air barrier to handle leakage paths that don’t get spray foam. If that is the case, then does spray foam make a house with a properly installed air barrier any tighter? I don’t think so, so I would go with the most cost-effective cavity insulation regardless of its air sealing properties.
As for spray foam having structural benefits, that makes sense. Are there any studies that show that to be true? Does using spray foam allow for other cost savings such as thinner sheathing or reduced wind bracing?
“Does spraying foam
“Does spraying foam insulation in the wall cavity sufficiently seal the wall assembly, or do you still need a properly installed air barrier?”
– Versus other forms of insulation closed cell spray foam (ccSPF) if applied correctly will easily fill in air-leaks, but IMO it’s poor judgment to solely rely on interior applied ccSPF as your air-barrier. Note: You could apply ccSPF on the exterior and it would work fine but it’s expensive (https://buildingscience.com/documents/insights/bsi-048-exterior-spray-foam).
“As for spray foam having structural benefits, that makes sense. Are there any studies that show that to be true? Does using spray foam allow for other cost savings such as thinner sheathing or reduced wind bracing?”
– Yes there are studies. Correctly applied ccSPF will not readily compress. Peruse around the BSC website.
My company provides closed
My company provides closed cell polyurethane foam structural insulated panels and the closed cell foam – even sprayed in a stud framed structure – will absolutely make the structure stronger. And it air seals at the same time (so one of the earlier commenters was not correct when saying it would not help air sealing). Of course air sealing is secondary to wall R values – that’s well established science according to ASHRAE. But back to the strength thing – the great thing about closed cell spray foam and wood is that the entire structure becomes rigid, but slightly elastic. We call this “rebound”. We have tested panels to over 200 lbs/sqft on 10′ span and after an hour of loading the panel will immediately rebound to zero deflection after weight removed. We had structures that were the ONLY surviving structures in a particular neighborhood on eastern side of St. John in USVI after more than 5 hours of 185+ winds in Hurricane Irma – all other stick frame and CMU buildings were destroyed either entirely or significantly. That was a pretty good testament to the strength you can achieve by having a structure held together by closed cell foam – either panelized like our system or stick frame, the polyurethane “glue” is bonding everything together.
Thank you Roy for adding
Thank you Roy for adding another term to my collection. I only got into this Building Science topic about eight years ago and learn more every day. My point with “advection” (see, I can learn) trumping all else, is based upon an example of having an R40 block of Dow foam with an air gap around the edges. The R40 block is rendered almost useless. As for structural enhancement from closed cell foam, a long time ago I bought a Dodge window van to make into a camper. Back then (1970s) the only place to get spray foam was a place that built refrigerated trailers. I had them spray a 1″ layer of closed cell onto all of the external metal surfaces, especially the roof deck. I could walk all over that metal roof and even jump up and down on it without it “oil canning” or denting. If I ever had to roll a vehicle over, that would be my choice.
My house was newly built.The
My house was newly built.The contractor used R-13 for 2×4 walls.We still feel cold in the house..Going forward what would you recommend?..
I’m just a regular old
I’m just a regular old consumer trying to gain a little education about how the parts of a home’s structure all work together. I have no affiliation with the building industry or products. I started following you when I had to sell my mom’s house and was told she had put in too big an AC unit for her square footage. I thought that was hogwash, research led me here and I became much better educated on ACs. The AC unit unfortunately WAS too large Thank you for that. Now we are remodeling a duplex for our upcoming retirement and this article and links below the article make me want to ask this question. If you have a continuous attic space that includes (over) areas not heated and cooled, such as our garage, do you need to insulate the area over the garage? My husband says NO! My readings about insulating the pull down attic door have led me to my question. We are moving the attic door from the laundry room out into the garage to allow for a different usage for the inside area below the door. If the attic space is continuous, is insulation needed over the areas that are not cooled or heated, or have we accidentally corrected any issue by moving the attic door out of the area that is cooled and heated? It seems to me that any uninsulated attic area that heats up or cools down excessively and is connected to the area with insulation, would lower the effectiveness of my insulation.
I would suggest you think in
I would suggest you think in terms of a thermal envelope around your conditioned space. Your pull down used to penetrate that insulated envelope so it was of a concern for air leakage. Moving it over the garage took it out of your thermal envelope, so that space does not need insulating as part of the house.
If, however, you were to move the thermal envelope up into the roof rafters by sealing the attic and using spray foam or other forms of insulation, then the shared space above the garage would need to be insulated to complete the envelope.
Hope that helps.
D
Cyndy,
Cyndy,
What Thomas said is correct, but let me approach it a bit differently. You asked, “If you have a continuous attic space that includes (over) areas not heated and cooled, such as our garage, do you need to insulate the area over the garage?” The first answer to your question is no. If you were building a new home, building inspectors would not fail you for omitting the insulation from the ceiling over the garage. It’s not required by code because that ceiling separates one unconditioned space (the attic) from another unconditioned space (the garage).
Take a look at which way the heat will flow and where it goes. With no insulation over the garage, heat will flow from the attic to the garage in summer. This will keep your garage a bit warmer. Some people, especially in hot climates, insulate that ceiling to keep the garage cooler, but it’s not required and won’t save you any money on your energy bills unless you also heat or cool your garage, which is a whole nother issue. Same goes for the walls that separate the garage from the outdoors.
What’s the proper foam to use
What’s the proper foam to use in a metal barn in northeast TX? In IL where I’ve been for 25 years closed cell seems to make the most sense, but the spray foam contractors in TX tell me they use open cell all the time. I may use closed cell on the lower parts for durability but I can get twice the R value for the same money using open cell on the underside of the roof. My fear is condensation on the metal behind the open foam. It’s unlikely that I would ever cover the foam with any type of sheathing. Are my fears valid? Lee
I started using spray foam
I started using spray foam for increased strength in roofs against hurricane force winds. Open cell does not provide this strength. So if you want to help your barn survive a Texas tornado, use closed cell. I only use open cell for some limited wall situations.
I have a challenging house
I have a challenging house and am unsure of the best way to insulate the attic. It is a round house built out of fiberglass. The exterior walls are made of 2×4 studs with the round fiberglass panels (16 of them) affixed to them, with standard 3.5″ batt insulation between the studs, so the walls seem fine. The roof, however, is also made of fiberglass similar to a boat hull, i would estimate about 1/4″ thick. The center of the roof has a dome, which is also a vent, and the eves overhang the walls and also have vents in every panel section. The previous owners installed a suspended ceiling and attempted to insulate with batts, but they had a problem with heat getting into the attic and condensing. They added blown insulation on top of the batts, which helped but did not solve the problem. They installed a shop fan in the attic to blow air over the roof deck, especially the dome, to keep condensation from forming, but they said they have to run it all the time during the winter. I am wondering if i should completely seal the roof so there is no ventilation, and spray foam on the underside of the fiberglass roof “decking”, or if i should try to leave the attic ventilated and attempt to seal above the ceiling. I do need to be sensitive to the weight and height of the ceiling since it needs to hang from the fiberglass structure as well as limited height options. I am unsure how to find competent advise for such a unique structure, and i do not want a mold problem. Any suggestions where to start?
Greg, first of all, I would
Greg, first of all, I would love to see photos of this house. Sounds most interesting. In a previous post, I indicated that I began using closed cell foam due to its inherent strength properties. Also, I am a firm believer that tighter is better so that I can control what comes in and what goes out. My latest house blew .54 ACH at 50 Pascal and I am now looking to reach .3 ACH on my next one. I believe closed cell weighs in at around 3 lbs per cubic foot. So, a three inch layer applied directly to the roof deck would add less than 1 lb per square foot of roof. I would like to think that the added structural strength from the foam would offset the added weight. A structural engineer should be able to easily verify that. You could then use the suspended ceiling solution with no insulation adding to its load. As for humidity control (an absolute must have), I have not had good luck relying upon my HVAC systems to handle “latent loads” year-round. Aprilaire has a nice 70 pint ductable unit that is very quiet and has performed very well here in coastal North Carolina. Ultra-Aire has one also that works well but is a little bit noisier and costs a couple hundred dollars more. Finally, this is not a good place to use open cell (IMHO). Seal it up with closed cell. (p.s. Still want to see photos).
Thomas,
Thomas,
Thank you very much for your comments. We have contacted a local spray foam company to come give us an estimate. They were unsure based on a phone conversation and wanted to see it first. They initially suggested rigid, but then we raised the issue of trying to keep condensation off of it they said perhaps open cell would be better to allow any moisture to pass on through and escape. That seems counterintuitive to me. I have a lot to learn.
Thank you for the tip on humidity control as that sounds like a must have for this house, and being in the Ozark hills and on a lake the moisture levels are always high.
I don’t see how I can upload photos, so I am hoping that sending by email the moderator can add them or send them out.
Here is a picture of the outside where you can see the roof structure and the vented center dome on top:
<<...>>
Here is a picture of the inside wall where you can see the curvature, the structure and insulation:
<<...>>
Here is a picture of the center pole inside the house, looking up at the dome in the very center. The dome is vented all around the bottom, so that would need to be sealed up completely I assume:
<<...>>
Here are the photos, with
Here are the photos, with Greg’s comments:
Here is a picture of the outside where you can see the roof structure and the vented center dome on top:
[[{“fid”:”2434″,”view_mode”:”default”,”fields”:{“format”:”default”,”field_file_image_alt_text[und][0][value]”:”Greg Titus dome outside”,”field_file_image_title_text[und][0][value]”:”Greg Titus dome outside”},”link_text”:null,”type”:”media”,”field_deltas”:{“1”:{“format”:”default”,”field_file_image_alt_text[und][0][value]”:”Greg Titus dome outside”,”field_file_image_title_text[und][0][value]”:”Greg Titus dome outside”}},”attributes”:{“alt”:”Greg Titus dome outside”,”title”:”Greg Titus dome outside”,”height”:”800″,”width”:”600″,”class”:”media-element file-default”,”data-delta”:”1″}}]]
Here is a picture of the inside wall where you can see the curvature, the structure and insulation:
[[{“fid”:”2435″,”view_mode”:”default”,”fields”:{“format”:”default”,”field_file_image_alt_text[und][0][value]”:”Greg Titus dome inside”,”field_file_image_title_text[und][0][value]”:”Greg Titus dome inside”},”link_text”:null,”type”:”media”,”field_deltas”:{“2”:{“format”:”default”,”field_file_image_alt_text[und][0][value]”:”Greg Titus dome inside”,”field_file_image_title_text[und][0][value]”:”Greg Titus dome inside”}},”attributes”:{“alt”:”Greg Titus dome inside”,”title”:”Greg Titus dome inside”,”height”:”722″,”width”:”600″,”class”:”media-element file-default”,”data-delta”:”2″}}]]
Here is a picture of the center pole inside the house, looking up at the dome in the very center. The dome is vented all around the bottom, so that would need to be sealed up completely I assume:
[[{“fid”:”2436″,”view_mode”:”default”,”fields”:{“format”:”default”,”field_file_image_alt_text[und][0][value]”:”Greg Titus dome roof vent”,”field_file_image_title_text[und][0][value]”:”Greg Titus dome roof vent”},”link_text”:null,”type”:”media”,”field_deltas”:{“3”:{“format”:”default”,”field_file_image_alt_text[und][0][value]”:”Greg Titus dome roof vent”,”field_file_image_title_text[und][0][value]”:”Greg Titus dome roof vent”}},”attributes”:{“alt”:”Greg Titus dome roof vent”,”title”:”Greg Titus dome roof vent”,”height”:”799″,”width”:”600″,”class”:”media-element file-default”,”data-delta”:”3″}}]]
Greg,
Greg,
There’s a lot to say about this house and the things you’ve written about it. First, Thomas is absolutely correct about controlling humidity. You’re in a humid climate so the first step is to make sure you have adequate control layers for heat, air, and moisture. The problem you’ve had with condensation at the roof is because fiberglass insulation, whether in the form of batts or blown, is a control layer for heat only. A drop ceiling doesn’t control air so when that was in the house, humid outdoor air could easily go from the “attic” to the conditioned space below in summer, causing the indoors to be too humid. It could also lead to mold growth. In winter, the humid air would be in the heated space and with an air permeable drop ceiling, that moisture can get into the “attic” and condense on the cold surfaces of the roof.
Here’s an article I wrote a while back about control layers:
Be a Controlling Building Enclosure Control Freak with Control Layers
That fan in the central opening of the roof would only make things worse by moving more humidity through the house.
From photo of the inside of the home, it looks like the floor might be exposed dirt. Is that the case? I see concrete around the outside so maybe it’s actually carpet or something else that just looks like dirt. If it is actually dirt, that needs to be covered with a Class 1 vapor retarder (a vapor barrier like polyethylene) and sealed. Exposed dirt can add a lot of moisture to the indoors.
Regarding spray polyurethane foam (SPF) insulation, I agree with Thomas that closed-cell SPF (which is about 2 lbs/cubic foot) is the better way to go. Open-cell (~0.5 lb/ft^3) can work, too, but the contractor who said you would need that to allow the moisture to escape is wrong. You need to control the moisture indoors with control layers first. Then with air conditioning. Then with supplemental dehumidification if necessary.
~ ab3
Allison,
Allison,
Thank you for the comments and the additional information. An update on progress: we had a local spray foam rep come over for an inspection and recommendation yesterday. He, too, said get rid of the fan, seal the top and side ventilation up, then spray the ceiling and walls with a continuous coating of foam. He recommended we use open cell for 2 reasons: 1) the fiberglass will need to expand and contract due to weather changes (southern Missouri so we have all 4 seasons) and he was worried about allowing expansion room, and 2) he was concerned about moisture coming in through the seams at each of the 16 panels or a leak in the roof (which there is evidence of and will be addressed). He concern was if any moisture did get through, it could create mildew and be really bad before we ever knew it. He suggested closed to allow it to drip on through then we would know. He said we need to install a moisture control system, as Thomas mentioned, to prevent moisture on the inside because the assumption is any moisture will not escape through a solid fiberglass roof.
By the way, the floor is concrete slab. The picture I uploaded still had the dingy 1970’s carpet and, yes, it looks like dirt in the picture.
Thank you,
Greg
Greg,
Greg,
Here are some more articles you might find helpful:
Make Dew Point Your Friend for Humidity
Two Rules for Preventing Humidity Damage
What Happens When You Put a Plastic Vapor Barrier in Your Wall?
Accidental Dehumidification – A Preventable Mess
~ ab3
Despite all of the best
Despite all of the best intentions of designers and insulation companies, we are still dependent on installers, who will actually take pride in their work, and will take the time and make the effort to ensure that the material is installed to the manufacturer’s and engineer’s specifications. Perhaps a bit more respect (and pay) for these folks could go a long way towards helping people get what they pay for? It is an ugly job, physically demanding, and with little satisfaction at the end of the day. Maybe an official “trade” designation with appropriate training and certifications could raise the bar here – and no, I am not some pinko trying to add cost to every house built – it just seems to make sense in this case.
Roy,
Roy,
Excellent point! We’re definitely dependent on those who do the dirty work to make buildings live up to their design. Everyone needs to be on board. I wrote an article a couple of years ago about this topic:
In Praise of Those Who Do the Dirty Work
~ ab3
Ah, now you have landed
Ah, now you have landed directly in my purview. As the General Contractor, one of my main tasks is to get all trades to play nice and ensure one doesn’t harm another. I have to make all of the pieces go together properly. I tell people 90% of my job is “boss-man we got a problem over here”.
Attic insul photo: where are
Attic insul photo: where are the 1] durn depth markers- 1 per 300sf? “Aged” blown insul was more likely installed w too much air. 2] Attic card purporting bags/sf.
Kevin,
Kevin,
Good questions. The photo at the top of this article doesn’t show any depth markers but this attic definitely had them. It also had the card showing depth, bags, square feet, and R-value. That’s something most insulation contractors do get right, in my experience. Maybe they didn’t have quite enough markers to meet the 1 per 300 sf, but they were there. This was a Habitat for Humanity house and they do a pretty good job, at least on the ones we verify for ENERGY STAR, which this was.
Even better, I think most contractors around here have realized they can no longer get away with cutting the first few inches off of the markers. ;~)
~ ab3
I’m having a new house built
I’m having a new house built in Central Texas hill country. The Custom home builder is recommending closed cell foam in the attic roof rafters and fiberglass in the exterior walls. Looking for recommendations if this is the smart way to go.